Harley Davidson Touring: Why Won't Flashing Turn Signals Work?
Electrical issues almost never have an easy solution. Some electrical problems go unresolved for a long time, only to discover there was a simple fix. This article will discuss turn signal issues and some ways to go about finding the problem as well as fixing it.
This article applies to the Harley Davidson Touring.
A busted or erratic turn signal repair can be a drag to fix, especially on the road. It’s not a showstopper because you can still ride. But turn signals are an essential part of bike safety. Hand signals are fine during the day, yet are hard to see at night. A broken signal light is illegal in many states. So, don’t let this problem persist. Get those signals fixed as soon as you can. Here are a few things you can do in light of repairing your signal problem.

Materials Needed
- Voltmeter, multimeter or test light
- Phillips screwdriver
- Emery cloth
- Needle nose pliers
- Electrical tape
Step 1 – Check your connections
All signals are not functioning.
It can be frustrating, but take your time. Start with the low hanging fruit and work your way through the troubleshooting process methodically. The source of the problem usually turns out to be something simple as a loose wire somewhere.
If you are just starting your bike for the first time after being in winter storage for a few months, it’s not uncommon for something that worked before to decide not work now. Changes in temperature, moisture and dust are some of the factors that can cause this to happen. Our bikes need some attention after spending a lonely cold winter in the garage. Electrical components and connections are often affected, which means some things probably need tightening, cleaning or replacing.
- Check the fuse.
- Check for broken or pinched wires.
- Check the switch connections.
- Check the hazard light box and make sure all signal wires are attached.
- Check the flasher for functionality (turn signal relay). The wiring for the turn signal lights goes through the turn signal switch. This means that the turn signal switch may be bad.
- If only one light (or one side) isn’t working, check the power to the bulb plug-in connections. With a voltmeter or test light, check the terminals for power.
- Check the battery for a full charge.

Pro Tip
Also consider what kind of work was recently done on the bike that might have affected the blinker system. For example, a connector may not have been pressed in all the way and disconnected itself from the vibration.
If the fuses, connections and wiring looks okay, check the bulbs.
Step 2 – Check your bulbs
Flashers work but turn signals don't.
There may not be enough amperage going through the system load equalizer to activate the flasher. Go ahead and replace the bulbs with hotter ones that draw more amperage. A turn signal flasher is like a circuit breaker that trips under a load and automatically resets (flashes). Each side (left and right) turn signal is two bulbs (minimal load) and four bulbs for the emergency flasher (maximum load). This is often why the emergency flashers will work and the turn signals will not. To troubleshoot this, check for the correct bulbs, clean sockets that the bulbs go into, a good ground at the socket and (if all else fails) you might consider switching to an automobile style low watt flasher.
- Check bulbs for broken filament.
- Check the bulbs for correct amperage.
- Clean the bulb sockets for looseness and corrosion.
- Check the ground wires.
- Replace the flasher.

Pro Tip
Apply a tiny dab of dielectric grease to the bulb socket connections. Note that too much dielectric grease will cause connectivity problems. So be sure to apply sparingly.
If you have checked your bulbs and your still having problems, check your components.
Step 3 – Check your components
Turn signals won't self-cancel.
If you are stuck with having to manually cancel the turn signals, the problem could be found in connectivity to the speedometer or the TSSM.
- Check the switches.
- Check for loose or disconnected wires to the speedometer.
- Check the tip switch that cancels if the bike falls over. On some bikes it's called a Bank Angle Sensor (BAS) and is located in the Turn Signal Security Module (TSM or TSSM).
- Check and clean your speed sensor. It may seem irrelevant but the TSSM serves many functions. Timing for turn signals is picked up by the speed sensor to control the time out distance/time. The speed sensor feeds the speedometer through the TSSM and also the ECM for controlling fuel flow to the injectors. If you need to reset your TSSM security module, refer to Step 5 for instructions.

If you have blinkers that blink too fast, go to Step 4.
Pro Tip
When you are getting deeper into your troubleshooting project, give yourself plenty of time. Be careful not to disconnect other wiring while you are going through the harness.
Step 4 – Lights blink too fast
Signal lights blink too fast
This is a common occurrence for bikes with aftermarket LED signal lights installed, and may occasionally happen on a standard system.
- Check the equalizers: commonly called "hyper flashing," this is due to the LED lights pulling less amperage than expected by the failure alert system. Putting LED lights on a Harley Davidson usually requires that you install a load equalizer on the line. A load equalizer brings the load to the same level as two incandescent bulbs, so the system thinks that everything is okay.
- Check for a bad bulb: check all the bulbs for any burnt ends and replace them.
- Check each light socket: clean the sockets of any dirt that may have deposited over the connections. Rain water has occasionally been known to find its way into the lights.
- Check for a short in the wiring: this is where you may need to practice due diligence. The source of this problem can be in several places, such as under the seat, on the frame or within your faring. Check the wires for continuity and any breakage. Check the ground wiring for connectivity issues.

Pro Tip
Custom modifications to a bike to improve performance and appearance are always welcome to the rider. However, this can also create headaches if done improperly. Be aware of the potential pitfalls of any electrical modification.
After checking all of the hardware and electrical connections, and everything looks good, it is time to check the codes.
Step 5 – TSSM reading and resetting trouble codes
You may need to read and reset the TSSM Security Module.
If you have cleaned all of your terminals and sockets, as well as checked all of your connections, then check the codes. The following procedure shows how to retrieve and clear the ECM Diagnostic Trouble Codes and TSM/TSSM codes through the gauge cluster.
Terminology:
- Turn Signal Security Module (TSSM)
- Hands Free Security Module (HSFM)
- Diagnostic Trouble Codes (DTC)
- Electronic Code Module (ECM)
- Odometer (ODO)
- Ingnition (IGN)
Get the Codes
- Turn the ignition to run/stop in run position with ignition off.
- Hold ODO reset button in and hold.
- Turn ignition switch to IGN.
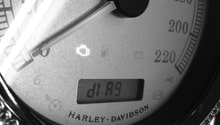
- Release ODO reset button. Background should light up, speedometer needle should sweep its full range and indicator lamps (battery, security, low fuel, check engine and cruise) should all light up. The word "diag" should then appear in the window.
- Press and release ODO reset button. PSSPtb should appear. "P" should be flashing (this is for ECM trouble codes section). Each letter represents an area of the diagnostics module. The module that is flashing is the one you are going to check. To move from one letter (module) to the next, you push the odometer reset button one time. (From P to S to SP to t and back to P, etc.)
- This is where you should record the codes.
- If the DTC's are cleared, press and release the odometer reset button. The part number of your Security Module will be displayed.
- Press and release the ODO reset button to continue to the next module. A second code will appear on the display. Continue by pressing the ODO to receive all codes.
- Exit by turning the ignition switch to off.
Note
To determine if a code is current or historic, you must clear the displayed code by pressing in and holding the ODO reset button for over five seconds until "clear" is shown in the display. Release the ODO reset button and turn off the ignition switch. Run your bike and shut it off. Then check the DTC's again by repeating Steps 1 to 7. If the code is current, it will reappear.
On models not equipped with a tachometer, "No Rsp" will appear when the tachometer identifier is selected. "No Rsp" (no response) will also appear if the run/off switch is in the off position during this procedure.
P is for ECM (Electronic Control Module).
S is for Turn Signal Security Module.
SP is for Speedometer.
t is for Tachometer (looks like an E, but because it's a lower case t).
b stands for ABS (brakes).
If you see PSSPtb, there is an open circuit on the turn signal feed. This wire is violet in color and runs from Pin 5 of the HFSM/TSSM connector to Pin 5 of the turn signal connector. There are two circuits in the light system. One circuit is for blinker and the other for running light. The TSSM will flash the running light in place of the actual turn signal circuit as a safety measure.
Solution: check continuity of this circuit (violet wire). Make the necessary fix and test the blinkers again.
The TSSM Has Many Functions:
- It cancels signals after turns.
- Prevents cancellation under 7 mph.
- Cancels after 20 blinks and no turn.
- Shuts off bike/fuel pump after tip over.
- It has an "accelerometer" that records lean and speed so do what it recommends.
After making the recommended fix, go back to the diagnostics and erase the code. Then check again before you make any more changes.

How to reset the TSSM Security module on 2001 and newer Harley Davidson:
- Make sure the load equalizer module is properly installed.
- The run/off switch should be in the off position.
- Turn the ignition key switch on, off, on, off, then on.
- Quickly depress the left turn signal switch and release, then repeat. (Turn the signal indicators will flash one to three times. Do not continue unless turn signals respond.)
- Depress the right turn signal switch and release. (The turn signal indicator light will flash one time.)
- Depress the right turn signal switch and release. (The turn signal indicator light will flash two times.)
- Depress the right turn signal switch and release. (The turn signal indicator light will flash three times.)
- Depress the left turn signal switch and release. (The turn signal indicators will flash trouble codes.)
- Depress and hold left turn signal for about four to five seconds until the turn signal indicator flashes twice.
- Turn the ignition key switch to off position.
Pro Tip
If you are not comfortable working on your bike at this technical level, it is best to leave it up to an expert or someone with valid experience.
For more information, look up the Related Discussions and Site below. We hope this helps.
Related Discussions and Site
- Harley Trouble Codes- FuelMotoUSA.com
- LEDs and Turn Signals Flashing Too Fast - HDForums.com
- Turn Signal Won't Flash - HDForums.com
- Turn Signals Not Self-Canceling - HDForums.com