Harley Davidson Sportster: How to Jump Start Your Bike
Modern Harley Sportsters have electronic voltage regulators and other electronics that can be damaged by improper use of jumper cables. This article will walk you through the steps to avoid costly mistakes.
This article applies to the Harley Davidson Sportster.
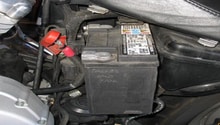
Most people don't think about the battery on their bike until it is dead. Whether it is just too old to get the job done or it was drained by leaving the key on, batteries don't last forever. If this happens, you may be left with no way to start your bike, either in your garage or out on the road. Older bikes with points and a kickstarter could be fired up with practically no juice, but not so for modern bikes with electric start only, and especially those with fuel injection where the fuel pump puts additional demands on the battery.
A motorcycle can be jump started from a car or truck if done properly, as they are both 12 volt systems. The problem is an automotive charging system that can put out well over 100 amps of current when the engine is running, which is enough to fry your electronics if that current surges into your electrical system. Fortunately, most car and truck batteries are plenty strong enough to start a motorcycle with the engine off, and that is how it should be done.

Material Needed
- Jumper cables
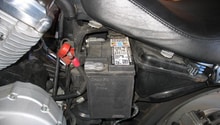
Step 1 – Remove the left side cover
- Turn the ignition to the OFF position.
- The left side cover is secured to the bike by two upper slots that fit into clips and a bottom slot that fits into a mounting tab on the battery tray.
- Place a cloth over rear brake master cylinder reservoir and left passenger foot peg (if equipped). This will protect left side cover from damage.
- Grasp left side cover at upper corners and gently pull away from plastic mounting clips on frame with your thumbs.
- While rotating top of cover out away from motorcycle, slide cover down slightly so mounting slot slides down from mounting tab on battery tray. Side cover will now rest on top of rear brake master cylinder reservoir and left passenger foot peg (if equipped) with slot hanging off bottom of mounting.
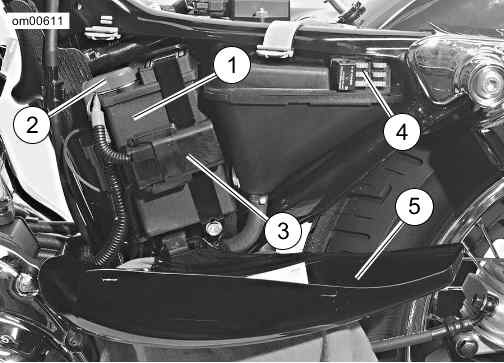
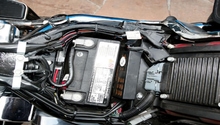
Looking at the picture above:
- Battery
- Positive (+) battery terminal (under protective rubber boot)
- Maxi-fuse and holder
- System fuses and starter relay
- Left side cover
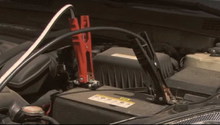
Step 2 – Connect jumper cables
Make sure that your support vehicle is turned off. A car's charging system is much stronger than a bike's and cause trouble if it's running.
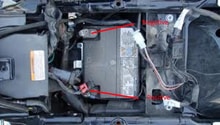
- Connect one end of a jumper cable to the bike's battery positive (+) terminal (number 1 in Figure 2).
- Connect the other end of the same cable to the car's battery positive (+) terminal (2).
Warning
At this point we need to state the following. Do not connect negative (-) cable to the bike's battery negative (-) terminal. Doing so could cause a spark and explosion, which could result in death or serious injury.
- Connect one end of a jumper cable to the car's battery negative (-) terminal (3).
- Connect other end of the same cable (4) to a safe ground (away from the bike's battery).
Do not connect the negative (-) cable to painted or chrome parts. Doing so could result in discoloration at the attachment point.
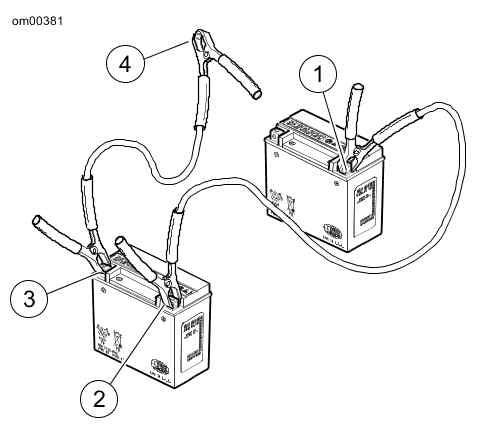
Pro Tip
Even sealed batteries give off a tiny amount of hydrogen. Connect cables in the order given to avoid sparks that could cause an explosion!
Step 3 – Start bike and disconnect jumper cables
- Allow five to 10 minutes for dead battery to charge with jumper cables connected. Do not start the car or truck.
- Start motorcycle and leave it running.
- Disconnect cables in reverse order of Step 2: Bike Ground, Car Negative, Car Positive, Bike Positive.
Step 4 – Reinstall left side cover
- Align the bottom of the side cover with tab on the battery tray and press top of side cover into clips until snug.
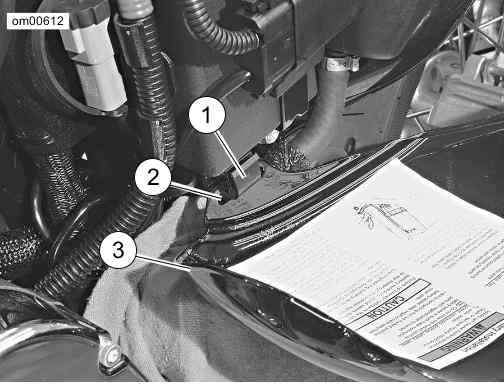
Looking at the image below:
- Side cover mounting tab (on battery tray)
- Mounting slot (bottom of left side cover)
- Left side cover
Related Discussions
- 2006 HD Sportster Owners Manual - Harley-Davidson.com
- Can You Jump Start Bike from Car/Truck - HDForums.com
- Anyone Tried Jump Starting Their Bike - HDForums.com
- Jump Start Help - HDForums.com