Harley Davidson Softail: How to Read Diagnostic Trouble Codes
Diagnostic trouble codes are more important now than ever before with the development of sophisticated computer systems used throughout your Softail.
This article applies to the Harley Davidson Softail (All Years).
Diagnostic trouble codes are used to help locate problems throughout the many sophisticated computer systems on your Harley. As the computers monitor the bike's systems, data is analyzed and a trouble code is set if data is found out of normal ranges. These systems monitor the powertrain, braking system, security system, and the communication between them. Often times, a trouble code will be your first warning to a problem and may give you enough time to correct it before expensive repairs are needed. Harley Davidson developed a quick and easy method most Softail owners can use to check their trouble codes anytime and anyplace. For owners that modify and perform their own service work, a scan tool may be of great use with its live data and programming ability.

Materials Needed
- Jumper wire (2000-2003 model years)
- Wire insulation strippers (2000-2003 model years)
- Code reader or scan tool (optional)
Diagnostic modules are represented with one of four different letters on 2004 to 2013 models.
- P = PCM
- S = Turn Signal/Security Module
- SP codes: Speedometer
- T codes: Tachometer
Codes are designated by the letters P, C, B, or U.
- "P" represents a code in the powertrain control module.
- "C" represents a code in the anti-lock braking system.
- "B" represents a code with the radio, instruments, and body control module.
- "U" represents a communication error between systems.
Method 1 – Using odometer button (2004-current models)
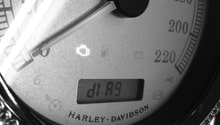
This method works for 2004 to 2013 year models. Move your kill switch to the run position. Press and hold the black odometer reset button and turn the ignition switch to the ignition position. Hold the reset button until the message "DIAG" appears. Press and release the odometer button to access the module selection menu. The message "P55PtB" will appear. The letters and numbers stand for the different systems. Press and release the odometer button to move through the message characters. The first character "P" stands for PCM (powertrain control module). Press and hold the odometer button to access the PCM codes once the "P" is flashing. If a code is present, the code will display. Record the code number to research possible causes. Press and hold the odometer button to clear the code, and then shut off the ignition to exit the menu. Repeat the process to check the other systems.
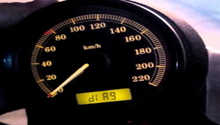
For 2014 and later models, hold the odometer button down on the lift grip. Move the ignition switch to the ignition position. You'll see the "DIAG" message displaying. Release the odometer button and press it again to read the different codes at each module. The first module will be the ECM (electronic control module). If you see a "N" displayed next to the module abbreviation, there are no codes present in that system. If you find a "Y" displayed next to a module abbreviation, hold down the odometer button to view the trouble code. To clear the code, press and hold the button until "CLEAR" displays, then press and hold the button again to erase it. Once you clear the code, a part number may display that correlates to the affected module. Press and release the odometer button again to move back to the module selection menu. Turn off the ignition to exit the module selection menu.
Some newer models are equipped with the "boom box." To access the codes on this system, leave the ignition off for 15 seconds. Press and hold the mute/power button, and then turn the ignition switch to accessories. Keep the mute button held as the system starts up and for three seconds after the warning screen appears. Press the accept option on the touchscreen, then select "DTC's." Any active codes will be displayed at this time.
A quick google search of your code should reveal most of the possible fault causes.
Method 2 – Installing jumper wire (2000-2003)
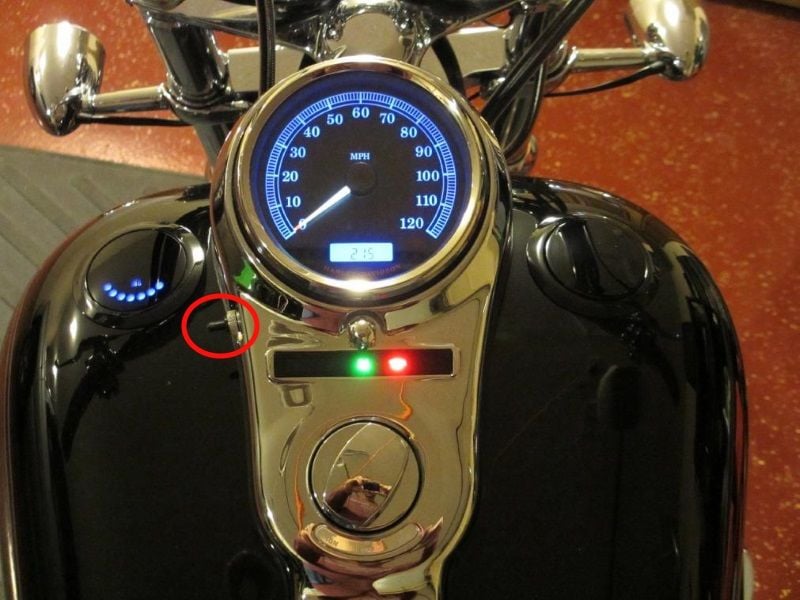
The second method is installing jumper wire across the diagnostic link connector. Make a jumper wire out of a 4" length of 14 gauge wire. Remove a half inch of wire insulation from each end. Locate the data link connector by removing the right side saddle bag and cover (if equipped). On some models, the diagnostic connector is located under the seat. Refer to the article How to Replace Battery to remove the seat. Remove the protective plug from the data link connector, then connect the wire to terminals one and two. Move the ignition switch to the "Ignition" position and wait ten seconds. The check engine light will start flashing. The number of flashes represents the first digit of the code. After the first digit is discovered, the flashing will pause for 1.2 seconds and the process will repeat for the second digit. If there is more than one code, a three second pause will occur followed by another series of flashes. If you record the same trouble code twice, you can be sure you've viewed all trouble codes.
Here is a list of common codes:
- Current 53 ECM flash error
- Historic 53 ECM flash error
- Current 54 ECM EEPROM error
- Historic 54 ECM EEPROM error
- Current 63 ECM serial data low
- Current 63 ECM serial data open/high
- Current 63 TSSM serial data low
- Current 63 TSSM serial data open/high
- Current 61 Loss of TSM/TSSM serial data
- Current 14 Loss of all ECM serial data (state of health) 10 24 Loss of vehicle speed 10 33 Loss of vehicle inhibit motion 10 43 Loss of powertrain security status
- Current 33 System relay contacts open
- Current 33 System relay coil high/shorted
- Current 33 System relay coil open/low
- Current 33 System relay contacts closed
- Current 99 Incorrect password
- Current 99 Missing password
- Current 41 CKP sensor intermittent
- Current 41 CKP sensor synch error
- Current 11 TP sensor open/low
- Current 11 TP sensor high
- Current 12 MAP sensor open/low
- Current 12 MAP sensor high
- Current 14 ET sensor voltage low
- Current 14 ET sensor open/high
- Current 15 IAT sensor voltage low
- Current 15 IAT sensor open/high
- Current 24 Front ignition coil open/low
- Current 25 Rear ignition coil open/low
- Current 24 Front ignition coil high/shorted
- Current 25 Rear ignition coil high/shorted
- Current 24 Front cylinder combustion intermittent
- Current 25 Rear cylinder combustion intermittent
- Current 23 Front injector open/low
- Current 32 Rear injector open/low
- Current 23 Front injector high
- Current 32 Rear injector high
- Current 16 Battery voltage low
- Current 16 Battery voltage high
- Current 43 VSS sensor low
- Current 43 VSS sensor high
- Current N/A (no speedo code for this) Check engine light open/low NO CHECK ENGINE LAMP AT KEY ON or CHECK ENGINE LAMP ON CONTINUOUSLY
- Current N/A (no speedo code for this) Check engine light high NO CHECK ENGINE LAMP AT KEY ON
- Current 35 Tachometer low
- Current 35 Tachometer high
- Current 25 Rear cylinder no combustion
- Current 24 Front cylinder no combustion
- Current 34 Loss of idle speed control IDLE AIR CONTROL
- Current 35 Accelerometer fault
- Current 34 Starter output high
- Current 25 Ignition enable output high
- Current 21 Left turn output fault
- Current 22 Right turn output fault
- Current 11 Battery voltage high
- Current 31 Alarm output low
- Current 32 Alarm output high
- Current 41 Ignition switch open/low
- Historic 63 ECM serial data low
- Historic 63 ECM serial data open/high
- Historic 63 TSSM serial data low
- Historic 63 TSSM serial data open/high
- Historic 61 Loss of TSM/TSSM serial data
- Historic 14 Loss of all ECM serial data (state of health)
- Historic 33 System relay contacts open
- Historic 33 System relay coil high/shorted
- Historic 33 System relay coil open/low
- Historic 33 System relay contacts closed
- Historic 99 Incorrect password
- Historic 99 Missing password
- Historic 41 CKP sensor intermittent
- Historic 41 CKP sensor synch error
- Historic 11 TP sensor open/low
- Historic 11 TP sensor high
- Historic 12 MAP sensor open/low
- Historic 12 MAP sensor high
- Historic 14 ET sensor voltage low
- Historic 14 ET sensor open/high
- Historic 15 IAT sensor voltage low
- Historic 15 IAT sensor open/high
- Historic 24 Front ignition coil open/low
- Historic 25 Rear ignition coil open/low
- Historic 24 Front ignition coil high/shorted
- Historic 25 Rear ignition coil high/shorted
- Historic 24 Front cylinder combustion intermittent
- Historic 25 Rear cylinder combustion intermittent
- Historic 23 Front injector open/low
- Historic 32 Rear injector open/low
- Historic 23 Front injector high
- Historic 32 Rear injector high
- Historic 16 Battery voltage low
- Historic 16 Battery voltage high
- Historic 43 VSS sensor low
- Historic 43 VSS sensor high
- Historic N/A Check engine light open/low NO CHECK ENGINE LAMP AT KEY ON or CHECK ENGINE LAMP ON CONTINUOUSLY
- Historic N/A Check engine light high NO CHECK ENGINE LAMP AT KEY ON
- Historic 35 Tachometer low
- Historic 35 Tachometer high
- Historic 25 Rear cylinder no combustion
- Historic 24 Front cylinder no combustion
- Historic 34 Loss of idle speed control
- Historic 35 Accelerometer fault
- Historic 34 Starter output high
- Historic 25 Ignition enable output high
- Historic 21 Left turn output fault
- Historic 22 Right turn output fault
- Historic 11 Battery voltage high
- Historic 31 Alarm output low
- Historic 32 Alarm output high
- Historic 41 Ignition switch open/low
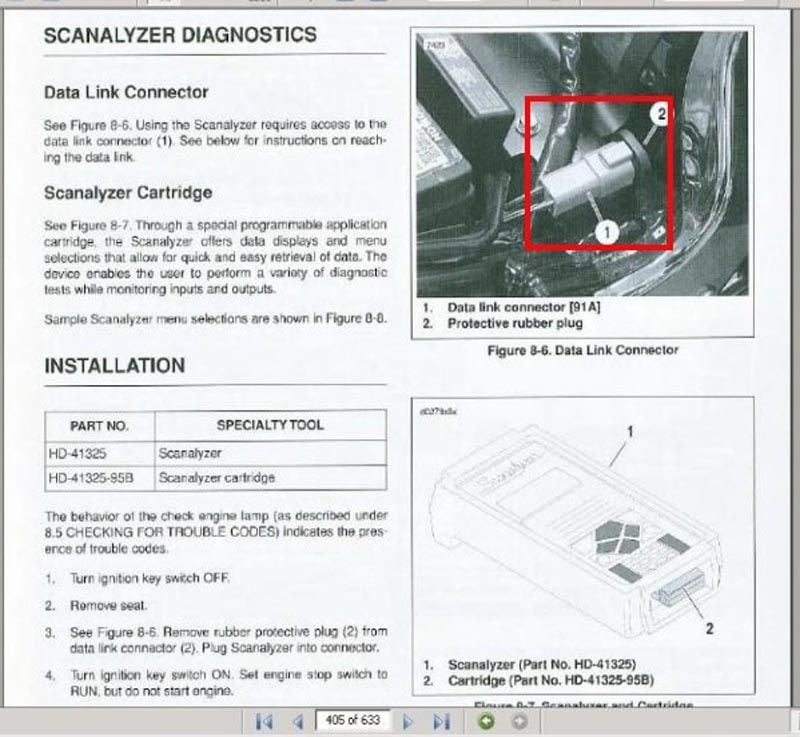
Figure 2. This model's data link connector is located under the seat. 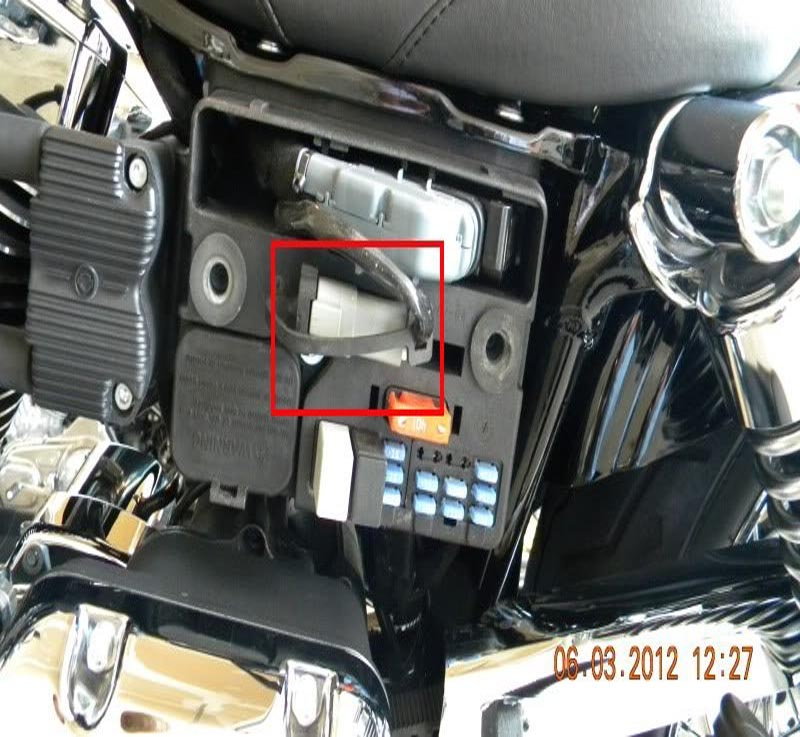
Figure 3. This data link connector is located on the right side near the rear shock. 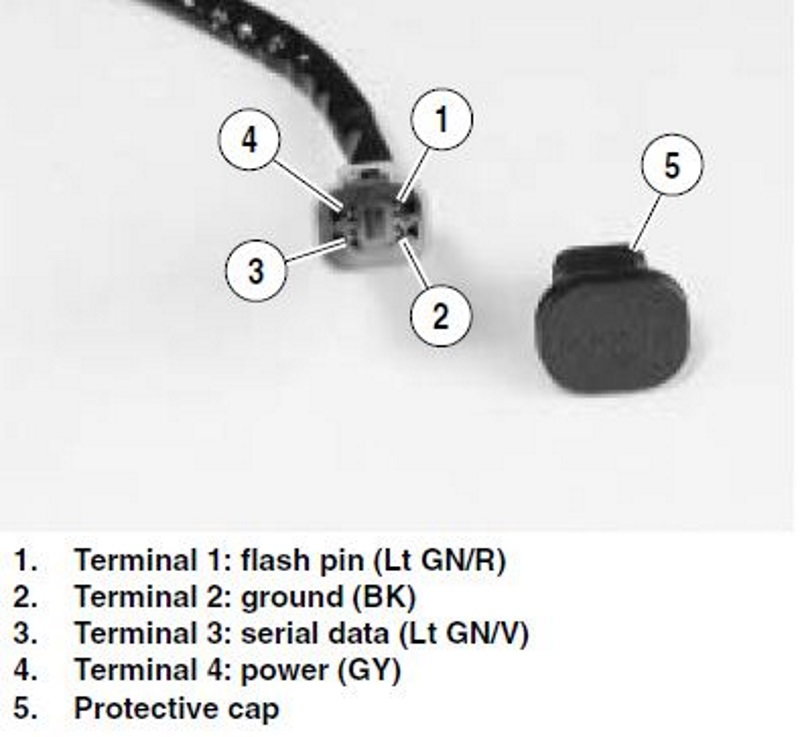
Figure 4. The data link connector terminals.
Method 3 – Using a scan tool
There are various brands and types of scan tools for the Softail. Some of the most common types are the Kent Moore/Harley Davidson Scanalyzer (part number HD-41325), the official Harley Davidson scan tool (part number MS531-HD), and the Harley Davidson Code Master Service code reader. There are some aftermarket options, as well. These include the Fuel Moto Dynojet Power Vision and Screamin' Eagle family of tuners.
The Scanalyzer and scan tool are complete diagnostic scan tools. In addition to viewing and erasing trouble codes, these scanners can view and record live data, such as engine speed and sensor voltage. You also have the ability to program once updated software is released and make changes to parameters such as engine idle speed. The Code Master is a more generic code reader. It gives you the same access as available to you when using your odometer button, although an extra feature allows you to view you Softail's current calibration I.D. The aftermarket scan tools offer a good mix of scan tool and code reader, and provide the capability to use your own tune. This is great for the Softail owner with modifications who is looking to extract maximum amounts of power with dyno tuning.
When purchasing your scan tool, make sure the cables are included to match up with your model years computer system. Earlier year models use the J-1850 cable, while later model CAN-BUS equipped versions use a cable unique to the CAN-BUS system.
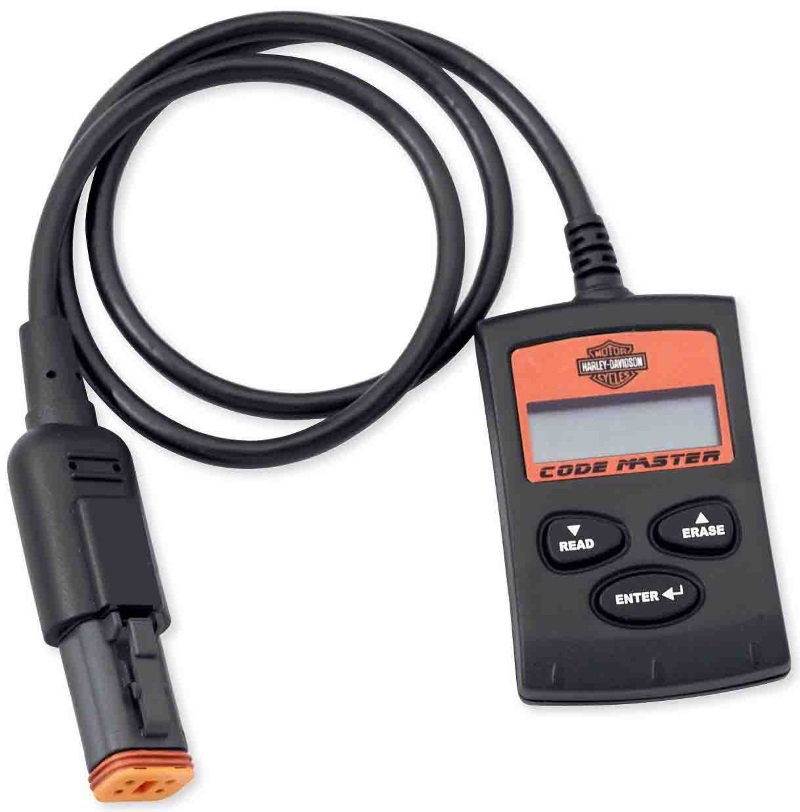
Figure 5. The Harley Davidson code reader. 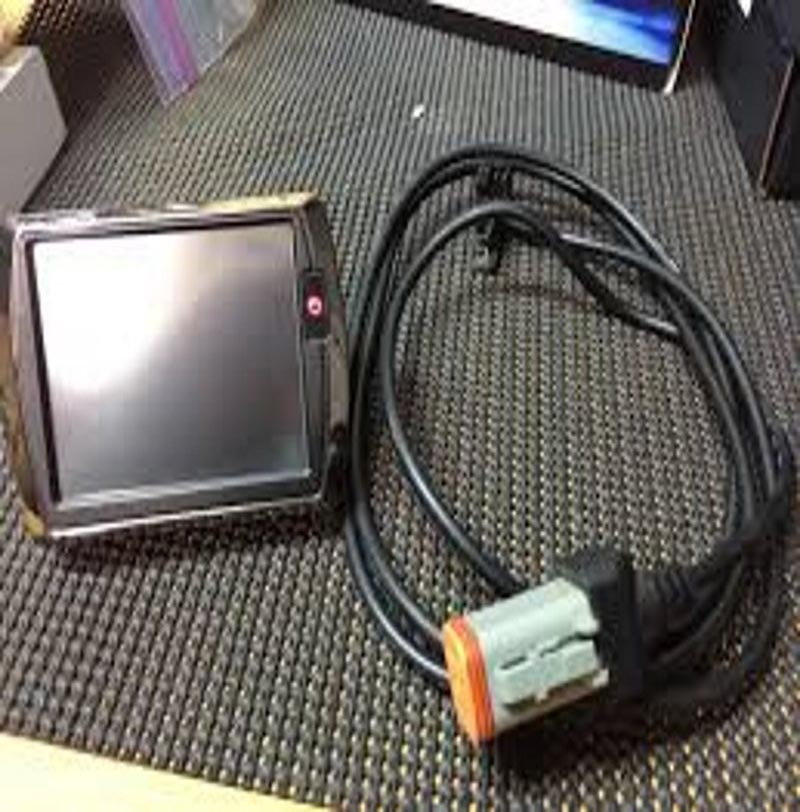
Figure 6. The Fuel Moto Dynojet Power Vision PV-2.
Featured Video: Quick and Easy Code Check
Related Discussions
- How to Diagnose Trouble Codes - HDForums.com
- All Scanner Threads - HDForums.com