Harley Davidson Dyna Glide: Tuner Reviews and How to Install a Tuner
What every rider needs to know about add-on CPU tuners for their Dyna Glide bike.
By James Bussey - May 2, 2016
Contributors: Jeffery Smith
This article applies to the Harley Davidson Dyna Glide (2000-2016).
Tuners, also known as fuel injection controllers, are aftermarket systems that communicate with your motorcycle's ECM or "brain box" and help your motorcycle run better by controlling the air/fuel mixture, as well as ignition timing of your motor. Most riders are introduced to the idea of a tuner when they decide to upgrade the factory exhaust or air cleaner and find the bike does not run as well afterward. If you didn't know already, anytime the subject of upgrades come up, so does the subject of mapping, flashing, and aftermarket tuners. ECMs are programmed lean from the manufacturer to make your engine run and meet emissions regulations, and when you add an aftermarket exhaust or air cleaner into your system, it will run even leaner.
For the absolute best results, it's recommended that you get an aftermarket tuner that can be custom mapped to the spec of your engine and aftermarket upgrades, but even the factory "Stage 1 Download" from the dealer is better than stock. Tuners can be as simple or as intricate as you want then to be, with some being just a slightly better preset map than stock, some being fully adjustable, and everything in between. Let's talk about how you hook one up and then compare popular options.
Key Terms
Flashed: The process of reprogramming the ECM; usually done at the dealership.
Mapped: The manner in which the engine is programmed to run using factors such as type, make and model of air cleaners as well as exhaust.
ECM (Engine Control Module): The on-board computer that is programmed to run the fuel injection and ignition of the bike, among other systems.
Installing a tuner can be one of the simplest modifications you can do as a rider. It takes very little experience and mechanical aptitude to complete the installation. As a matter of fact, the most difficult part of this task is getting to the ECM, especially if you are installing one that doesn't connect to the injectors themselves. Make sure to use patience and take your time when routing the harnesses (Step 5) because there can be very little room to work, so it may take a little trial and error to find a good way to route the harness connectors. Be extra careful to avoid routing anything too close to the exhaust pipes.
Before you start, make sure the engine and the run button are in the off position, then disconnect the battery or at least pull the main fuse.
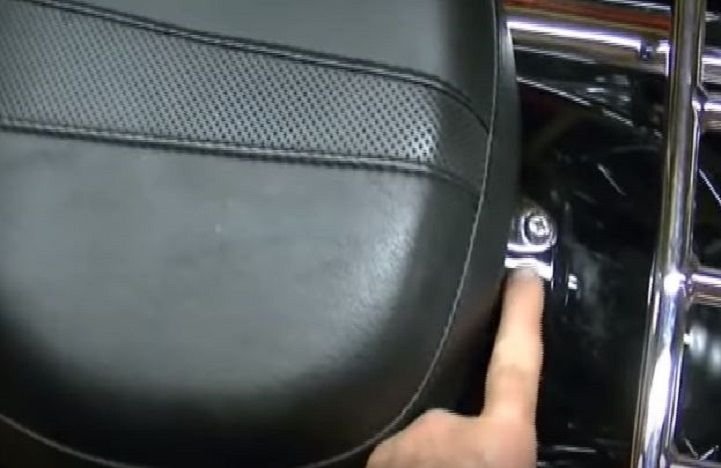
Step 1 – Remove your seat
First thing to do is to remove the seat; everyone who rides a motorcycle should know how to remove the seat. After removing the seat, remove the side covers, which shouldn't require an explanation.
If your seat has the strap over it, that will need to come off from one side.
Pick a side and remove the saddlebags to access the bolt that holds the strap in place. Use a 7/16" wrench or socket to remove the bolt.
Once the strap is out of the way, use a Phillips head screwdriver on the seat mounting screw on the back end of the seat.
Remove the screw, then lift up slightly on the end of the seat and pull straight out.
Figure 1. This one screw or bolt is basically all that holds the seat on.
Step 2 – Move gas tank out of the way
Whether you have a tuner that connects to the injectors or not, chances are you will need to access the wiring harness under the tank. Once the seat is removed, you'll have access to move the tank up and out of the way. You don't have to take the tank completely off, but if you want to, you can follow this article: How to Remove Fuel Tank.
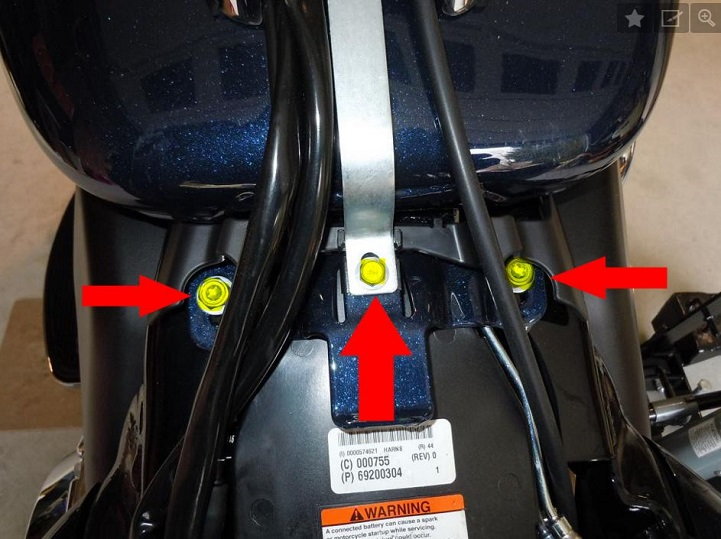
Remove the two rubber boots that cover the front tank bolts and loosen the bolts almost completely, but do not remove them.
Remove the three rear tank bolts completely: the two on either side and the one in the center with the metal strap.
Once the rear bolts are removed, carefully lift up the rear of the tank. The hoses and wiring harness is still attached, so watch for those. Use something such as a piece of 2x4 lumber to prop up the rear end of the tank. This allows enough room to work with the injectors and installing the tuner.
Figure 2. Remove these bolts and loosen the ones up front.
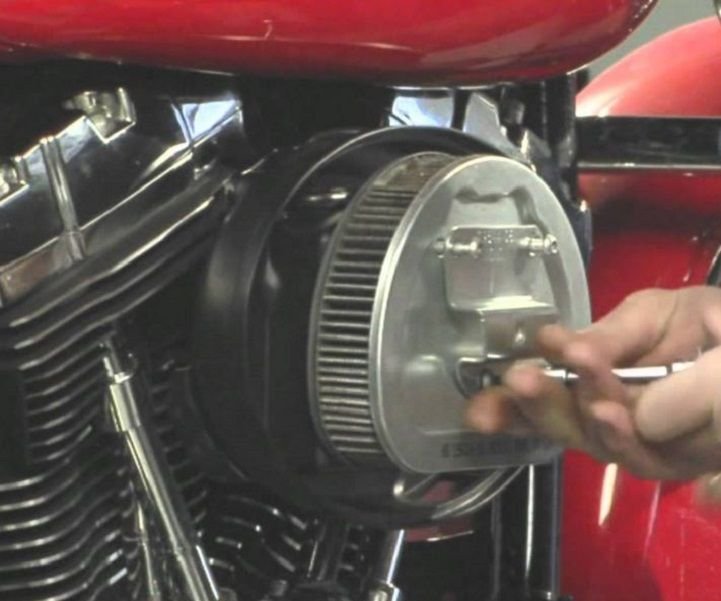
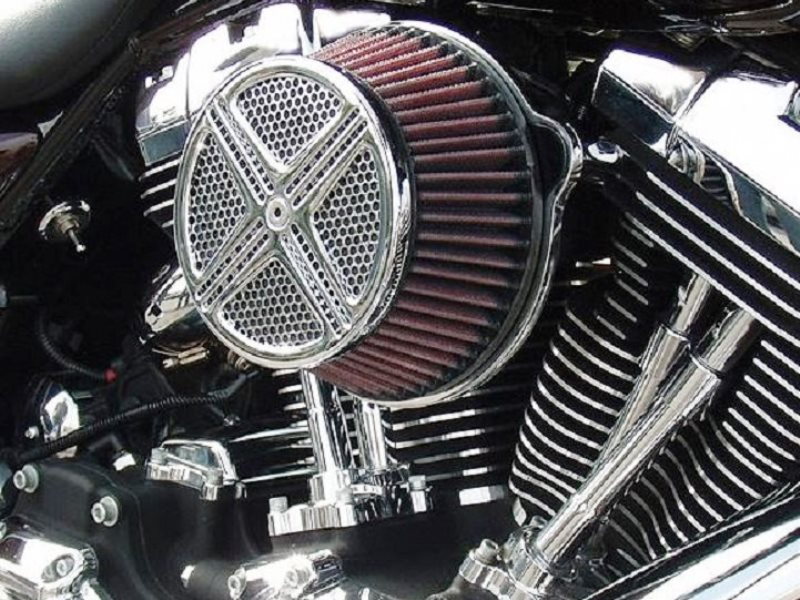
Step 3 – Remove the air cleaner assembly
Remove the air cleaner assembly. The induction bracket underneath the air cleaner may or may not need to be removed. If you have an upgraded or high flow air cleaner to install, you may not be using this bracket at all. If this is the case, just remove it now and set it aside.
Figure 3. This is a great time to upgrade your air cleaner as well.
Step 4 – Mount tuner and harnesses
The tuner may or may not have come with mounting media, such as Velcro strips.
The tuner will be placed on top of or next to the ECM, which is under the seat.
Use Velcro, double-sided mounting tape or some other tools to mount the tuner on the ECM.
Take the ground wire from the tuner harness and connect it to the negative (black) battery terminal post.
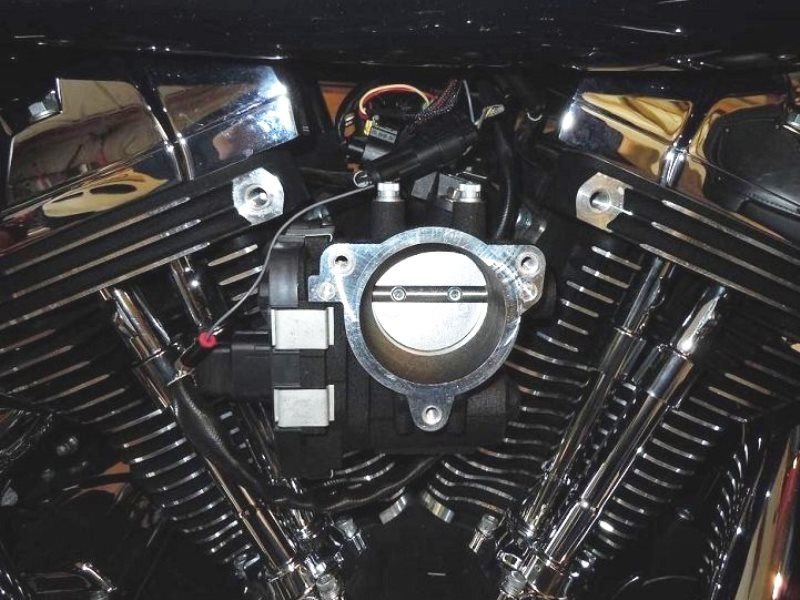
Take the rest of the tuner harness and snake it down to the throttle body.
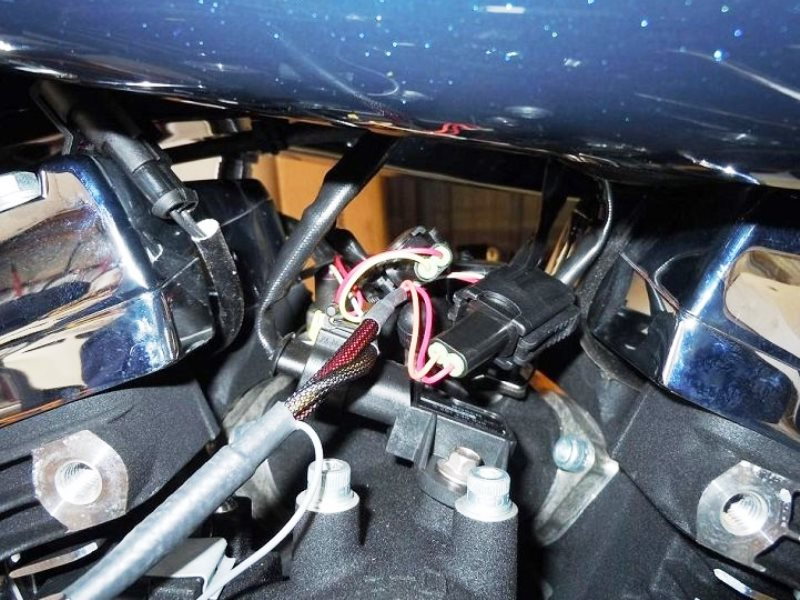
Step 5 – Make tuner harness connections
Unplug the large harness from the ECM. Then take the tuner, which should have two harnesses attached, and install the matching grey harness from the tuner into the ECM. Next, take the factory harness and plug it into the corresponding black harness on the tuner. Have patience and take your time, since routing the harness may take some trial and error because there is little room to work in.
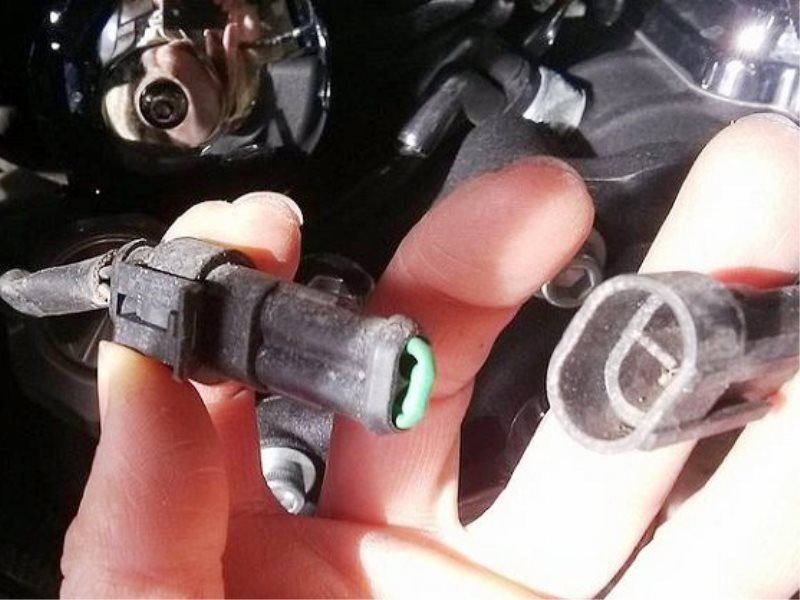
Unplug the front fuel injector plug and wire from the injector.
Take the orange wire from the tuner and plug it into the injector.
Unplug the rear fuel injector and plug in the other tuner wire to the injector.
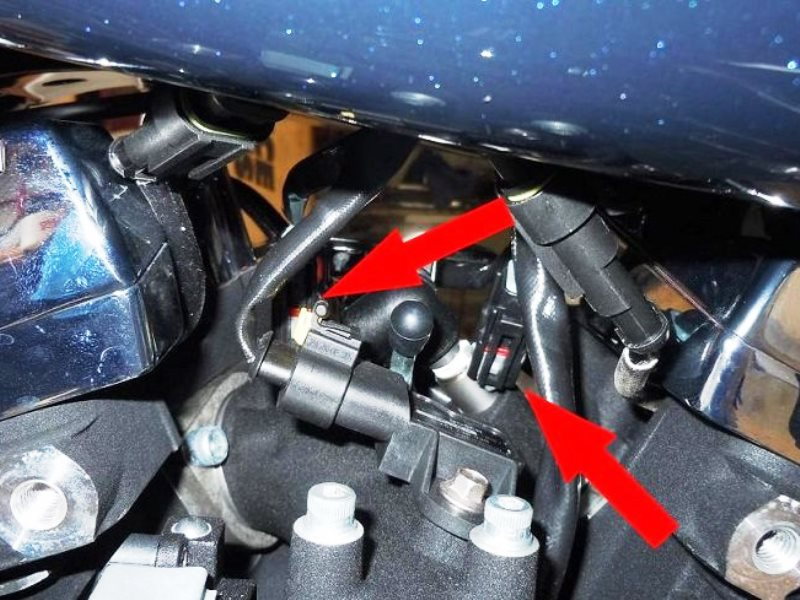
Unplug the wiring harness from the TPS on the throttle body.
Use the tuner harness' final gray wire and connector to tap into the gray as well as purple wire on the TPS harness.
Once you have made that splice, plug the TPS back into the throttle body.
Figure 4. Fuel injector plugs.
Figure 5. Plug tuner harness into injectors.
Figure 6. Plug tuner into throttle position sensor.
Step 6 – Reinstall air cleaner
After the tuner connections are complete, install the air cleaner. You may or may not need the bracket depending upon the model you are installing. Once the air cleaner is installed, depending on the tuner, you may have to unplug the O2 sensors. If you do, unplug both of the O2 sensors. Replace the tank to its position and tighten all the bolts. Replace the seat and the seat strap if applicable. Start your ride and you should immediately notice the difference. Take her for a ride and feel the difference.
Figure 7. Re-install air filter.
Figure 8. Disconnect O2 sensors, if needed.
Most tuners should come prepped for your motorcycle; if not, you will need to program it for it to work properly. Most tuners come pre-mapped for simple and common upgrades; if not, the manufacturer will provide you with a custom map via email and the tuner will have some type of interface that allows you to program the custom map.
Afterwards, re-mapping your motorcycles should run better, with more performance and possibly even get better gas mileage. Installing a tuner is one of the best mods a rider can do and seldom does anyone regret it. If in the future you change upgrades after you have installed a tuner, make sure you re-map the tuner to match your new upgrades. Have fun and ride safe.
Featured Videos: Tuner Install
Dyno Jet Install
Thundermax Tuner Install
Tuner Reviews
The tuner for your Harley plays a pivotal part in the performance of your bike, after you have added high performance components, to give you that horsepower and torque boost that you've been longing for. Without the proper tune, your bike will run horribly and you'll essentially have thrown all that money on those upgrades to the wind. So the easy part is realizing that you need a tune, and the difficult part is deciding on which tuner you should go with. Here are five of the most popular tuners on the market and some pros as well as cons to help your decision making process a little easier.
Vance & Hines
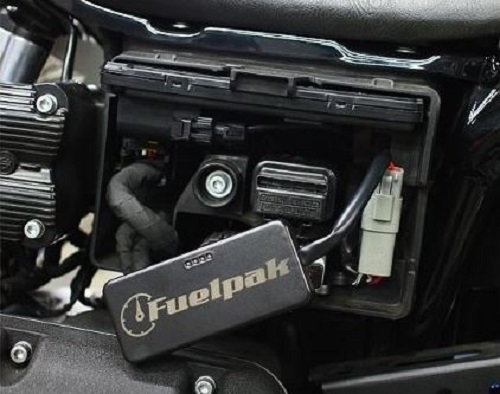
Fuel Pak 3
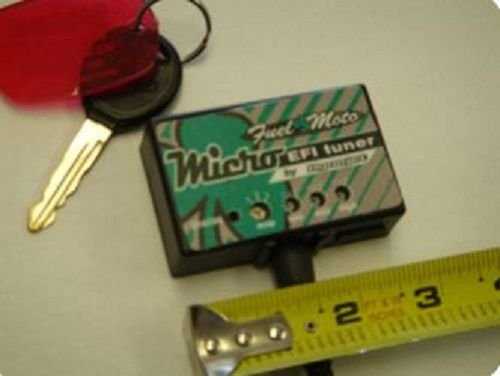
Fuel Moto
Micro Tuner
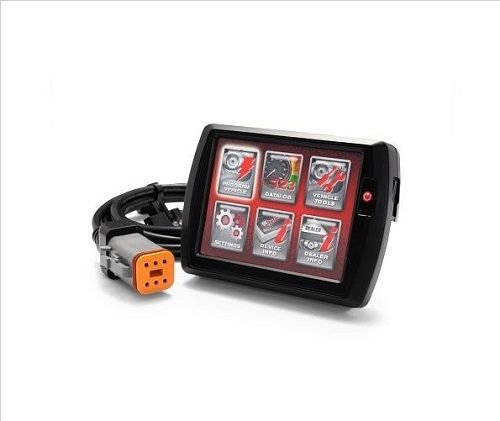
Dyno Jet
Power Vision
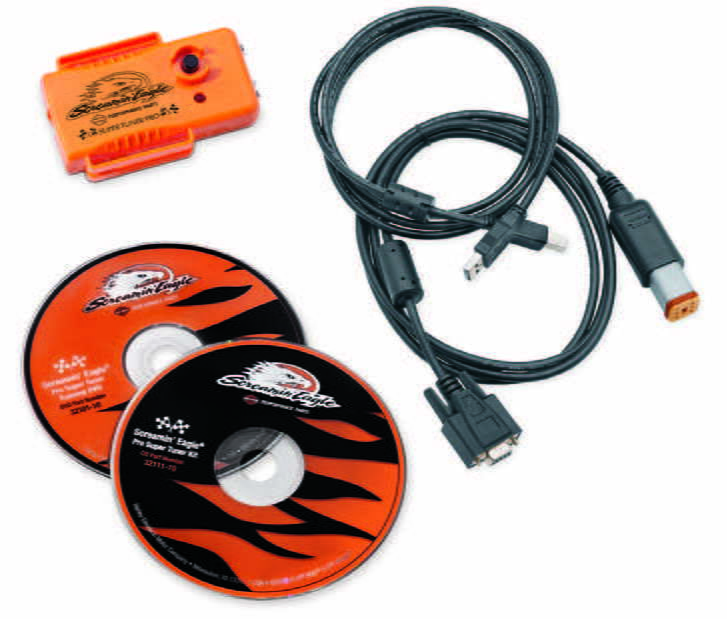
Screamin' Eagle
Pro Super Tuner
Thundermax
Fuel Management
Price
$350
$400
$430
$450
$800
Max Maps
Unlimited
3
6
3
N/A
Stay on
Both
Yes
No
No
Yes
I/O Display
Smartphone
PC / Laptop
Built-in (No PC needed)
PC / Laptop
PC / Laptop
Best Quality: Thundermax Fuel Management
Best Value:Dyno Jet Power Vision
Vance & Hines Fuel Pak 3
Price –$350
Max Maps – Unlimited
Stays on – Both
I/O Display – Smartphone
The Vance & Hines Fuel Pak 3 is one of the most versatile and easy to use tuners on the market. With a decent price point, there is a lot that this little unit offers. It is fully Bluetooth ready and all interaction with it comes through your Android or IOS smartphone. The unit can be connected to the ECM harness and flashed with one of any 10,000 maps already created by Vance & Hines. Once flashed, the unit can be unplugged and stored in your saddlebag. If you prefer, the unit also offers auto-tuning and can make hundreds of adjustments on the fly, as well as learn the most optimum setting for your ride in just a matter of minutes. This unit works great with most modifications, but may not be able to handle radical cams and high compression. Recommended for anyone wanting total control and fool-proof tuning on their ride just by using their smartphone.
Fuel Moto Micro Tuner
Price – $400
Max Maps – 3
Stays on – Yes
I/O Display – PC or Laptop
This is perhaps the smallest tuner on the market, but don't let its size fool you. This is a powerful tuner; easy to use as well as install, and gives you a ton of optimization settings. It should be noted, however, that this is not emissions compliant, meaning that while it will work in all applications, it is not guaranteed to pass emissions based upon your setup. Recommended for those who want a tiny unit that can be mounted anywhere and be well hidden.
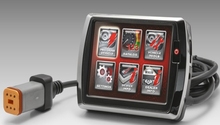
Dyno Jet Power Vision
Price –$430
Max Maps – 6
Stays on –No
I/O Display – Integrated Display (no PC needed)
The Power Vision is plug and play right into the ECM port, and everything is right at your fingertips. You need no smartphone, iPhone, PC or laptop. This machine does it all right on your bike. You don't need to get off or plug it in anywhere else. This is an extremely convenient feature. This tuner also allows you to auto-tune as you ride. Recommended if you want an all-in-one, dedicated product and an easy to use interactive touch screen.
Screamin' Eagle Pro Super Tuner
Price –$450
Max Maps – 3
Stays on –No
I/O Display –PC or Laptop
The Screamin' Eagle Super Tune is another fine product made by Harley Davidson. This unit stays on long enough to capture all the readings, and then get analyzed when you hook it up to your USB connection on your laptop or PC. You simply download the applicable map and flash it to your ECM. This unit works with big bore kits and Stage 2 and 3 kits as well. Recommended for the rider who wants factory quality, and are making some significant upgrades to their bike.
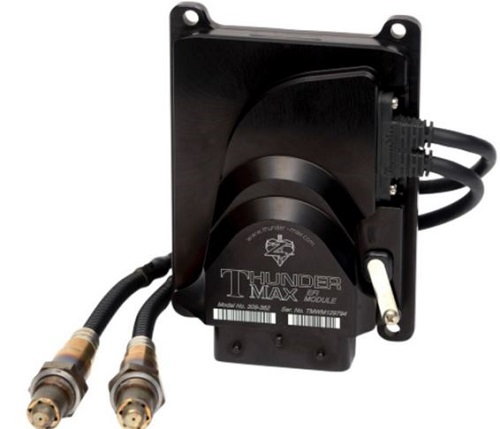
Thundermax Fuel Management System
Price –$800
Max Maps – N/A
Stays on –Yes
I/O Display – PC or Laptop
The Thundermax is actually an ECM with a closed loop O2 system that does all your tuning for you as well. Installation, while easy, is still more difficult than any of the other systems, because you must remove the factory ECM and install this unit in its place. This is a lot more expensive than the other units; however, it is more powerful because it replaces the ECM rather than rides along with it. Recommended if you want total control over all aspects of a tune and money is no object.
Harley Davidson Touring EFI Tuner Reviews and How to Install a Tuner
EFI Tuner Reviews and How-to
With the modern computer controlled engines on the fuel injected Harley Davidson's, you need a tuner to get the ...
Harley Davidson Sportster Tuner Reviews and Installing Tuner
Tuner Reviews and How to Install a Tuner
Unlock, alter, and increase the performance of you Sportster engine with an engine performance tuner.
This ...
Harley Davidson Dyna Glide Performance Engine Modifications
Performance Engine Modifications
Bryan Wood
These simple, essential mods will make a difference in the looks, sound and performance of your Harley ...
Harley Davidson Touring Top 7 Modifications
Top 7 Performance Modifications
Can it ever get fast enough? This is where to start if you want your bagger to move out better.
This article applies to the Harley ...
Sportsters are small and perfectly formed, but as stock. The XL series was Harley Davidson's first Superbike, the V-Rod of its day, but if you want to get more out of it, here are some pointers as to what you can get ...
Harley Davidson Sportster Engine Performance Modifications
Engine Performance Modifications
So you have a Sportster and it's just not fast enough for you? You have no bragging rights at the bar? Whatever your ...
When you click on links to various merchants on this site and make a purchase, this can result in this site earning a commission. Affiliate programs and affiliations include, but are not limited to, the eBay Partner Network.