Harley Davidson Dyna Glide: Electrical Diagnostic Guide
An electrical problem can cause a nagging CEL to light up on your dash, or worse, prevent your bike from starting. Whether your bike is blowing fuses, draining the battery, or displaying fault codes, a quick once over of the electrical system can sometimes identify the issues. Listed below are a few common electrical issues that tend to pop up on Harley Dyna models.
This article applies to Harley Davidson Dyna Glide models (2000-2015).
Modern Harley's have moved away from simple electrical systems and are now considered moving computers, just like your car. The electrical system is integrated into just about every part of the motorcycle, and while it can make for a more efficient vehicle, electrical gremlins can wreak havoc and ruin the riding experience. More often than not, the bike's mechanical components are fully operational, but a bad sensor, poor electrical harness connection, or inadequate battery/charging system voltage can throw a wrench into the system and leave you with a check engine light (CEL) or a bike that will not run. While not every electrical problem can be predicted or easily diagnosed, this article will outline several common known electrical issues on various Harley Dyna Glide models.

Materials Needed
- Digital multimeter
- Battery charger
- SAE wrench and socket set
- Ratchet and extensions
- SAE Hex (Allen) key set
Inspect the Battery
The battery plays an important role in the normal operation of modern Harley's. Bikes today, especially fuel-injected models, have various sensors to monitor engine parameters to ensure the bike is running properly. In years past, a motorcycle with a faulty battery or loose battery connections could still run once the charging system took over; however, today's bikes can get a little wacky and spit out various error codes while running poorly all because of insufficient battery voltage. As with most modern vehicles, Harley's have been known to have the occasional ghost in the machine that is often related to battery issues. Before you start pulling your hair out and dig too deep into electrical system diagnosis, check that the battery is fully charged and in good working order. Ensure that the battery cables are securely fastened, free of corrosion, and tightly connected at both the battery, starter and ground.
Pro Tip
It is a good idea to keep your bike on a battery tender if it is not ridden regularly. The computer, security system, and various aftermarket accessories can have a small but constant draw on the battery, leaving it susceptible to low voltage upon startup.
"V INERR" Error Code
A common complaint among Harley owners is the peculiar V INERR error code that displays on the instrument cluster. This error typically pops up when there is a hard starting issue and the engine cranks over for an extended length of time. Additionally, this error has also occurred after shutting the bike off and restarting it shortly after while still warm. Some have gone to great lengths to try and narrow down the source of this problem, but the general consensus is that ECM is detecting low voltage from the battery during startup and triggering the error. A weak cell in the battery, poor battery or starter connections, and voltage regulator issues are typically the problem when this code pops up. For 2012 and newer bikes that use a CAN-BUS electrical system, aftermarket accessories not designed to work in a CAN-BUS system can overload electrical modules and result in an error code as well.

Turn Signal Security Module (TSSM)
Owners that have bikes fitted with a security system have had trouble with the turn signal security module (TSSM). This module incorporates the function of the turn signal flashing and automatic cancel, along with the immobilizer to prevent bike theft. Replacing a dead battery or installing aftermarket LED turn signals without resistors (load equalizers) can cause the security light to stay on and the turn signals to operate intermittently. These problems can be cured by resetting the module (see Figure 3 for procedure). Additionally, a faulty key FOB or bad FOB battery will not communicate with the module and prevent the bike from starting, so check your FOB batteries often to prevent having to call a tow truck, and know your manual override PIN. If you have reason to believe that the TSSM has failed, check your fuses, battery, and wiring for shorts before committing to a new unit. The TSSM is not difficult to replace; however it is typically paired with the ECM, so the replacement procedure usually requires a trip to the dealership to match the new unit to the bike.
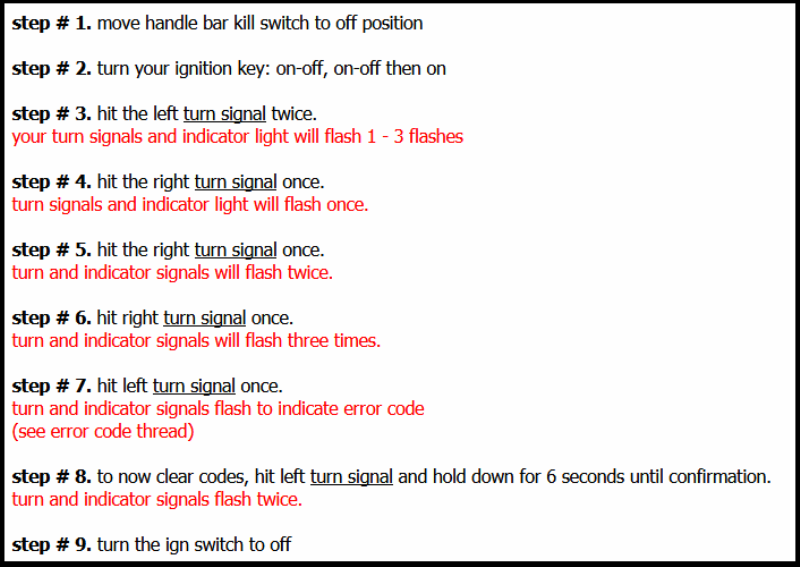
Figure 3. TSSM reset procedure. 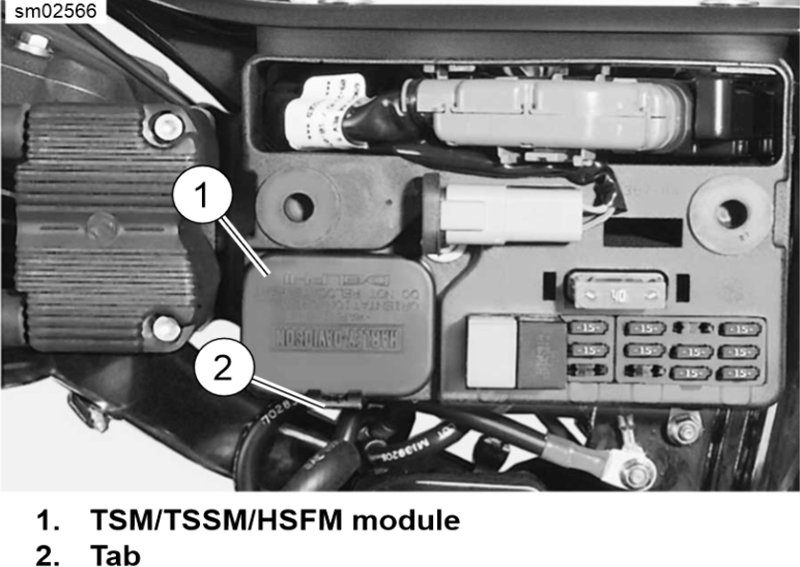
Figure 4. TSSM module located under electrical caddy cover.
Charging System
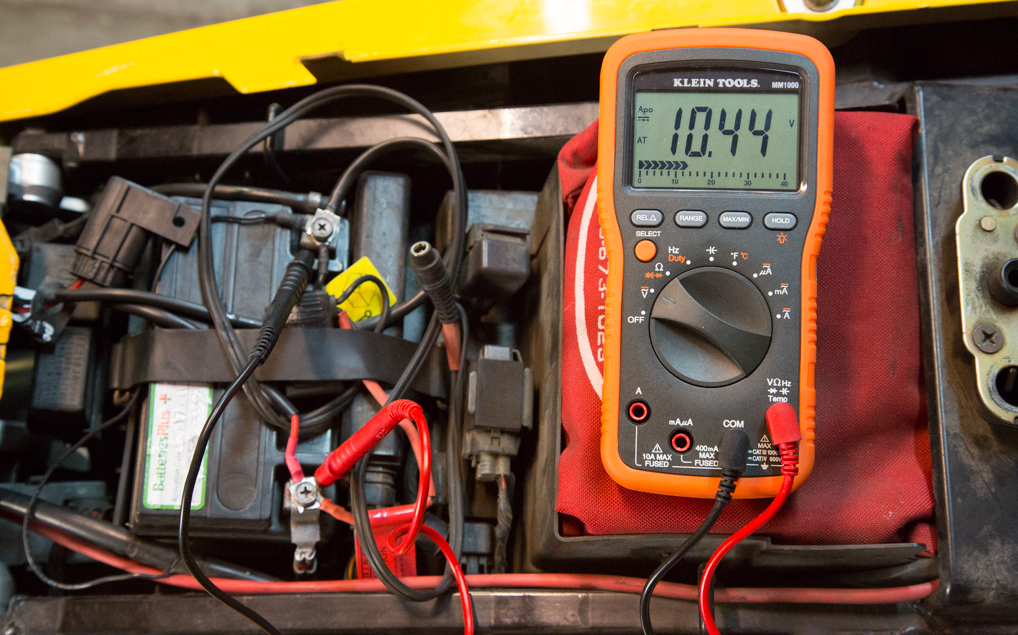
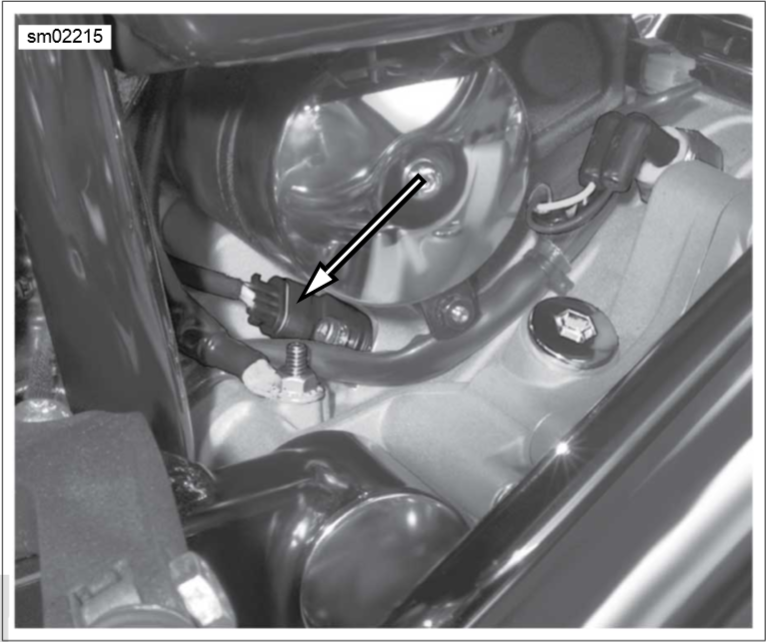
The alternator stator and voltage regulator are often considered normal service items on various Harley models. If you own your bike for any significant length of time, most owners will agree that these items will eventually need replacing. The stator sits behind the compensating sprocket in the primary and can be a pain to change; however, testing the charging system is quite easy and can be completed using a digital multimeter. You first want to measure voltage at the battery while the motorcycle is running. A reading between 13.1 volts and 15 volts will indicate the the charging system is working properly, but anything lower is a cause for concern. The stator can be tested by measuring AC voltage at the stator plug with the engine running. Voltage should read approximately 18 to 22 AC volts per 1,000 RPM engine speed, but may vary slightly depending on the system being tested. Similarly, the resistance of the stator can be measured by placing one lead of the multimeter into the stator plug and the other lead grounded to the chassis. If the multimter reads any continuity, the stator is shorted to ground and should be replaced.

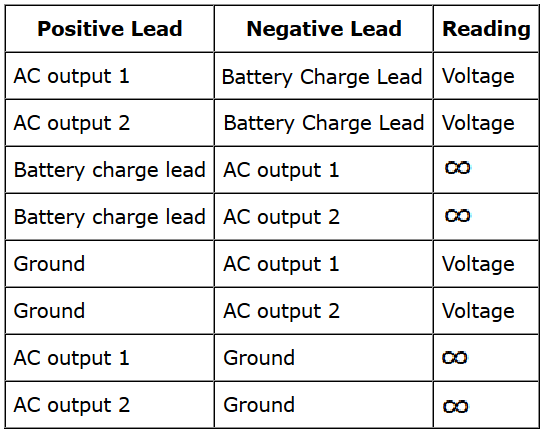
A faulty voltage regulator can either fail by allowing too much or too little voltage to the battery. Much like the stator, the voltage regulator/rectifier can be easily checked with a digital multimeter. The diode scale on your multimeter can be used to check that the diode is functioning to rectify AC current into DC current. Use the table below to verify the readings at the regulator. Note that the AC output leads are the wires coming from the stator to the regulator, the battery charge leads are the wires going from the regulator to the battery, and the ground is the ground wire leading from the regulator that in many cases is directly bolted to the chassis near the regulator itself.
Related Video: Testing Battery and Charging System
Speedometer
A fairly common electrical issue is a faulty or inoperative speedometer. Gone are the days of the cable driven units connected to the front wheel and instead are bikes that use an electronic sensor at the transmission to calculate vehicle speed. This Hall effect sensor has the potential to act as a magnet and catch small debris that has developed inside of the transmission. The sensor becomes contaminated and is unable to accurately take measurements, thus leading to an erratic or inoperative speedo. The sensor can be easily removed and cleaned to restore functionality. It is also a good idea to check the speedometer electrical harness plug under the tank console. The plug can often be overlooked during reassembly and may not be making good contact for proper gauge operation.
Related Discussions
- V INERR Error Code on Start-up - HDForums.com
- TSSM Trouble??? - HDForums.com
- Speedometer Stopped Working - HDForums.com