
anyone ever bought these lowers?
#81
 09-19-2013, 04:52 PM

Thought I'd chime in with some assembly thoughts since I put my lowers together, but haven'y installed them on the bike yet. The only items I bought from Harley were the 4 stud clips (part #8175), the 4 nuts (part #7716), and the 2 bottom clamps (part #27048-84). To be honest, 1/4-20 nylon lock nuts from Lowes would be just as good, and a 1 1/4" electrical cable clamp would serve for the bottom clamp. The stud clips are a must though IMHO.
I found a video on Youtube that shows the assembly process pretty well:
VIDEO WAS HERE
I used a 1/4" x 1 1/4" carriage bolt, 1/4" fender washer, and a 1/4" nylon lock nut to assemble the vent door to the inner glove box using the supplied black round disks that allow the door to be adjusted on the bike. I only tightened up the assembly tight enough so as to allow the vent door to ratchet to different positions. Some guys have mentioned a spring which is Greek to me since I don't know where that would go. I did mine like the guy in the video and it will work good enough for the few times I'll adjust it.
#8 x 1/2" phillips head or hex head self tapping screws put the vent door/glove box assembly onto the trim piece (2 on each side), then that assembly is held onto the main lowers body with 3 more screws on each side, for a total of 10 screws. The video shows that pretty well. I'd probably use hex head to keep from stripping out the phillips head. Another member mentioned using #10 screws, but I honestly believe they would be too big and bust out the plastic.
I'll mount them to the bike when the parts dept. gets the stud clips in. I've got plenty of bolts to use for the bottom clips around here and I bought a couple rubber washers also from Lowes.
Hope this helps anyone wrestling with the install!!
#82
09-21-2013, 07:41 AM
ok guys.. finally finished the pods and let me give you my .02 on this and it's really simple. If you don't have patience, take these to a painter and be done with it. In all reality by the time I was done with materials and time I could have easily taken these to a painter and been done with it.
I don't and I'm sure most of you won't either, have the appropriate controlled envirnoment to be doing this but I figured I'd give it a try. After the final coat of black paint went on and immediately pulled up earlier in this post I wound up going back down to the plastic with sanding and sanded 3 more coats of primer and paint back onto the pods. Now they're done and ready for clear so I let them sit for 48 hours while they cured. Later I find out the best time to apply clear coat (lacquer based) is when the final color coat is still wet so I screwed up there but all was good as I simply water sanded the previous black coat with 1200 and sprayed another coat of black on then commenced to clear coating. 1st light coat fine, 2nd light coat fine, 3rd coat fine, 4th coat fine. Nice deep shiny pods. So I let those dry for an hour or so while i tinkered with something else. Go back to look at them and they look like a fogged up piece of plexiglass. I was PISSED to say the least. So I called my brother who still paints and the first thing that came out of his mouth was "how's the humidity"? UGH.. It's SE TX and the humidity is always 140%. So he told me how to correct this and that was by yet again, water sanding but with 2000 this time and then polish. So did that and realized my 10" orbital was just too big for this project so off to wally world to pick up a 6" orbital. Used 3M rubbing compound which is a little more abrasive initially to cut through any imperfections then followed up with meguiars ultimate polishing compound then finally finishing up with meguiars black wax. So they are done now but man what a PITA! Doing this project reminded me exactly why I gave up my aircraft painting career years ago.
PRIMED

WATER SANDED AND READY FOR COLOR

3 COATS OF COLOR

FINISHED

now if I could just get LSHD1.COM to get me my damn parts.. These guys have great prices but guys let me tell you don't ever order anything from them unless you can wait for it. They are SLOW AS MOLASSES
I don't and I'm sure most of you won't either, have the appropriate controlled envirnoment to be doing this but I figured I'd give it a try. After the final coat of black paint went on and immediately pulled up earlier in this post I wound up going back down to the plastic with sanding and sanded 3 more coats of primer and paint back onto the pods. Now they're done and ready for clear so I let them sit for 48 hours while they cured. Later I find out the best time to apply clear coat (lacquer based) is when the final color coat is still wet so I screwed up there but all was good as I simply water sanded the previous black coat with 1200 and sprayed another coat of black on then commenced to clear coating. 1st light coat fine, 2nd light coat fine, 3rd coat fine, 4th coat fine. Nice deep shiny pods. So I let those dry for an hour or so while i tinkered with something else. Go back to look at them and they look like a fogged up piece of plexiglass. I was PISSED to say the least. So I called my brother who still paints and the first thing that came out of his mouth was "how's the humidity"? UGH.. It's SE TX and the humidity is always 140%. So he told me how to correct this and that was by yet again, water sanding but with 2000 this time and then polish. So did that and realized my 10" orbital was just too big for this project so off to wally world to pick up a 6" orbital. Used 3M rubbing compound which is a little more abrasive initially to cut through any imperfections then followed up with meguiars ultimate polishing compound then finally finishing up with meguiars black wax. So they are done now but man what a PITA! Doing this project reminded me exactly why I gave up my aircraft painting career years ago.
PRIMED
WATER SANDED AND READY FOR COLOR
3 COATS OF COLOR
FINISHED
now if I could just get LSHD1.COM to get me my damn parts.. These guys have great prices but guys let me tell you don't ever order anything from them unless you can wait for it. They are SLOW AS MOLASSES
#83
09-21-2013, 08:13 AM
There must be something on backorder. I have always got my orders very quickly from them. Even when I ordered painted saddlebag latches they were to me in less than two weeks. Which is quick for painted parts.
#84
09-21-2013, 09:03 AM
#87
09-23-2013, 10:35 PM
I received my lowers from this vendor, and other than a couple of minor scuffs that I can buff out, they look to be pretty nice. I was missing the left and right parts that allow you attach the vents, but after contacting the vendor, sending some pictures, I think I've got it resolved. I hope they ship right away as it looks like winter is headed here early. In the 30's the last couple of days with chilly rain to keep you cool. Can't wait to get them on and see what a difference they make. Wanted to say thanks to UltraNutz for all the assistance and info, as well as those that contributed with parts needed to actually mount them. NO INSTRUCTIONS, so it takes a minute or two to figure them out.

#89
09-25-2013, 04:44 PM
#90
09-25-2013, 06:23 PM
Tourer
Hello All,
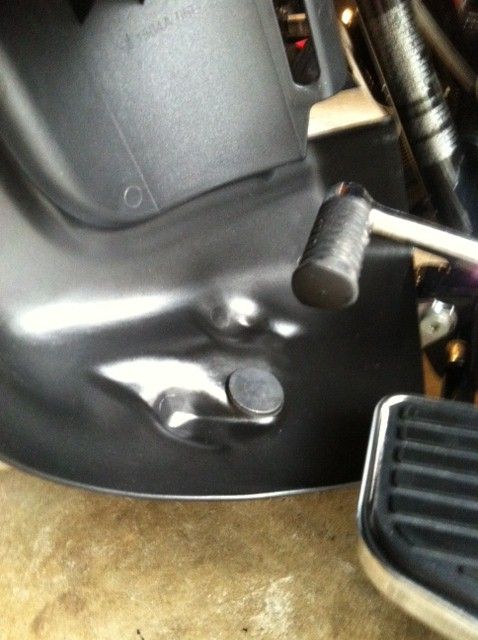
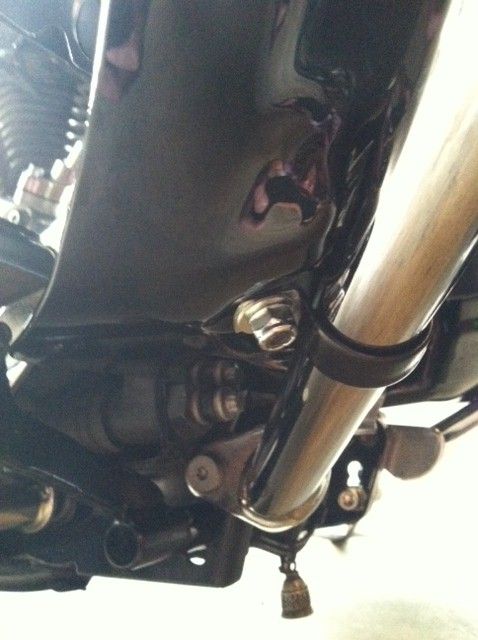
The stud clips came in so I installed the lowers on the bike. I put a strip of 3/16" thick packing material from a shipment I received in the upper section to keep them from rattling around when assembled.
I used a 5/16" x 1" elevator bolt on each lower clamp with a rubber washer and a 5/16" nylon lock nut with washer all from Lowes.
Some crappy cell phone pics:
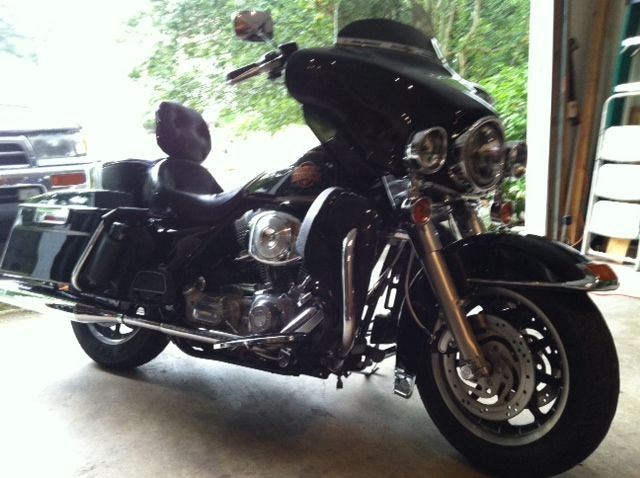
Hope this helps with your installs!
The stud clips came in so I installed the lowers on the bike. I put a strip of 3/16" thick packing material from a shipment I received in the upper section to keep them from rattling around when assembled.
I used a 5/16" x 1" elevator bolt on each lower clamp with a rubber washer and a 5/16" nylon lock nut with washer all from Lowes.
Some crappy cell phone pics:


Hope this helps with your installs!