
2012 Street Glide Ape Install Tutorial
#51
 04-07-2015, 09:49 AM


6th Gear
Join Date: Sep 2012
Location: Madison
Posts: 10
Likes: 0
Received 0 Likes
on
0 Posts
Ok. I did not take a photo of the bars after I installed them. I forgot because I was so tired. Having the inner fairing loose helped with installing the new bars. It would also help you to have plenty of sockets and socket extensions that allow the sockets to move. Not everything works in a 90 degree angle.
I bought Magnum clutch and brake cables... upper and lower.
The next step I worked on the clutch cable. the transmission drain plug in on the bottom of the pan located towards the front on the right side. Drain the fluid. Make sure you have replacement fluid and new gasket on hand. Many people told me I could use the original gasket, but for $5.00 why take a chance.
I forgot to loosen the cable at the clutch release cover. I had to reattach it to do this. Helpful hint there. In the service manual, it tells you to remove the exhaust. I just removed the heat shields.. Again, this is where having sockets that work at multiple angles help. Just in case your forget to check, the two smaller bolts go in the two top hole.
When you get the cover off, you do not have to disassemble the inside. I just twisted the cable 180 degrees so the holding clamp inside was turned upside down. it has a flat side which lets it to be removed. When you go to put the cover back on, refer to the service manual for tightening pattern and torque values.
The next step was the brake lines. The master cylinder line goes through the fairing and along side of the back bone under the gas tank to the ABS module located on the right side of the bike behind the right side cover. The caliper lines come from the ABS module to the distribution block located under the triple tree and to each caliper. I tried to keep air out of the line, but it is pretty much impossible. I know one of the mechanics at my local dealer... He is a good guy and only tells things I need to do at the dealer. I STRONGLY suggested... **** , told me to bring my bike into the shop to have the ABS serviced after I installed and manually bled the lines. I trust him. He stated the warranty will not cover the ABS module if you change the brake lines and do not have the dealer do the service on the ABS module. It costs me about $100.00 to have it done... But it is better than $450.00 for a new ABS module... The choice is up to you, but for me... no choice. I trust him. Anyways, replacing the brake lines were pretty simple. I used a vacuum brake tool I purchased from Harbor Freight and two 60cc syringes I got from Tractor Supply. One to pull the fluid and one to push... Remember, newer bikes take DOT4 fluid. I kept a bottle of windex to wipe down and spills as soon as it happened.
I had to use my Dremel tool to cut out a channel for the stereo wire and power wire for my Garmin in the switch housings on the left side. I just took my time. I also painted the part of the bars the switch housing and grips attach to.. it came unpainted and started to rust. Because I used Performance Machine Contour XL grips, I did not have to worry about clearance. The left grip uses two set screws to hold it in place... Really nice grips. I love them.
A friend of mine, Ron, took a piece of aluminum plate and cut a small square piece to mount my Garmin on the left switch housing. I used two aluminum spacers and longer bolts I purchased from Ace. I cleaned everything with brake cleaner, painted with automotive etching primer, and then painted with flat black automotive paint. Looks great to me.
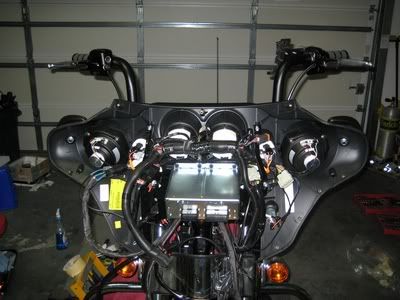
Here is a photo before a finished assembly. All wires worked perfectly. You may have to play with the routing for the clutch cable. I ordered +8 on mine. It work okay for my WO576 bars.
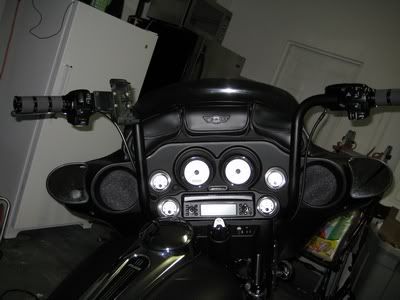
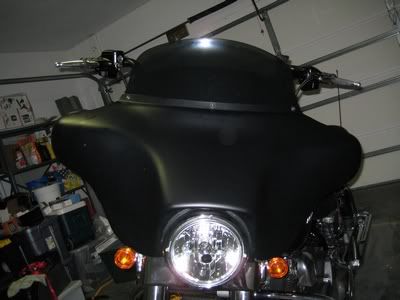
Okay here is the finished photos. I hope this tutorial helps someone out. If I remember anything I will post or modify the original posts. If anyone thinks I need to add anything, please let me know...
Okay... you can post now... Thanks for waiting...
Oh, I forgot to add that I tested everything and it seems to work great.
I bought Magnum clutch and brake cables... upper and lower.
The next step I worked on the clutch cable. the transmission drain plug in on the bottom of the pan located towards the front on the right side. Drain the fluid. Make sure you have replacement fluid and new gasket on hand. Many people told me I could use the original gasket, but for $5.00 why take a chance.
I forgot to loosen the cable at the clutch release cover. I had to reattach it to do this. Helpful hint there. In the service manual, it tells you to remove the exhaust. I just removed the heat shields.. Again, this is where having sockets that work at multiple angles help. Just in case your forget to check, the two smaller bolts go in the two top hole.
When you get the cover off, you do not have to disassemble the inside. I just twisted the cable 180 degrees so the holding clamp inside was turned upside down. it has a flat side which lets it to be removed. When you go to put the cover back on, refer to the service manual for tightening pattern and torque values.
The next step was the brake lines. The master cylinder line goes through the fairing and along side of the back bone under the gas tank to the ABS module located on the right side of the bike behind the right side cover. The caliper lines come from the ABS module to the distribution block located under the triple tree and to each caliper. I tried to keep air out of the line, but it is pretty much impossible. I know one of the mechanics at my local dealer... He is a good guy and only tells things I need to do at the dealer. I STRONGLY suggested... **** , told me to bring my bike into the shop to have the ABS serviced after I installed and manually bled the lines. I trust him. He stated the warranty will not cover the ABS module if you change the brake lines and do not have the dealer do the service on the ABS module. It costs me about $100.00 to have it done... But it is better than $450.00 for a new ABS module... The choice is up to you, but for me... no choice. I trust him. Anyways, replacing the brake lines were pretty simple. I used a vacuum brake tool I purchased from Harbor Freight and two 60cc syringes I got from Tractor Supply. One to pull the fluid and one to push... Remember, newer bikes take DOT4 fluid. I kept a bottle of windex to wipe down and spills as soon as it happened.
I had to use my Dremel tool to cut out a channel for the stereo wire and power wire for my Garmin in the switch housings on the left side. I just took my time. I also painted the part of the bars the switch housing and grips attach to.. it came unpainted and started to rust. Because I used Performance Machine Contour XL grips, I did not have to worry about clearance. The left grip uses two set screws to hold it in place... Really nice grips. I love them.
A friend of mine, Ron, took a piece of aluminum plate and cut a small square piece to mount my Garmin on the left switch housing. I used two aluminum spacers and longer bolts I purchased from Ace. I cleaned everything with brake cleaner, painted with automotive etching primer, and then painted with flat black automotive paint. Looks great to me.
Here is a photo before a finished assembly. All wires worked perfectly. You may have to play with the routing for the clutch cable. I ordered +8 on mine. It work okay for my WO576 bars.
Okay here is the finished photos. I hope this tutorial helps someone out. If I remember anything I will post or modify the original posts. If anyone thinks I need to add anything, please let me know...
Okay... you can post now... Thanks for waiting...
Oh, I forgot to add that I tested everything and it seems to work great.
#52
04-08-2015, 07:58 AM
thanks for the detailed post. I am doing mine and cant find the color wire diagram I had for when is time to plug in the wires for the left and right connectors. do you have a detailed photos of the sequence for the right ( black) and left ( white) . thanks a lot jose jdv8a@yahoo.com Madison, WI


Thread
Thread Starter
Forum
Replies
Last Post
akakillroy
2014-2023 Touring Models
15
10-04-2015 09:32 PM