
Help - Anyone installed Auxillary Lamp Independent Control on a RKC?
#1
 02-19-2012 | 05:51 PM
Thread Starter
|
Tourer
Joined: Apr 2008
Posts: 321
Likes: 2
Has anyone installed one of these on a RKC yet? I am using kit 69200442, which says is for FLHR models, which should include my FLHRC. OK, from experience I know that the HD instruction sheets are crap, but I started to install this afternoon, and 2 things don't seem right per the instructions. First, the auxillary light switch on my 08 RKC doesn't have a female terminal connected to a spade terminal coming out the back of the switch as described in the instructions. The wires are soldered directly to the spade terminal coming out of the switch? Second, the wiring harness provided is supposed to connect in-line with the fender tip lights....there are no fender lights on a Classic and I don't see any wires/connectors for it, so I have no-where to plug the new harness into? Do I have the wrong kit?
The steps in question are 4-6 from the instruction manual
http://www.harley-davidson.com/en_US...ts/-J05535.pdf
The steps in question are 4-6 from the instruction manual
http://www.harley-davidson.com/en_US...ts/-J05535.pdf
#2
02-19-2012 | 05:56 PM
Tourer
Joined: Dec 2011
Posts: 258
Likes: 0
From: Beach House on the moon
#3
02-20-2012 | 11:21 AM
Thread Starter
|
Tourer
Joined: Apr 2008
Posts: 321
Likes: 2
Your post confirms what I already knew, that I am an idiot about this, however I remain in that condition and if anyone who has actually successfully installed one of these kits, (not spliced wires w/o a kit) on a RKC w/o fender lights can tell me what I am looking at wrong, I would still appreciate it. Thanks.
#4
02-20-2012 | 11:24 AM

Outstanding HDF Member
Joined: Nov 2005
Posts: 3,171
Likes: 821
From: KMHT KFMY
OK kids here is the deal, Uncle Sam says the driving lights can not be on with the high beams if you want the bike to meet DOT spec at time of manufacture.
So HD uses the power to the low beam to run the auxiliary lamps
All you have to do is find the wire into the switch, cut it, seal the harness side of it with tape and splice in a new wire 16AWG stranded fused w/15 amp inline fuse to another power source, switched would be my choice.
So HD uses the power to the low beam to run the auxiliary lamps
All you have to do is find the wire into the switch, cut it, seal the harness side of it with tape and splice in a new wire 16AWG stranded fused w/15 amp inline fuse to another power source, switched would be my choice.
#5
02-22-2012 | 02:58 PM
Outstanding HDF Member
Joined: Dec 2008
Posts: 2,008
Likes: 350
From: Ohio
I installed this kit on my 2009 RKC. It is the same as 2008. There IS a connector for the fendertip light behind the headlight even though the RKC doesn't connect anything to it. Use a soldering iron to remove the wire from the switch and file it smooth so the female spade connector slides over it.
#6
02-22-2012 | 03:19 PM
Seasoned HDF Member
Joined: Sep 2009
Posts: 16,642
Likes: 5,618
From: SE Michigan
I installed this kit on my 2009 RKC. It is the same as 2008. There IS a connector for the fendertip light behind the headlight even though the RKC doesn't connect anything to it. Use a soldering iron to remove the wire from the switch and file it smooth so the female spade connector slides over it.
#7
02-22-2012 | 04:13 PM
Extreme HDF Member
Joined: Jun 2011
Posts: 10,216
Likes: 219
From: Glendale AZ
Your post confirms what I already knew, that I am an idiot about this, however I remain in that condition and if anyone who has actually successfully installed one of these kits, (not spliced wires w/o a kit) on a RKC w/o fender lights can tell me what I am looking at wrong, I would still appreciate it. Thanks.
Trending Topics
#8
02-22-2012 | 05:23 PM
Seasoned HDF Member
Joined: Sep 2009
Posts: 16,642
Likes: 5,618
From: SE Michigan
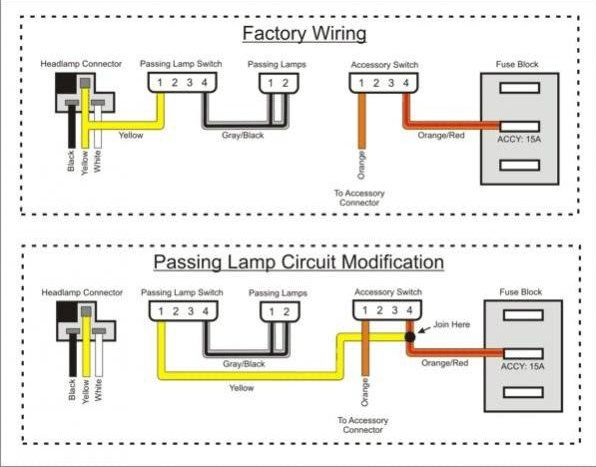
Yeah, I've seen that diagram, I guess I'll take the headlight out and splice it up. I have the kit, but I cant understand why they'd sell a part with connectors that dont connect.
#9
02-22-2012 | 06:36 PM
Cruiser
Joined: Aug 2010
Posts: 143
Likes: 2
From: Ballston Lake
Has anyone installed one of these on a RKC yet? I am using kit 69200442, which says is for FLHR models, which should include my FLHRC. OK, from experience I know that the HD instruction sheets are crap, but I started to install this afternoon, and 2 things don't seem right per the instructions. First, the auxillary light switch on my 08 RKC doesn't have a female terminal connected to a spade terminal coming out the back of the switch as described in the instructions. The wires are soldered directly to the spade terminal coming out of the switch? Second, the wiring harness provided is supposed to connect in-line with the fender tip lights....there are no fender lights on a Classic and I don't see any wires/connectors for it, so I have no-where to plug the new harness into? Do I have the wrong kit?
The steps in question are 4-6 from the instruction manual
http://www.harley-davidson.com/en_US...ts/-J05535.pdf
The steps in question are 4-6 from the instruction manual
http://www.harley-davidson.com/en_US...ts/-J05535.pdf
I was whining about this in the other thread, but decided not to return it and just fix it.
Step one, ignore the directions, what do you want for $30. For Harley that's practically free!
The wire that is black, in my directions it says it's orange and white, either way it's the one with the fuse, needs to get connected to the switch.
Go to the white 4 pin connector at the end of the switch, don't mess with the switch end, it's probably soldered. Unplug it and look for the #1 on the white connector. It's written on the connector and it is inline with the yellow wire on the other side of the connector. Pull the number one wire out of the white connector and snip off the male metal connector. Attach a male spade connector to that.
One of these

So you are now going to have your switch still connected to the white 4 pin connector but one of the wires now has the spade connector instead of going into the white connector.
Plug that back together and attach the new harness wire, the one with the fuse, to the spade connector.
Now fish around in there and you'll find the connector that is used for the fender light for other bikes. It's in there, but because the classics don't use it, it could be tapped off or bundled with other wires. The wire colors are black and orange/white. Plug in the new harness, only one side it only can go one way.
Worked like a charm for me . Sorry I can't take pics, I put everthing back together.
TC