
Pictorial: installing Heritage-style handlebars on a 2011 Road King
#1
 09-11-2011, 08:07 PM


Hello all. I like reading the how-to postings with pictures, so I thought I'd give it a try, and post a pictorial on swapping the Heritage-style bars for the stock bars. I bought a 2011 Road King in August, and I love it. Except for the handlebars. Two problems:
1) to avoid leaning forward, I have to keep my arms almost straight. In other words, I need more pull back.
2) I've got some wrist pain in one hand: I think the stock grips are angled too much like wheel-barrow handles. I want them more perpendicular to the line of the bike's travel.
Anyway, I bought these bars for $80: the Heritage-style bars, H-D part number 56902-08.

This was absolutely all I needed, other than a few tools I didn't already have: some torx socket bits and a small (inch-pound) torque wrench.
I saw an earlier post https://www.hdforums.com/forum/touri...andlebars.html with some nice pictures comparing handlebars, but none of them were the 56902-08 Heritage-style bars. So here is the "flash-forward" showing the stock bars (bottom) vs. the Heritage-style:

The old bars still have the throttle cable in them. You can't tell too much about the amount of pull-back from the picture. Trust me: it's better. One obvious difference, though, is how much narrower the Heritage-style bars are at the base. I don't know why anyone would care, but it is what it is.
This next pic is an attempt to show the different grip angle. I propped the bars up so middle bent sections are close to parallel. You can easily see how the Heritage-style bars are much less wheel-barrow like, which is great (for me, anyhow). Again, the stock bars are on bottom and the new bars are on top:

One final shot, to show that they are exactly the same width at their widest point (old on top, new on bottom this time):

To be continued...
1) to avoid leaning forward, I have to keep my arms almost straight. In other words, I need more pull back.
2) I've got some wrist pain in one hand: I think the stock grips are angled too much like wheel-barrow handles. I want them more perpendicular to the line of the bike's travel.
Anyway, I bought these bars for $80: the Heritage-style bars, H-D part number 56902-08.
This was absolutely all I needed, other than a few tools I didn't already have: some torx socket bits and a small (inch-pound) torque wrench.
I saw an earlier post https://www.hdforums.com/forum/touri...andlebars.html with some nice pictures comparing handlebars, but none of them were the 56902-08 Heritage-style bars. So here is the "flash-forward" showing the stock bars (bottom) vs. the Heritage-style:
The old bars still have the throttle cable in them. You can't tell too much about the amount of pull-back from the picture. Trust me: it's better. One obvious difference, though, is how much narrower the Heritage-style bars are at the base. I don't know why anyone would care, but it is what it is.
This next pic is an attempt to show the different grip angle. I propped the bars up so middle bent sections are close to parallel. You can easily see how the Heritage-style bars are much less wheel-barrow like, which is great (for me, anyhow). Again, the stock bars are on bottom and the new bars are on top:
One final shot, to show that they are exactly the same width at their widest point (old on top, new on bottom this time):
To be continued...
The following 5 users liked this post by dr_jay:
pdbuzz (04-29-2017),
photo2u (01-24-2020),
sledge13 (02-15-2021),
Streetscenes (09-16-2016),
Texasblues (12-02-2019)

#3
09-11-2011, 08:31 PM
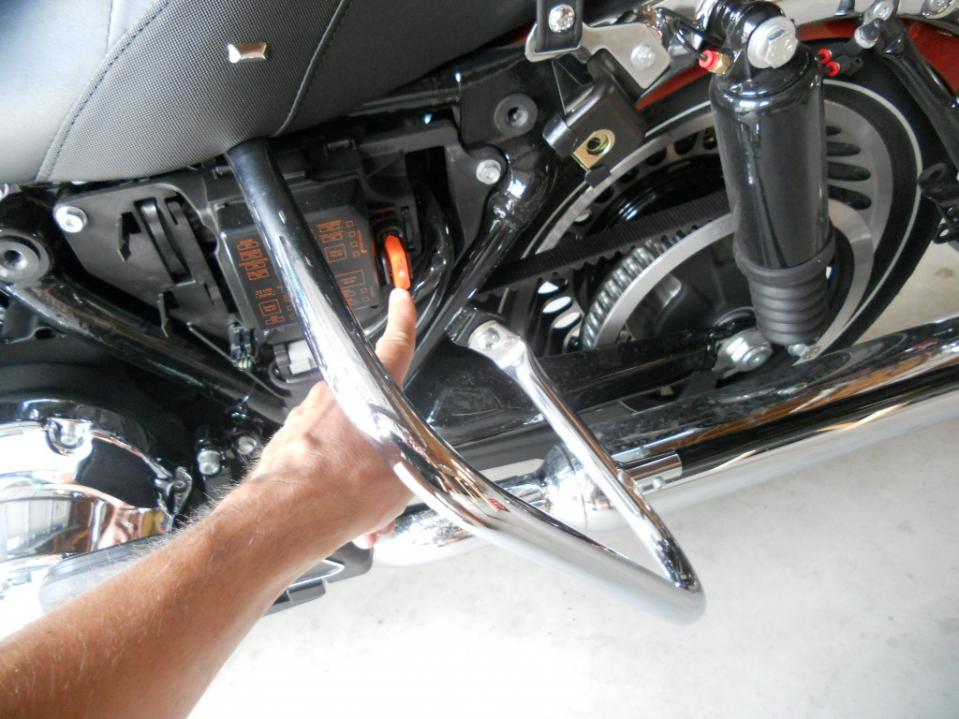
So let's get started. The manual says to pull the main fuse. I usually ignore this stuff, but didn't this time, so here it is, under the left-side cover. Remove the left saddle bag, and then the left-side cover to get at the fuse box. The main fuse is right there in the open:
First, pop off the 2 decorative covers with a thin screwdriver:
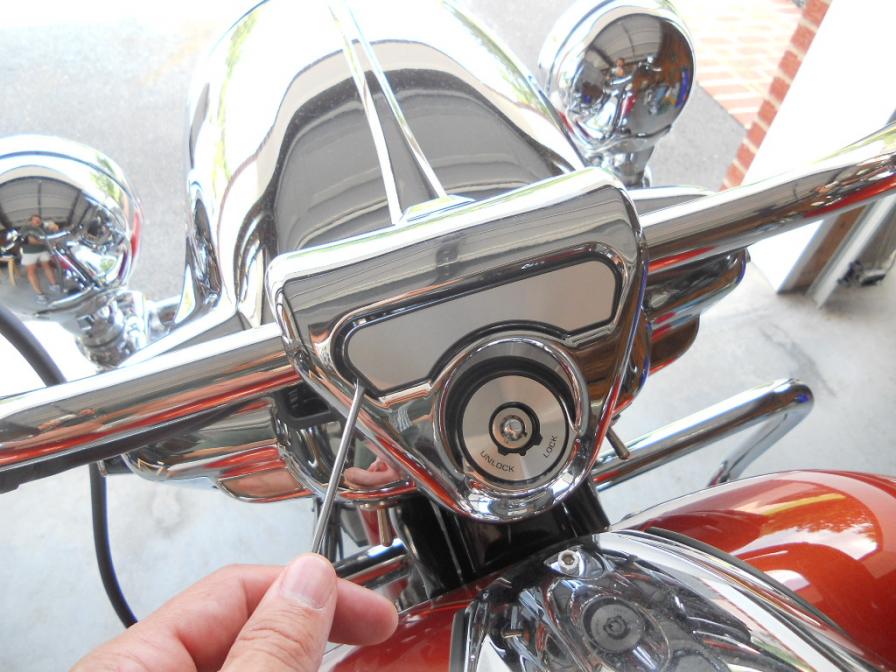

Next, remove the outer trim ring around the headlight. The manual calls this the "headlamp door", and it is held with a single screw at the bottom, and a spring clip at the top. Remove the screw and lift the trim ring up and off:


First, pop off the 2 decorative covers with a thin screwdriver:
Next, remove the outer trim ring around the headlight. The manual calls this the "headlamp door", and it is held with a single screw at the bottom, and a spring clip at the top. Remove the screw and lift the trim ring up and off:
#4
09-11-2011, 08:37 PM


#5
09-11-2011, 08:46 PM
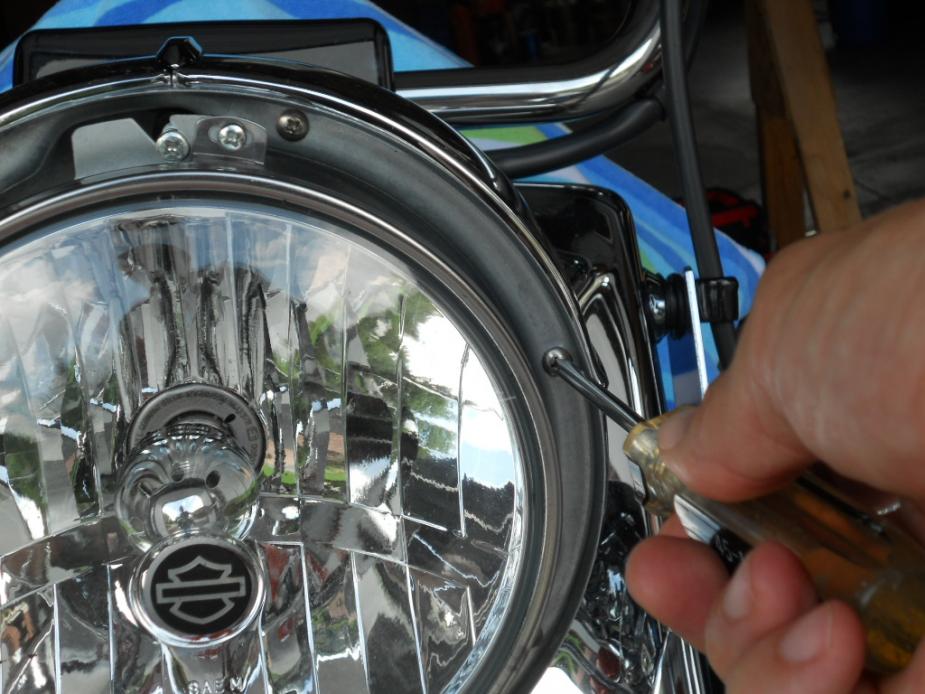
First, you should probably protect both the front fender and the gas tank/spedometer with heavy towels, to avoid scratches. Now remove the headlamp housing, which is held in with 7 small screws. (I had only 6.) Don't mess with the screws that control the aiming, just remove the smaller ones as shown below:
Hold on to the headlamp housing, as it may flop out.

Pull it out carefully, and undo the electrical plug by squeezing on both sides of the plug:


Put the headlamp housing aside.
Hold on to the headlamp housing, as it may flop out.
Pull it out carefully, and undo the electrical plug by squeezing on both sides of the plug:
Put the headlamp housing aside.
The following users liked this post:
pdbuzz (04-29-2017)
#6
09-11-2011, 08:48 PM
#7
09-11-2011, 09:06 PM
Remove the decorative "spear" on top of the headlamp nacelle. It is held on with one locknut (5/16" socket) inside the top of the nacelle (not a word you use much in daily conversation). It just lifts off:

Next, we'll remove only the "handlebar clamp shroud". No need to remove the entire nacelle, although it's a bit challenging to get at the electrical connectors through the headlamp hole alone. Just undo the 2 screws which are right next to the fork lock:

and then one tiny screw on top which was under the spear. Here, I'm holding the small locknut and washer which are underneath. It's tight, but you can move the wires and get 2 fingers on them while you unscrew the screw:


Just pull off the handlebar clamp shroud:

Next, we'll remove only the "handlebar clamp shroud". No need to remove the entire nacelle, although it's a bit challenging to get at the electrical connectors through the headlamp hole alone. Just undo the 2 screws which are right next to the fork lock:
and then one tiny screw on top which was under the spear. Here, I'm holding the small locknut and washer which are underneath. It's tight, but you can move the wires and get 2 fingers on them while you unscrew the screw:
Just pull off the handlebar clamp shroud:
The following users liked this post:
pdbuzz (04-29-2017)
Trending Topics
#9
09-11-2011, 09:25 PM
I've installed those exact bars & while they were an improvement over the original Roadking bars, the wrist angle was killing my right wrist. I just ordered the "Softail Heritage handlebars from Zanottis tonite & hope that these feel as good as the Softail I sat on at the dealer today...They should as they are the very same bar!
The bars I ordered tonite are HD part # 56569-09. These bars ARE NOT notched for the TBW so that will require some altercation & there is no hole at the bottom of the bars so I will have to drill a hole & file so I can run the TBW out of the bars but they feel GREAT & hopefully will resolve the wrist angle for ME. My final & last alternative will be to bite the bullet & spend about $600 on the Wild One Chubbys & have to extend the TBW, clutch cable, control wiring & brake lines. Hoping the Softail heritage bars fill the bill!
The bars I ordered tonite are HD part # 56569-09. These bars ARE NOT notched for the TBW so that will require some altercation & there is no hole at the bottom of the bars so I will have to drill a hole & file so I can run the TBW out of the bars but they feel GREAT & hopefully will resolve the wrist angle for ME. My final & last alternative will be to bite the bullet & spend about $600 on the Wild One Chubbys & have to extend the TBW, clutch cable, control wiring & brake lines. Hoping the Softail heritage bars fill the bill!
#10
09-11-2011, 10:22 PM
Aw, man!
Hey, did you happen to notice any play in the headlamp trim ring before you removed it? I'm anxious to see if you have any play in it when you reinstall it and tighten it down. The dealer did my bars and the trim ring rattles and moves a tiny amount, even when the retaining screw at the bottom is as tight as it will go.
Hey, did you happen to notice any play in the headlamp trim ring before you removed it? I'm anxious to see if you have any play in it when you reinstall it and tighten it down. The dealer did my bars and the trim ring rattles and moves a tiny amount, even when the retaining screw at the bottom is as tight as it will go.