
Fork Oil Change Made easy
#11
 05-08-2010, 10:43 PM

I did a write-up on this procedure here. This is page 3 of the thread where I finally muster up the ***** to try what we had been talking about earlier. Scroll down to Post #23 for the procedure.
The discussion of the switch removal is because it is required for the job and can be tricky if you don't do it right.
The discussion of the switch removal is because it is required for the job and can be tricky if you don't do it right.
#12
05-09-2010, 01:46 AM

Hey guys it's the "video guy" here. Rshwetz, you have some good info here. I like the idea with the clamp. I had to remove mine with vise grips and then purchased the allen head drains from the dealer.
You are correct in saying the switch is the exact shape of the tumblers. What you have to remember is the switch has a two gaps cut into it. If the switch isn't at the right level it will one turn one tumbler and bypass the other. The DYI tool will turn them both at the same time every time.
Iclick, your method works too if you are comfortable working on the front end with the forks moving around. Once you accidentally rotate them to the left they will lock. I showed how to lock the forks for maintenance and how to unlock them without the switch for ease and without buy the dealer tool.
Removing the switch (which some are doing) in the "off" position is okay but when you want to reinstall the switch, it has to go in on the "lock" position. When doing so the switch will be locked down but the tumblers will not be in the lock possition.
Like my father says, "there's a hundred ways to get home, just pick a route your comfortable with."
What I don't understand is how the video guy managed to get the fork lock to fail. He pointed the switch **** at 12 o'clock (OFF), pulled the switch, then rotated the forks to the left lock and back. After he replaced the switch it wouldn't lock. I didn't try that on mine, but it seems odd. Maybe you shouldn't rotate the forks to the left lock while the switch **** is out.
Removing the switch (which some are doing) in the "off" position is okay but when you want to reinstall the switch, it has to go in on the "lock" position. When doing so the switch will be locked down but the tumblers will not be in the lock possition.
Like my father says, "there's a hundred ways to get home, just pick a route your comfortable with."
#13
05-09-2010, 06:52 AM
Road Warrior
So I have a question on this....if I remove it in the locked position with the forks straight, then remove the ignition cap (the plastic shroud) why wouldn't I just insert the ignition assembly back in at that time just in case the forks did get moved into the locked position?
Or am I missing something here? This way I don't need the tool and if I am removing the ignition assembly I'm sure it's because I just need to remove the cap.
So, put switch in lock position with forks straight, remove ignition, remove cap, put ignition back in. Won't that work?
Or am I missing something here? This way I don't need the tool and if I am removing the ignition assembly I'm sure it's because I just need to remove the cap.
So, put switch in lock position with forks straight, remove ignition, remove cap, put ignition back in. Won't that work?
#14
05-09-2010, 08:29 AM
So I have a question on this....if I remove it in the locked position with the forks straight, then remove the ignition cap (the plastic shroud) why wouldn't I just insert the ignition assembly back in at that time just in case the forks did get moved into the locked position?
Or am I missing something here? This way I don't need the tool and if I am removing the ignition assembly I'm sure it's because I just need to remove the cap.
So, put switch in lock position with forks straight, remove ignition, remove cap, put ignition back in. Won't that work?
Or am I missing something here? This way I don't need the tool and if I am removing the ignition assembly I'm sure it's because I just need to remove the cap.
So, put switch in lock position with forks straight, remove ignition, remove cap, put ignition back in. Won't that work?
I don't want to hijack rshwetz's thread but this is why.
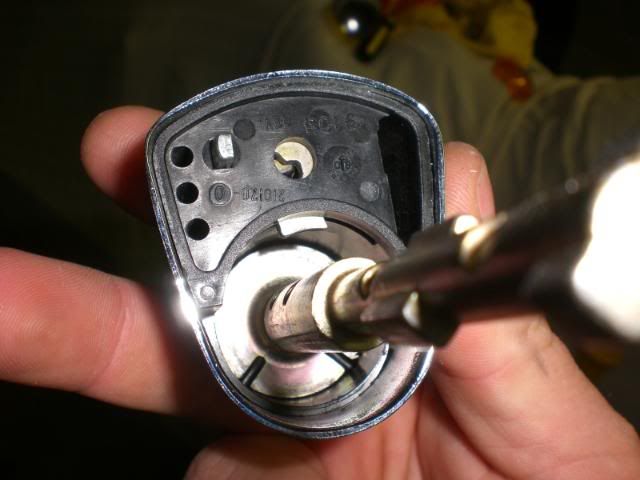
Look at the switch. You can see there are only two cams that turn the tumblers. The switch needs to be spaced just right or it will only turn one tumbler (upper or lower). It could even turn one and lock the switch down in there. You would then have to turn it until you got it out. Doing this may get them out of whack. I made the video for the guys that aren't as mechanically savvy, wanted a little confidence, or just wanted to see how it came out. You dont have to make the tool. You can just remove the spring, the spacers, locking nut so you can get to the cap. Then reinstall it all to space the switch out right. Then take it all back apart to install the cap when the job is done. Most people made the tool for under $1. So, the .99 question is why not make the tool? Here is the thread I started with the video https://www.hdforums.com/forum/touri...h-removal.html
#15
05-09-2010, 08:53 AM
You are correct in saying the switch is the exact shape of the tumblers. What you have to remember is the switch has a two gaps cut into it. If the switch isn't at the right level it will one turn one tumbler and bypass the other. The DYI tool will turn them both at the same time every time.
As I said, I just remove it in the LOCK position while the forks are pointed straight, then do my work and re-insert the **** in the same position. Works every time. But what I don't understand is how your bike's lock failed in the video after doing this and moving the forks to the locked position and back after the **** was removed. When you did this the lock didn't work. I haven't tried that with mine and don't really want to, but maybe the rule of thumb is to keep the forks away from the locked position if you do it my way.
Iclick, your method works too if you are comfortable working on the front end with the forks moving around. Once you accidentally rotate them to the left they will lock.
So if I do it my way and accidentally lock the forks, I should be able to re-insert the **** (with spacers and nut in place) and unlock it, right?
Removing the switch (which some are doing) in the "off" position is okay but when you want to reinstall the switch, it has to go in on the "lock" position. When doing so the switch will be locked down but the tumblers will not be in the lock possition.
To Hogdoc: When you remove the switch in the ACC position do you re-insert it in the same way?
Last edited by iclick; 05-09-2010 at 08:56 AM.
#16
05-09-2010, 09:05 AM
BTW, to Rshwetz: That's a great idea on the vise. I also used a ratchet with Phillips bit, and one side just barely came off--but had it not I would've probably used vise-grips. Your idea would've been better. I'm going to go back to my old thread and point to your thread here for that good point.
What I'll probably do the next time is replace them with a regular hex-head bolt, then put a chrome cap on it. I used these on my old RK and it worked well, but you need to be careful not to over-torque the bolt, as you have a shallow bolt going into aluminum and it would be very easy to strip it. OTOH a button-head Allen would work well too. Did someone say they found these at their HD dealer? If not, Ace Hardware would probably have them in chrome. Does anyone know the thread size and pitch? The parts manual does not have this information in the back section where it should be.
What I'll probably do the next time is replace them with a regular hex-head bolt, then put a chrome cap on it. I used these on my old RK and it worked well, but you need to be careful not to over-torque the bolt, as you have a shallow bolt going into aluminum and it would be very easy to strip it. OTOH a button-head Allen would work well too. Did someone say they found these at their HD dealer? If not, Ace Hardware would probably have them in chrome. Does anyone know the thread size and pitch? The parts manual does not have this information in the back section where it should be.
#17
05-09-2010, 09:37 AM
I think you are missing the point. The point of the video was to show people how the switch was removed. I like to do it in they way its done in the video. I remove the switch then use the tool to unlock and lock the front end when I need to. Its just easier and faster that way for me. I leave the tool in there the whole time and lock/unlock as needed and there is no guess work. Make the tool...dont make the tool. Like with everything its nice to have options.
#18
05-09-2010, 10:12 AM

I think you are missing the point. The point of the video was to show people how the switch was removed. I like to do it in they way its done in the video. I remove the switch then use the tool to unlock and lock the front end when I need to. Its just easier and faster that way for me. I leave the tool in there the whole time and lock/unlock as needed and there is no guess work. Make the tool...dont make the tool. Like with everything its nice to have options.
#19
05-09-2010, 10:20 AM
Tourer
Join Date: Feb 2009
Location: L.A. (Lower Alabama)
Posts: 404
Likes: 0
Received 0 Likes
on
0 Posts
#20
05-09-2010, 10:48 AM
As for forks on the newer models, I've never understood the reasoning behind the elaborate procedure HD outlines in the service manual, but Hogdoc suggested it might be to allow inspection of the bushings. Mine never wore noticeably even after 100k miles in my old bike, but I guess they could wear and damage the slider. My write-up and this thread show how to do a fork-oil change that takes about an hour and requires little fuss.
Last edited by iclick; 05-09-2010 at 02:38 PM.