
95" Engine Build Project Pics
#1
 02-26-2009, 10:08 PM


Join Date: Apr 2008
Location: Minnesota
Posts: 280
Likes: 0
Received 0 Likes
on
0 Posts
Here are pictures step by step of rebuilding my Twin Cam 95"
Disclaimer:
I am not a mechanic, this is the first time I have ever tore down a HD motor and rebuilt one. If I had a question I had a qualified mechanic just a phone call away. Along with some conversations and help from Dalton (thanks). I had a HD Service Manual and if I had questions, I asked!
Just so you know what I am posting is not the "written in stone" way to do this. I am just posting this for those that my not have seen the inside of the twin cam or those thinking of doing a project like this on their own. Also I know how everyone loves pictures.
I hope that this post creates some good conversation from those that have done this build a thousand times or have never done it before.
I dont know how many pics I will be able to put per post so bear with me. It may also take a few evenings to write it all up and bring new posts.
Well lets begin:
When doing a build like this you cant be clean enough. All of my parts were washed in hot soapy water and rinsed then dried completly. I did not was my heads in water they were cleaned when I had them ported.
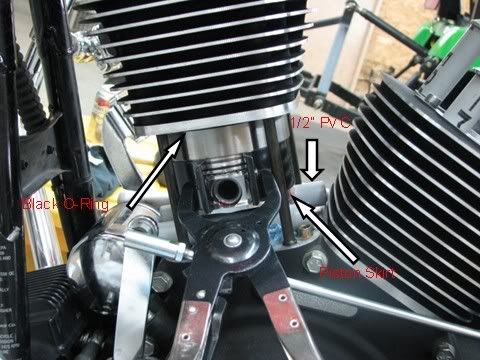
I placed all of the piston rings on before placing them on the connecting rods. I use 1/2" pvc on the cylinder studs to protect the pistons and studs from scratches. Also I had clean rags down in the case to prevent anything from falling in there. I took them out for the picture.
I installed the pistons onto the connecting rods that run down into the crank. Make sure they are orientated correctly. The large reliefs face eachother in the picture. The large relief is the intake side of the piston. I found it easier to put one circlip into the piston on the work bench, slide the wrist pin (with ATF for lube) in up against the insalled circlip then install the second circlip with the piston on the connecting rod.
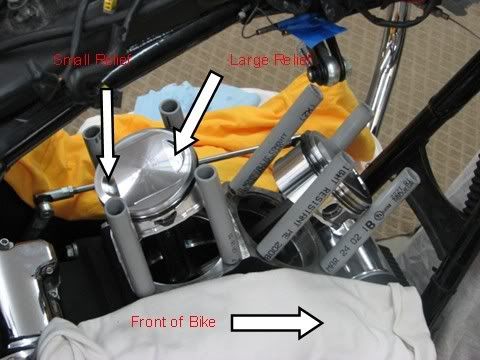
I am using headquarters pistons, their circlips are very stiff, you may have a few coice words when insalling them. Just take your time. You will need to use some grace along with some braun. In other word you need to be careful but it take some strength to put them in. I lubed the circlips with ATF prior to installing. Use the tool that HD offers, unfortunatly it is made for an Evo and the nose is small in the pin making it a little akward to use on the TC. The circlips have a gap in them try and get them in the 6 or 12 o-clock possition or close to that. You dont want to have the opening at the 3 or 9 o-clock possition, due to side loading.
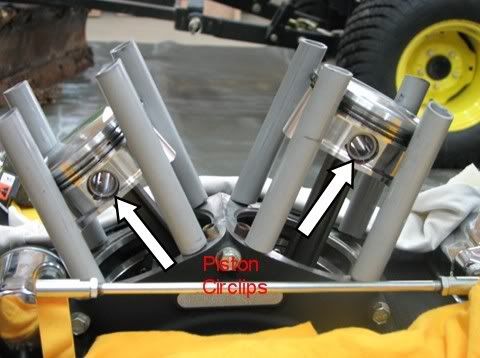
Make dam sure that the circlip in seated fully in the slot, check and recheck. If it is not it wont be a good thing latter.
You notice below the arrows pointing at the circlips.
At this point we are ready to orient the piston rings. Check the HD SM for the correct orientation. Check and recheck the orientation. This is also a good time to check that your rings are on the pistons the right way.
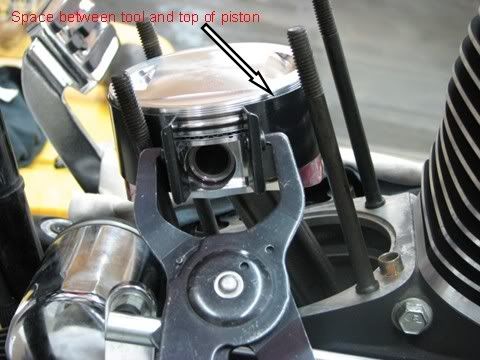
You will need a ring compressor to compress the ring while the cylinder is slid down over the piston. I took my ring compressor and lubed the inside of it with ATF along with the inside of the cylinder. The piston skirts have assembly lube on them, but be carefull not to get assembly lube on the piston rings! Place the ring compressor on the piston so that the piston top stands proud of the compressor as the picture shows below.
Disclaimer:
I am not a mechanic, this is the first time I have ever tore down a HD motor and rebuilt one. If I had a question I had a qualified mechanic just a phone call away. Along with some conversations and help from Dalton (thanks). I had a HD Service Manual and if I had questions, I asked!
Just so you know what I am posting is not the "written in stone" way to do this. I am just posting this for those that my not have seen the inside of the twin cam or those thinking of doing a project like this on their own. Also I know how everyone loves pictures.
I hope that this post creates some good conversation from those that have done this build a thousand times or have never done it before.
I dont know how many pics I will be able to put per post so bear with me. It may also take a few evenings to write it all up and bring new posts.
Well lets begin:
When doing a build like this you cant be clean enough. All of my parts were washed in hot soapy water and rinsed then dried completly. I did not was my heads in water they were cleaned when I had them ported.
I placed all of the piston rings on before placing them on the connecting rods. I use 1/2" pvc on the cylinder studs to protect the pistons and studs from scratches. Also I had clean rags down in the case to prevent anything from falling in there. I took them out for the picture.
I installed the pistons onto the connecting rods that run down into the crank. Make sure they are orientated correctly. The large reliefs face eachother in the picture. The large relief is the intake side of the piston. I found it easier to put one circlip into the piston on the work bench, slide the wrist pin (with ATF for lube) in up against the insalled circlip then install the second circlip with the piston on the connecting rod.
I am using headquarters pistons, their circlips are very stiff, you may have a few coice words when insalling them. Just take your time. You will need to use some grace along with some braun. In other word you need to be careful but it take some strength to put them in. I lubed the circlips with ATF prior to installing. Use the tool that HD offers, unfortunatly it is made for an Evo and the nose is small in the pin making it a little akward to use on the TC. The circlips have a gap in them try and get them in the 6 or 12 o-clock possition or close to that. You dont want to have the opening at the 3 or 9 o-clock possition, due to side loading.
Make dam sure that the circlip in seated fully in the slot, check and recheck. If it is not it wont be a good thing latter.
You notice below the arrows pointing at the circlips.
At this point we are ready to orient the piston rings. Check the HD SM for the correct orientation. Check and recheck the orientation. This is also a good time to check that your rings are on the pistons the right way.
You will need a ring compressor to compress the ring while the cylinder is slid down over the piston. I took my ring compressor and lubed the inside of it with ATF along with the inside of the cylinder. The piston skirts have assembly lube on them, but be carefull not to get assembly lube on the piston rings! Place the ring compressor on the piston so that the piston top stands proud of the compressor as the picture shows below.
Last edited by hollywoodultra; 02-28-2009 at 11:19 AM.
#2
02-26-2009, 10:25 PM
Join Date: Apr 2008
Location: Minnesota
Posts: 280
Likes: 0
Received 0 Likes
on
0 Posts
Place the o-ring on the case dont forget it!
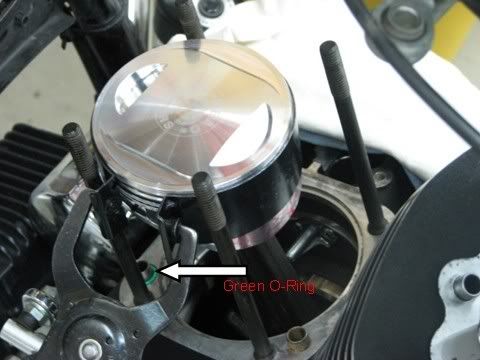
Place the o-ring on the base of the cylinder, use a very thin layer of HD oil to get the ring on, if you use to much, oil will weap off the o-ring and make it look like you have a oil leak at the base of the cylinder. Make sure that the o-ring doesnt roll over or twist, push it on evenly.
I used ATF to coat the inside of the cylinder walls with a lint free rag. If you wipe the ATF off with a clean rag and it doesnt show up completly red and clean, rewash your cylinders they arent clean enough. ATF is like a detergent and will clean off all of the grime from the honing, and it will show up on a white rag.
I used the same 1/2" pvc to use as a brace under the piston skirts, you need something to steady the piston as you push the cylinder on.
With both hands push with a brisk even downward push to get the cylinder on the piston.
You now have the piston in the cylinder and you can remove the compression tool form the area. Make sure that you remove the rag from the case and carefully slide the cylinder down into the case. Dont roll the o-ring, make sure that it is orientated the correct way in the case.
#3
02-26-2009, 10:26 PM
Join Date: Apr 2008
Location: Minnesota
Posts: 280
Likes: 0
Received 0 Likes
on
0 Posts
#4
02-27-2009, 06:02 PM
Join Date: Apr 2008
Location: Minnesota
Posts: 280
Likes: 0
Received 0 Likes
on
0 Posts
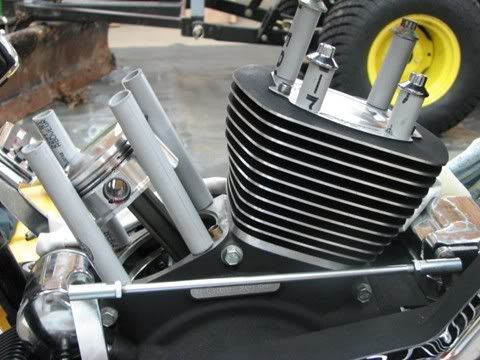
Ok so you have the first cylinder on. As you can see in the pic. below I used some 1/2" pvc as shims between the head bolts and the cylinder. The head bolts are just past finger tight, no need to wrench on them hard. I did this to keep the cylinder from moving/rocking when you turn the rear wheel to move the next piston up and down. Just repeat the above mentioned steps to complete the second cylinder install.
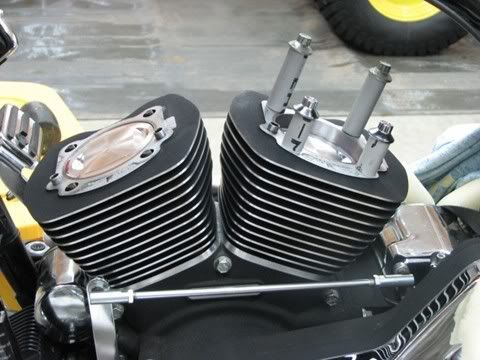
Ok, both cylinders are inplace.
Now it is time to place the head gasket on. I made sure that my hands were free from any grease and oil before handling them, just to keep the gaskets clean.
Before placing the gasket on the cylinder wipe any ATF/oil from the gasket area. I used a clean lint free rag with alocohol on it to wipe the gasket area (of the cylinder) to remove any contaminates from the top of the cylinder.
Place the gasket on the cylinder with the locating dowels in the correct holes on the gasket.

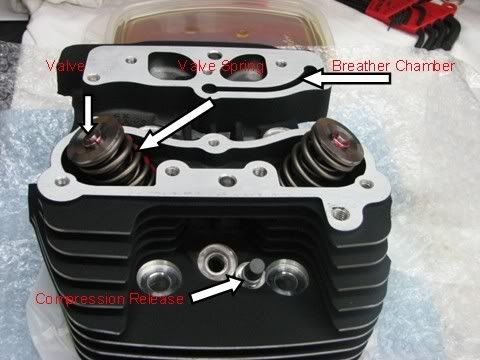
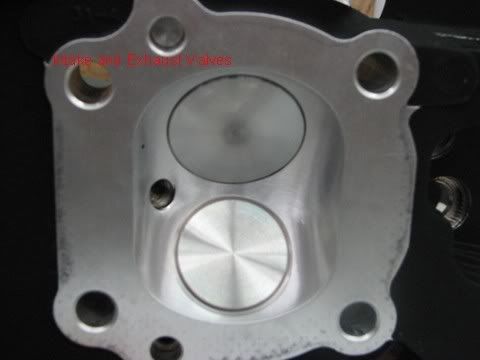
A picture of the ported heads labeling some of the parts of the head
Ok, both cylinders are inplace.
Now it is time to place the head gasket on. I made sure that my hands were free from any grease and oil before handling them, just to keep the gaskets clean.
Before placing the gasket on the cylinder wipe any ATF/oil from the gasket area. I used a clean lint free rag with alocohol on it to wipe the gasket area (of the cylinder) to remove any contaminates from the top of the cylinder.
Place the gasket on the cylinder with the locating dowels in the correct holes on the gasket.
A picture of the ported heads labeling some of the parts of the head
#5
02-27-2009, 06:26 PM
Join Date: Apr 2008
Location: Minnesota
Posts: 280
Likes: 0
Received 0 Likes
on
0 Posts
Pic of the combustion chamber of the head with the intake and exhaust valve installed.
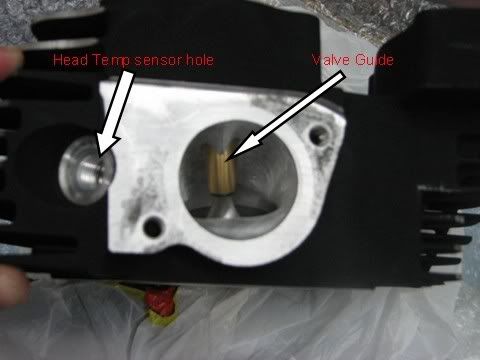
This is the front head looking into the intake port, this is where the throttle body mounts to. Notice how shinney and new everything looks!
Before I place the head on to the cylinder, I wiped down the entire surface area that will meet the head gasket with a clean lint free rag and alcohol, to eliminate contaminates. The alcohol will evaporate quickly and leave everything clean.
I placed a very small amount of HD oil on the cylinder studs, and on the bottom side of the head bolt flange. Dont put to much oil on the studs, If you put to much on you will get an incorrect torque reading, and there is no place for that oil to go b/c it is going into a blind hole with no vent. (Hope that made sense) The small amount of oil on the bottom of the head bolt flange reduces the resistance when the head bolt is torqued down on the head, giving a proper reading.
Once clean carefully place the head onto the cylinder. Once on you will need to torque the head bolts in a sequence and a stepped torque value. I used Cometic head gaskets, and followed the directions for sequence and torque values. I will not put the values or sequence in here. Follow the manufactures directions, or the HD SM. This is a very important step so you want to get it right the first time!
So you now have the head on and torqued to spec. Just repeat the same steps to complete the next cylinder.
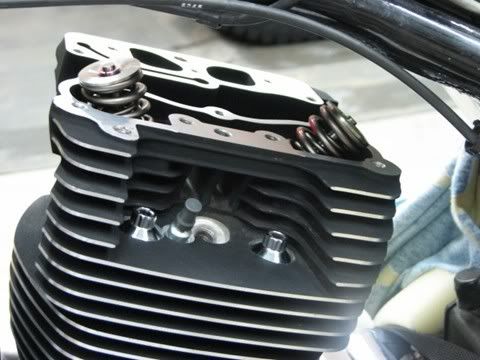
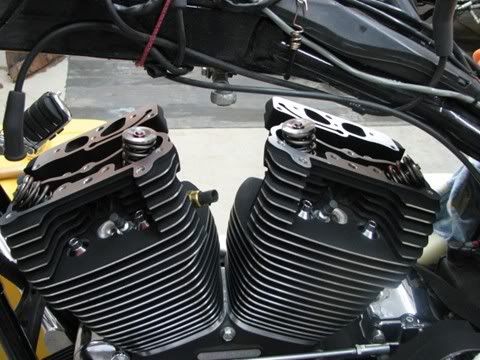
Both heads are on, the motor is now starting to take shape.
Now you need to clean the top of the head and the bottom side of the rocker box with alcohol and a lint free rag before you place the lower rocker box on the cylinder head.
Once clean place the proper gasket on the cylinder head making sure that the gasket is orientated properly over the breather chanel in the cylinder head.
Make sure the gasket is straight and place the lower rocker box on the head.
This is the front head looking into the intake port, this is where the throttle body mounts to. Notice how shinney and new everything looks!
Before I place the head on to the cylinder, I wiped down the entire surface area that will meet the head gasket with a clean lint free rag and alcohol, to eliminate contaminates. The alcohol will evaporate quickly and leave everything clean.
I placed a very small amount of HD oil on the cylinder studs, and on the bottom side of the head bolt flange. Dont put to much oil on the studs, If you put to much on you will get an incorrect torque reading, and there is no place for that oil to go b/c it is going into a blind hole with no vent. (Hope that made sense) The small amount of oil on the bottom of the head bolt flange reduces the resistance when the head bolt is torqued down on the head, giving a proper reading.
Once clean carefully place the head onto the cylinder. Once on you will need to torque the head bolts in a sequence and a stepped torque value. I used Cometic head gaskets, and followed the directions for sequence and torque values. I will not put the values or sequence in here. Follow the manufactures directions, or the HD SM. This is a very important step so you want to get it right the first time!
So you now have the head on and torqued to spec. Just repeat the same steps to complete the next cylinder.
Both heads are on, the motor is now starting to take shape.
Now you need to clean the top of the head and the bottom side of the rocker box with alcohol and a lint free rag before you place the lower rocker box on the cylinder head.
Once clean place the proper gasket on the cylinder head making sure that the gasket is orientated properly over the breather chanel in the cylinder head.
Make sure the gasket is straight and place the lower rocker box on the head.
Last edited by hollywoodultra; 02-28-2009 at 11:26 AM.
#7
02-27-2009, 06:46 PM
Road Master
Trending Topics
#8
02-27-2009, 08:00 PM
Road Master
#9
02-27-2009, 08:02 PM
Road Master
 Been there


