
95" Engine Build Project Pics
#11
 02-27-2009, 09:10 PM


Stellar HDF Member
Slick trick on my old shovel but not on TC as wrist pin is too close to the oil ring groove. And yes those CP piston clips are a bugger and the HQ heads are sure pretty.
#12
02-27-2009, 09:13 PM

Road Master
Join Date: May 2007
Location: North Central Arkansas
Posts: 938
Likes: 0
Received 0 Likes
on
0 Posts

#14
02-27-2009, 09:27 PM

Elite HDF Member

#15
02-27-2009, 09:32 PM
Road Master
Motor was built for horsepower not torque. I could have ran torque cones but I loved my Triple Step Headers. I just wanted the numbers not a tune. Bike ran very well had plenty of torque for my setup.

#17
02-28-2009, 12:22 PM

Join Date: Apr 2008
Location: Minnesota
Posts: 280
Likes: 0
Received 0 Likes
on
0 Posts
Up to this point you have the rocker box base installed the gasket is lined up below the rocker base. Take the bolts for the rocker base, place some blue loctite on them and install them in the corresponding holes, use the HD SM for the sequence and torque specs. (You should have the treads of the bolts clean and free from any old loctite before inserting them)
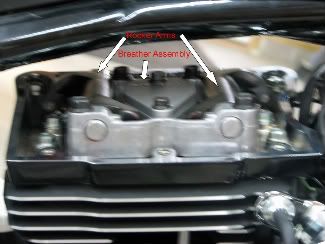
Now that the rocker base is toruqed down you need to install the rocker assembly along with the breather assembly. Place some assembly lube on the rocker tips, valve tips, and the pockets of the rocker arms where the push rod fits in. It is a little tight on the rear cylinder b/c the frame is in the way. You will have to do a little jockying to get it in there but you will figure out how to place it in there with no troubles. Place blue loctite on the bolts and torque them in sequence according to the SM.
Sorry for the poor pic quality here I must have set the camera up wrong, but you get the idea.
Next we need to put the rocker cover on the rocker box base, once again clean the top of the rocker base gasket area with alcohol as well as the rocker cover gasket surface.
Place the rocker cover gasket onto the rocker box base set the rocker cover onto the gasket, line the gasket up with the bolt holes. Place some blue loctite on the rocker cover bolts and install them finger tight to hold the cover in place. The bolts are different lengths make sure they are in the right hole.
To torque the rocker covers you will need a torque adapter due to the lack of space. Take the time to torque them to proper spec dont guess here. Follow the torqe spec and sequence in the SM.
Repeat the above steps to do the front cylinder, and you now have the top end built. The front cylinder will be a lot easier b/c there is more room to work. I did the rear first b/c I like to do the hard part first and save the easy work for last, you may choose to do the front first either way the end result is the same.

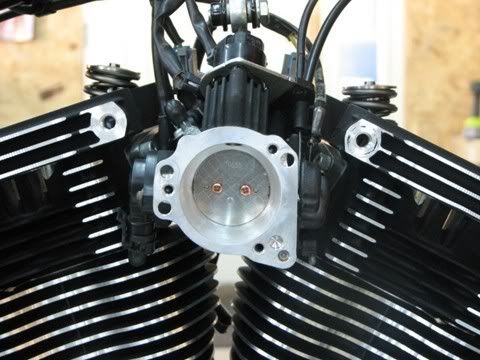
So the top end is put back together, you now need to install the trottle body/carb. Place new gaskets on the tb and line up the mounting brackets with the bolt holes in the head. I wont go into much detail here b/c it is straight forward and the SM explains it well.
You will notice the pic below is a little out of sequence. I was waiting for top end parts to arrive so I insalled the tb before the rocker boxes. Either way you choose to do it is fine.
I will not go into the installation of the cams and pushrods, there is already a very good write up with pics on this process here:
https://www.hdforums.com.au/Default....ics&forumid=24
I hope that this helps anyone that is thinking of doing a build like this in the future. If not I hope you enjoyed the pics.
This is what I used for engine components:
HQ Pistons
HQ Titanium Valve springs
HQ Valves
HQ Black OPS Lifters
S&S Quick Adjust Pushrods
Andrews 54N cams
07 and later cam plate and oil pump (roller chain conversion) my bike is a 06 Ultra
Crane Roller Rocker arms
Stock TB smoothed and cleaned internally
SE High flow injectors
My heads were ported locally from a trusted head porter
Kuryakyn Hi-Five Air Cleaner
I will post the numbers that I get once the weather gets nice and I can put some miles on the bike.
If you have questions feel free to ask or send me a PM.
Now that the rocker base is toruqed down you need to install the rocker assembly along with the breather assembly. Place some assembly lube on the rocker tips, valve tips, and the pockets of the rocker arms where the push rod fits in. It is a little tight on the rear cylinder b/c the frame is in the way. You will have to do a little jockying to get it in there but you will figure out how to place it in there with no troubles. Place blue loctite on the bolts and torque them in sequence according to the SM.
Sorry for the poor pic quality here I must have set the camera up wrong, but you get the idea.
Next we need to put the rocker cover on the rocker box base, once again clean the top of the rocker base gasket area with alcohol as well as the rocker cover gasket surface.
Place the rocker cover gasket onto the rocker box base set the rocker cover onto the gasket, line the gasket up with the bolt holes. Place some blue loctite on the rocker cover bolts and install them finger tight to hold the cover in place. The bolts are different lengths make sure they are in the right hole.
To torque the rocker covers you will need a torque adapter due to the lack of space. Take the time to torque them to proper spec dont guess here. Follow the torqe spec and sequence in the SM.
Repeat the above steps to do the front cylinder, and you now have the top end built. The front cylinder will be a lot easier b/c there is more room to work. I did the rear first b/c I like to do the hard part first and save the easy work for last, you may choose to do the front first either way the end result is the same.
So the top end is put back together, you now need to install the trottle body/carb. Place new gaskets on the tb and line up the mounting brackets with the bolt holes in the head. I wont go into much detail here b/c it is straight forward and the SM explains it well.
You will notice the pic below is a little out of sequence. I was waiting for top end parts to arrive so I insalled the tb before the rocker boxes. Either way you choose to do it is fine.
I will not go into the installation of the cams and pushrods, there is already a very good write up with pics on this process here:
https://www.hdforums.com.au/Default....ics&forumid=24
I hope that this helps anyone that is thinking of doing a build like this in the future. If not I hope you enjoyed the pics.
This is what I used for engine components:
HQ Pistons
HQ Titanium Valve springs
HQ Valves
HQ Black OPS Lifters
S&S Quick Adjust Pushrods
Andrews 54N cams
07 and later cam plate and oil pump (roller chain conversion) my bike is a 06 Ultra
Crane Roller Rocker arms
Stock TB smoothed and cleaned internally
SE High flow injectors
My heads were ported locally from a trusted head porter
Kuryakyn Hi-Five Air Cleaner
I will post the numbers that I get once the weather gets nice and I can put some miles on the bike.
If you have questions feel free to ask or send me a PM.
#20
02-28-2009, 08:23 PM

Luke,
Nice job on the write-up and your pics showed one thing that is absulutely essential when doing any kind of build - cleanliness !
Hope it it turns out to be a fun ride !