
"DIY MODS" and TRICKS to SAVE $$$$$$
#1351
 08-20-2013 | 01:36 PM
Extreme HDF Member
Joined: Jun 2011
Posts: 14,731
Likes: 2,530
From: Mountain Top, Alabama
Only connect 12 volt remotes to the 12 volt system.
There are means to step down the voltage, however, if you are so inclined.
Replacement remotes in 12 volts are out there...
#1352
08-21-2013 | 06:57 PM
Extreme HDF Member
Joined: Nov 2007
Posts: 14,673
Likes: 138
From: East of the Sun, West of the Moon
#1353
08-23-2013 | 10:21 PM
Road Warrior
Joined: May 2006
Posts: 1,535
Likes: 42
From: Bossier City, LA
#1354
08-30-2013 | 09:08 AM

Intermediate
Joined: Aug 2012
Posts: 44
Likes: 2
From: Northern Virginia
Brilliant!!! Thanks!
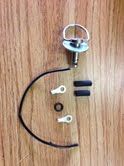
If you're tired of fishing around the bottom of you bags or trying to remember where you put the pins and washers when you removed them, try making a few sets of these fastener keepers. It's an inexpensive way to keep the pins and washers close at hand. I had a lot of the stuff lying around so it didn't cost me much more than some time to make these. My best estimate is that this would cost less than $10 if you had to buy everything.
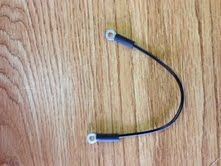
Here is the finished and installed product.
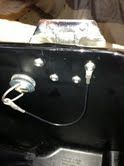
They are pretty simple to make.
I used some black 16ga stranded wire, some 14/16ga ring terminals with the plastic insulation removed, some 1/4" O-rings and some black heat shrink tubing. I used 6" of wire for each keeper but you can choose the size that works best for you.
First I cut the wire to size - no need to strip the insulation off the wire - and slid the wire (insulation and all) into the terminal. Once in the terminal I crimped it.
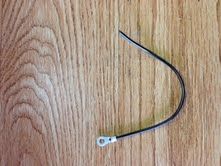
I then slid the piece of heat-shrink tubing over the wire and on to the terminal end.
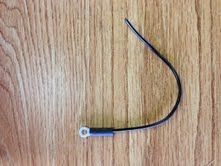
I slid the second piece of heat-shrink tubing onto the wire and crimped on the other terminal. I slid the second piece of heat-shrink tubing onto the other terminal as before. I was careful to make sure that the terminals both faced the same way as this allows for the wire to lay flat while connected and it looks better too.
I repeated this process four times so that I had a keeper for each of the fasteners.
Then, using my heat gun, I shrunk the heat-shrink tubing.

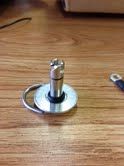
Then I took the 1/4" O-Ring and slid it onto the pin.
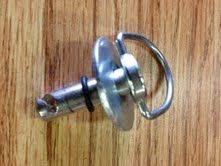
I made sure that I pushed it all the way down so it kept the fender washer in place.
With a pair of needle nose pliers, I popped one side of the ring on the end of the pin out of its hole so I could insert one end of the terminal keeper onto it.
I slid the terminal on so it looked like this
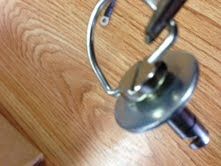
Using the proper torx bit, I loosened one of the screws holding on the bag latch. I found that using the one furthest away from the pin allows the six inches of wire to lay in a nice arc.
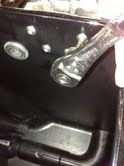
I placed the other terminal under the screw and tightened it to factory specs and repeated it three more times and I was done!
I've learned a lot from this forum and thought I would give back by sharing this. Happy to answer any questions.
Here is the finished and installed product.

They are pretty simple to make.
I used some black 16ga stranded wire, some 14/16ga ring terminals with the plastic insulation removed, some 1/4" O-rings and some black heat shrink tubing. I used 6" of wire for each keeper but you can choose the size that works best for you.

First I cut the wire to size - no need to strip the insulation off the wire - and slid the wire (insulation and all) into the terminal. Once in the terminal I crimped it.

I then slid the piece of heat-shrink tubing over the wire and on to the terminal end.

I slid the second piece of heat-shrink tubing onto the wire and crimped on the other terminal. I slid the second piece of heat-shrink tubing onto the other terminal as before. I was careful to make sure that the terminals both faced the same way as this allows for the wire to lay flat while connected and it looks better too.

I repeated this process four times so that I had a keeper for each of the fasteners.
Then, using my heat gun, I shrunk the heat-shrink tubing.

Then I took the 1/4" O-Ring and slid it onto the pin.

I made sure that I pushed it all the way down so it kept the fender washer in place.

With a pair of needle nose pliers, I popped one side of the ring on the end of the pin out of its hole so I could insert one end of the terminal keeper onto it.

I slid the terminal on so it looked like this

Using the proper torx bit, I loosened one of the screws holding on the bag latch. I found that using the one furthest away from the pin allows the six inches of wire to lay in a nice arc.

I placed the other terminal under the screw and tightened it to factory specs
I've learned a lot from this forum and thought I would give back by sharing this. Happy to answer any questions.
#1356
08-30-2013 | 11:50 AM
Cruiser
Joined: May 2013
Posts: 218
Likes: 4
From: Central FL
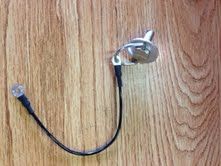
I bought the Top Shelf organizer tray for the tourpak, and I really wanted the 12v port that goes with it, but I wasn't willing to spend an additional $40. I found something on amazon that (for me at least) cost less than $20 and did exactly what I wanted:

5v/2.1a usb charger that connects direct to 12v. All I had to do was make a quick disconnect harness for it so I can unplug it when I take the tourpak off.
I tapped into my accessory harness that I made when I installed the sat radio and phone charger in the batwing. I even learned a new soldering technique to boot.

Got everything installed kind of temporary-like, since I'm getting the full pak liner here in a little bit.

Charges the iPad!

I also installed a battery tender harness so I could use my charger again.

5v/2.1a usb charger that connects direct to 12v. All I had to do was make a quick disconnect harness for it so I can unplug it when I take the tourpak off.
I tapped into my accessory harness that I made when I installed the sat radio and phone charger in the batwing. I even learned a new soldering technique to boot.
Got everything installed kind of temporary-like, since I'm getting the full pak liner here in a little bit.
Charges the iPad!
I also installed a battery tender harness so I could use my charger again.
#1357
09-01-2013 | 02:46 PM

Extreme HDF Member
Joined: Sep 2010
Posts: 14,744
Likes: 398
From: Phoenix '53, '88, '09 Big Twins

#1358
09-01-2013 | 03:07 PM
Tourer
Joined: Jun 2012
Posts: 404
Likes: 0
From: Piedmont NC
Are your passing lamps still able to be controlled by the switch?
#1359
09-09-2013 | 03:01 PM

6th Gear
Joined: Aug 2013
Posts: 14
Likes: 0
From: Slippery Rock PA
I bought a new Road Glide Ultra 2013, and when adding air to my rear shocks I've noticed that you have to remove the left saddle bag.... well because the rear shocks do leak.
I purchased a new HD flexible valve extension and bent my valve bracket slightly upward, and attached the valve extension to the shock valve and used black wire ties to affix the flexible extension to the rear comms socket and harness. It stays hidden and I no longer have to remove my saddle bag to add air to my rear shocks!
Valve Stem Extension-42300009
Part Number 42300009
$10.95
#1360
09-10-2013 | 07:06 AM

6th Gear
Joined: Mar 2013
Posts: 13
Likes: 0
From: New York
I bought a new Road Glide Ultra 2013, and when adding air to my rear shocks I've noticed that you have to remove the left saddle bag.... well because the rear shocks do leak.
I purchased a new HD flexible valve extension and bent my valve bracket slightly upward, and attached the valve extension to the shock valve and used black wire ties to affix the flexible extension to the rear comms socket and harness. It stays hidden and I no longer have to remove my saddle bag to add air to my rear shocks!
Valve Stem Extension-42300009
Part Number 42300009
$10.95
I purchased a new HD flexible valve extension and bent my valve bracket slightly upward, and attached the valve extension to the shock valve and used black wire ties to affix the flexible extension to the rear comms socket and harness. It stays hidden and I no longer have to remove my saddle bag to add air to my rear shocks!
Valve Stem Extension-42300009
Part Number 42300009
$10.95