
Kuryakyn curved license plate frame
#11
 11-16-2007, 09:30 AM


Outstanding HDF Member
Join Date: Jan 2007
Location: Tucson AZ
Posts: 2,578
Likes: 0
Received 0 Likes
on
0 Posts

#12
02-01-2008, 12:06 PM
#13
02-01-2008, 12:23 PM

Tourer
Join Date: Nov 2007
Location:
Posts: 371
Likes: 0
Received 0 Likes
on
0 Posts
#15
02-01-2008, 12:48 PM
Tourer
Join Date: Nov 2007
Location:
Posts: 371
Likes: 0
Received 0 Likes
on
0 Posts

#17
02-01-2008, 02:14 PM

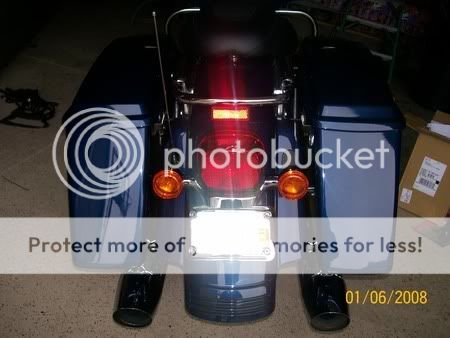
Thanks to those of you who've provided the guidance to go through the tail lightas opposed to the fenderup from behind the tire!
A few things to add here from a (very) amatuer wrench-turner (all of this is common sense, but I don't commonly use much sense when it comes to these kind of things...)
First, I highly recommend covering the rear fender with a towel or something that will guard against anything (like the stock license plate, falling screws, sockets, wratchet-wrench, parts, etc.) - I created a hair-line scratch from the old plate.
Second, when you're removing the wiring harnesses from the tail light assembly, keep in mind that each wiring harness has some kind of clip or "lock" of some sort which holds each wiring harness in place. Do not just pull each one out with pliers. This may seem obvious, but Harley puts a gel like substance around/on each harness and its a bit hard to see where each "lock" or clip is on each wiring harness. On the two inner clips, there is a push button on the top/back of the wiring harness clip that needs to be depressed before the wiring harness will release... Pulling the harness without depressing these will damage the harness.
Third, when you're inserting the wratchet wrench through the tail light hole, use caution as you're cranking the light bar bolts, Its very, very easy to slip off the bolt and potentially damage/chip paint, etc. off the tail light hole. This is pretty forgiving as the lense and trim assembly will cover up the effected area.
Fourth (regarding the Kury frame itself). You'll likely notice that the holes in the frame don't align with the holes on the license plate, in addition, the plate itself may be just a bit too large to fit into the frame. Clipping snips works just fine for trimming the license plate, then simplydrill through the Kury frame screw holes.
And finally, (this conventional knowledge brought to you by AKEA), don't tighten each light bar bolt until both are well threaded. Tightening one makes the other far more difficult to align and tighten.
All you pros are rolling your eyes at this post... But considering how many guys took as much, if not more time than I to install, perhaps there is value for the next guy who takes this project on...
For what its worth, this is a good warm-up to more complex (but harmless) things you can do to your bike without ending up in the emergency room or the dealer for "DIY gone bad" projects...
Total time from start to finish - about 1 hour 30 minutes...
#18
02-01-2008, 04:39 PM
Road Captain
Join Date: Jul 2007
Location: LexVegas, KY...home of fast wimmen & beautiful horses
Posts: 548
Likes: 0
Received 0 Likes
on
0 Posts

Thread
Thread Starter
Forum
Replies
Last Post
avneeshj
Sportster Models
4
09-08-2013 01:32 AM