
temp and oil install in fairing
#1
 10-02-2007, 02:28 PM


Join Date: Dec 2006
Location: Michigan
Posts: 975
Likes: 0
Received 0 Likes
on
0 Posts
yeah i know the temp is a P.O.S but they came together and it fills the blank in my fairing.
Ok - heres the problem
I have a FLHTPI cop bike . I open the fairing and install the gauges realize that the police electrical does not look like what the directions are telling me in the fairing. I am also missing the plugs or units that plug into the back of the gauge itself before it goes to the wires. Am I missing a harness?
has anyone with a police EG done this to fill in the blanks on the fairing? where can i get the gauge backside plugs that turn the pins from the gauge to wires to be connected in a harness?
I currently have a send unit for the oil already in the pan and comes up to the fairing (i assume to turn on the oil temp light on dash). Does it need to be replaced with the new send unit ? they look the same and have the same wires color too.
Have i bit off more then i can chew?
should i get a police suppliment for this ? will it show what wires are used etc?
or
just pop these out and put in little speakers and be done with it?
#2
10-02-2007, 04:09 PM
Road Master
#3
10-02-2007, 04:27 PM
Road Master
Join Date: Aug 2005
Location: Alleghany Co., NC and SW Florida
Posts: 765
Likes: 0
Received 0 Likes
on
0 Posts
The oil pressure gauge takes a different sending unit than just the light. The correct sending unit, while it is installed instead of the unit for the light, handles both the light and the gauge with one unit. It costs in the thirties of dollars.
The air temp. gauge only needs a ground connection, a hot wire and a hook up to the sending unit. When you replace the air temp gauge with an oil temp gauge in a bike that comes with the air gauge std. you just splice into the existing wires that were for the air gauge. Shouldn't be a big deal to run these from either the fuse block (using the existing harness as a routing guide or another power point (this gauge doesn't take much elec.)
If you were expecting plug and play, most Harley adds won't just plug in BUT the system itself is pretty simple to use.
EZ
#4
10-02-2007, 04:53 PM
Extreme HDF Member
Smitty: [Edit: depending on the year of your bike, the main wiring harness has the wire for theoil pressure gauge in a connector (Connector 2A) in the upper left of your fairing as you face the bike to work on it. You don't need another sending unit. The wire you need to find, explained below, is brown with a green stripe. You can also see this wire at the oil pressure sending unit at the front, bottom rightof the engine.]
I have an '04 FLHTPI and have installed the HD oil pressure and oil temp gauges.
The oil temp sending unit wire that you need to connect to the oil pressure gauge is brown w/green stripe (GN/BN in HD wiring diagram useage). You can either splice this wire as it enters the 12-place Deutsch connector (connector 2B on HD wiring diagram)located in the uppper left as you face the fairing to work on the bike. Or you can do what I eventually did and go to the male side of this connection (Connector 2B), remove the seal pin since the slot you need is blank, attach a Deutschpin to the wire (going to the gauge)and install the pin in the connector so that it connects to the brown/green wire in the mating connector. On a HD wiring diagram this is Connector 2A, slot 8.
Your cop bike, like mine, does not have the wiring harness for the gauge bulb or gauge. The former is a two place wire connector (power and ground); the latter is a three place wire connector (power, ground, gauge). You can buy these at the HD store using their parts book for the part numbers. They are the same connectors that are used on the fuel and volt meter gauges. You will also need thespade/terminal connectors that are usedto insert the wires into the connectors.
If you aren't going to doany electrical work on your bike, you probably don't need the police model supplement. If you will do electrical work (e.g. handlebar controls of a stereo headunit, cruise control, etc.)or work that requires electrical information (e.g.changing levers, switch housings, etc.) then you should buy the supplement. They often show-up on Ebay at good prices.
The installationof the oil pressure gauge and associated wiring is simple to finish. After you have wired the connector or spliced the brown green wire, insert this in the correct chamber of the threewire connector, splice power and ground for the bulb (two-wire connector) and gauge (the remaining two chambers of the three-wire connector) and you are good to go.
I did the same installation of an oil pressure gauge on a buddy's '06 TPI a couple of months ago.His wiring was the same as my '04. If you have an '07 or '08, your bike will likely have the same wiring colors, but it may have Molex connectors instead of Deutsch connectors.
I installed the HD spun aluminum gauges when I had the inner fairing painted and installed the oil temp gauge where the volt meter used to be and moved the volt meter to where the air temp gauge would go.
#5
10-03-2007, 08:45 AM
Join Date: Dec 2006
Location: Michigan
Posts: 975
Likes: 0
Received 0 Likes
on
0 Posts
#6
10-03-2007, 09:26 AM
Join Date: Dec 2006
Location: Michigan
Posts: 975
Likes: 0
Received 0 Likes
on
0 Posts
#7
10-03-2007, 10:33 AM

Road Warrior
The Pingman helped us get the 06 Cop Glide upgraded with both the Oil Temperature and Oil Pressure gauges.
We swapped them around so tha both of the oil related gauges are on the left side of the failring.
Not real issues, just take your time, and yes, we would suggest getting the Polcie Supplement Service manual
Good Luck
We swapped them around so tha both of the oil related gauges are on the left side of the failring.
Not real issues, just take your time, and yes, we would suggest getting the Polcie Supplement Service manual
Good Luck
Trending Topics
#8
10-03-2007, 01:47 PM
Extreme HDF Member
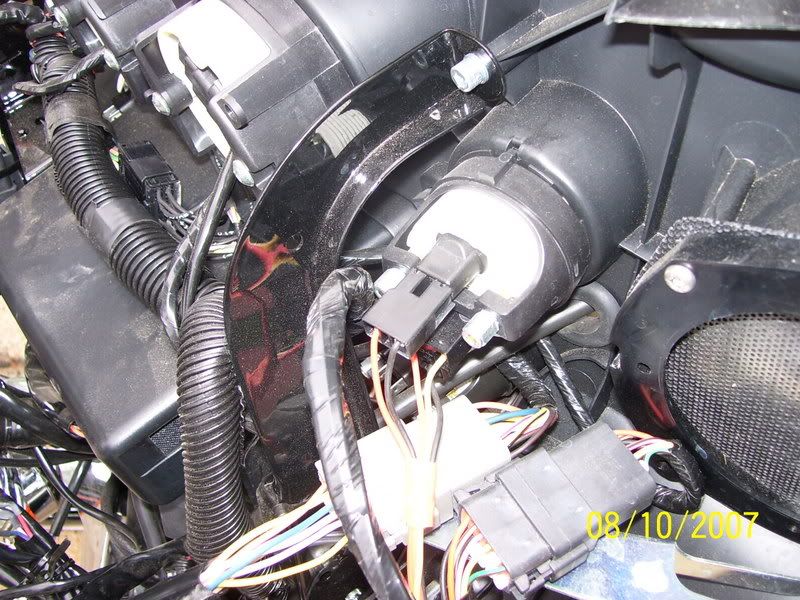
In your second picture, the back of the volt meter gauge is shown. It has two connectors; the one on top is for the gauge bulb and is a two wire connector. Below it on the back of the gauge is a three wire connector: you need both connectors. Also, inside the connectors are metal tabs that attach to the wires and secure the wire into the gauge and slip over the spade terminals on the gauge. You will need five of these along with the two black plastic connectors.
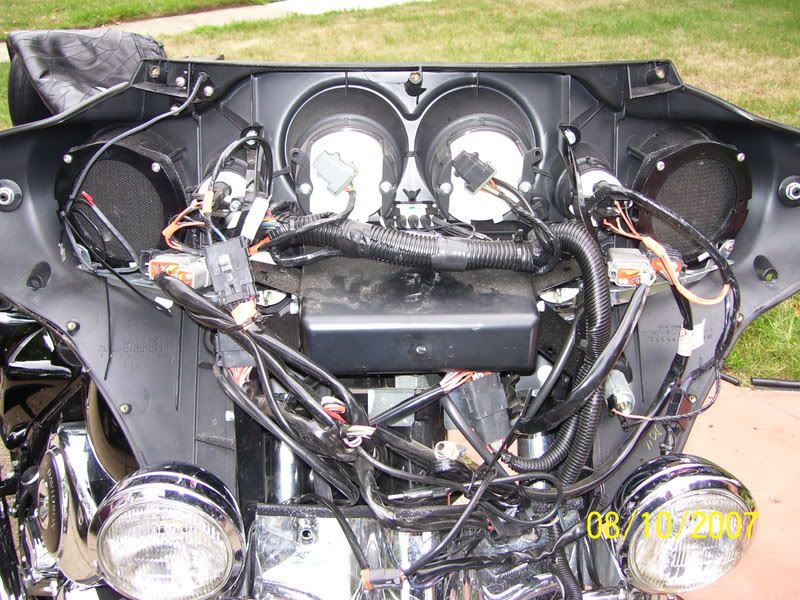
The brown/green oil pressure wire is located in the twelve place, gray Deutsch connector shown in your first picture at the far left near the speaker opening.
The brown/green oil pressure wire is located in the twelve place, gray Deutsch connector shown in your first picture at the far left near the speaker opening.
#9
10-03-2007, 01:58 PM
Join Date: Dec 2006
Location: Michigan
Posts: 975
Likes: 0
Received 0 Likes
on
0 Posts

#10
10-03-2007, 02:46 PM
Extreme HDF Member
Smitty: You're welcome. If you find a website with HD part pics and part numbers, let us know.
Typically, I go to the parts counter and ask for the parts book and look up what I need; learned the hard way that the parts folksusually know very little, and often much less than I do.
If you intend to install a wire inthe Deutsch connector for the oil pressure gauge, you can find the Deutsch website; it explains how to dissassemble the connector to install the wire. The HD parts book will tell you what Deutsch pin to use.
If you have the HD service manual, its appendix explains the various connectors, how to assemble/dissassemble, etc.
Also, the various Deutsch, AMP, etc.sockets and pinsHD uses require careful crimping to fit in the connectors and lock inside the connector. When I did a lot of crimping to install the Base Audio Connector so that I could have handlebar controls of the stereo headunit, I learned that the Snap-On tool HD recommends cost $320. OUCH!!!
Found a very useful special crimping tool to do the work at Fry's Electronics: Philmore WS-26 for $7.99. You can find them on the web. J&P sells the same tool (judging from the pic in their catalog) for ~$25.