
making the Harbor Freight high position motorcycle lift fit a sporty
#1
 09-01-2012, 06:48 PM


Join Date: Jul 2011
Location: Frozelandia, Minnysota
Posts: 27,076
Received 4,632 Likes
on
2,735 Posts
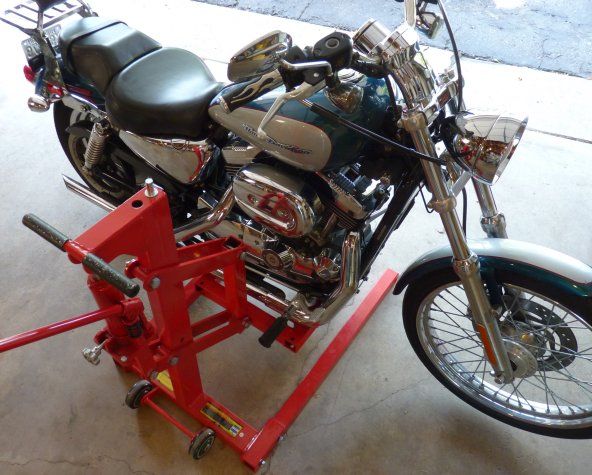
There are enough threads about jacks to know a lot of folks have issues trying to jack a sportster. Putting a wood block under the frame sounds pretty shaky, and if you weld something solid, the jack probably can't be used for anything else. I thought the Harbor Freight high position motorcycle lift looked like a good deal (went to a store to see it first), but it's just too wide for a sporty. The kickstand stop is in exactly the worst spot for that jack, for both solid and rubber mount engines (used an '00 883XL and an '04 1200 Custom for the pics). I got the jack anyway, and made a mod for it that works very well, and isn't permanent so the jack can be used for a larger Harley, too.
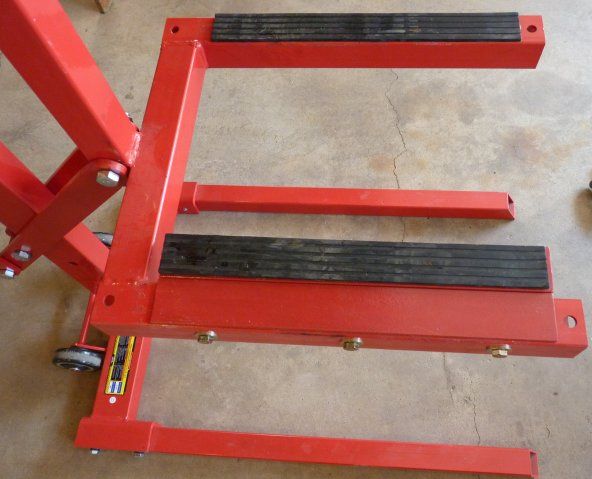
Here's a pic of the jack with the modification - 2 pieces of 2" angle iron bolted to one pickup arm of the jack:
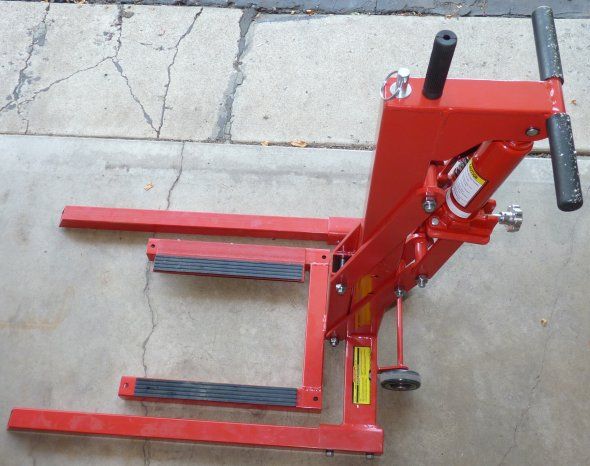
The reason for the extra angle iron is because with the rear arm against that kickstand stop, the front arm catches the frame on the forward curve - on a solid mount engine. On a rubber mount (Custom model at least), it misses the front frame altogether so you have to catch the frame behind the stop, and then it still catches the front of the frame on the curve; that doesn't give much contact surface on the frame, so I worry about slippage or denting the tubes. That extra piece of angle iron lets both bikes sit solid on flat frame sections.
I'll go through the mod step at a time with pictures; I know trying to just write about it might just sound confusing. And if you paint it, try to get something quick drying; mine was tacky for 5 days.
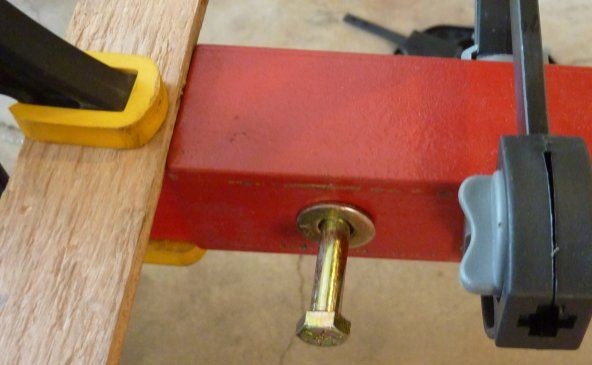
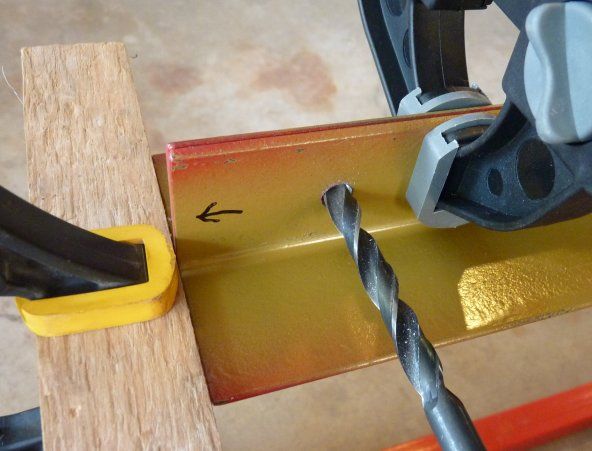
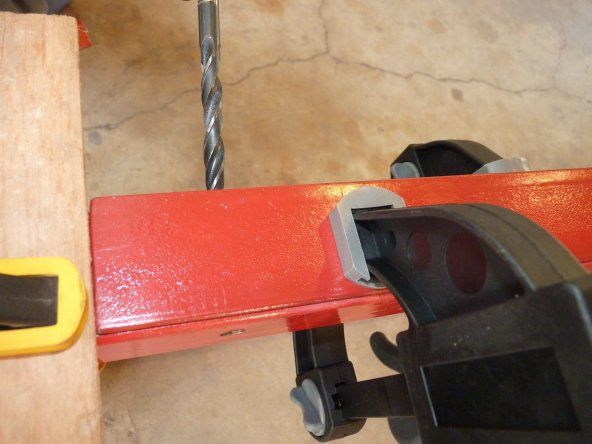
First, cut the angle iron to length (I used 16" so it wouldn't cover the tie down hole), mark one end for front (you don't want to get them mixed up, holes could be all wrong), and clamp one on the jack lifting arm. I used three 3/8 number 8 bolts; just two 1/4" might work, but my philosophy is stronger than necessary is far better than not strong enough, and I'm not an engineer. I centered one hole, and drilled the others 2" from the ends. I drilled just enough with the 3/8 drill bit to mark the center, then drilled through with a 3/16, then finished up with the 3/8 - the 3/8 by itself wouldn't cut very fast. These pictures are after I'd finished and used the jack, by the way, took it apart again for the pictures.
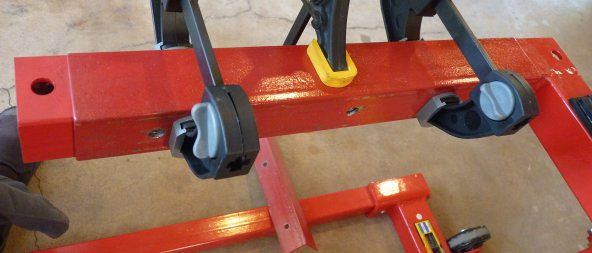
With the first piece drilled, clamp an alignment stop.
Then lay both pieces upside down, back to back as they will be when bolted, and drill the second piece using the first as a pattern.
Here's where you really need that alignment stop. Put the second piece on the outside (undrilled) of the arm, clamp it down, and use it for a pattern to get the holes lined up right on the other side of the lifting arm.
Finished and bolted on, looks like this. I peeled the rubber scuff pads off, and just lay them in place when using the jack. With this arm extended this way, the jack can be used from the right side. For the left side of the bike, move the extension to the other lifting arm. Drill it using the same method (I haven't yet, but will need to). You could even drill another set of angle iron, but since you can't use both at the same time, don't see any reason for it. Maybe on a different kind of bike. You could probably use just one piece of angle iron, and not have one overlapping the lifting arm, but since I had enough angle iron, thought this would be even stronger.
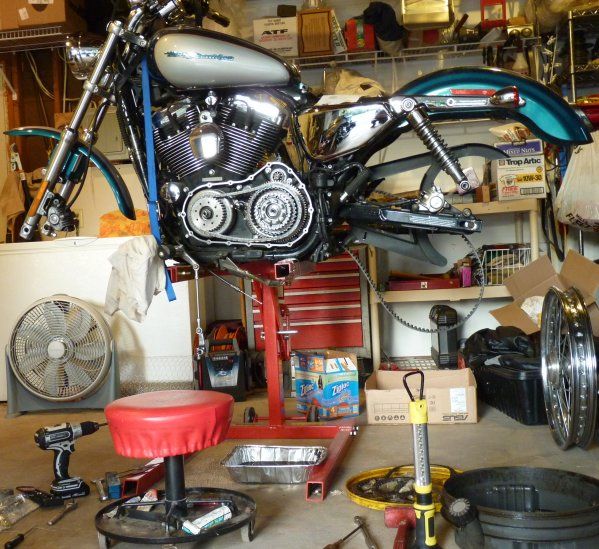
So what's it look like on the bike? Here's the 883 lifted. You can hopefully make out the kickstand stop (rubber pulled off for more clearance) just behind the rear lifting arm; that's the big obstruction to lifting this bike with the unmodified jack. You can see the tie downs on the ends of the lifting arms I left unobstructed - that's a neat feature, once tightened you can lift or lower the bike without the straps getting loose or tighter, like the ones that tie onto the base do. If the lifting arm on this bike was behind the stop, a bracket on the right side of the frame would tilt the bike. A note about this bike: the exhaust is off (for other work, not just the jack). The jack (any jack?) won't fit under the exhaust without some kind of riser on the jack arm. In the future I'll - take the exhaust off if need be, it isn't that hard. Or maybe when I'm feeling bored, make some adapters, but they'd have to be bolt on, don't want anything that could tip in the jacking process. No short sections of 2x4...
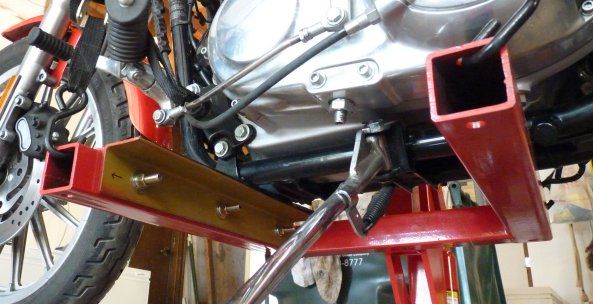
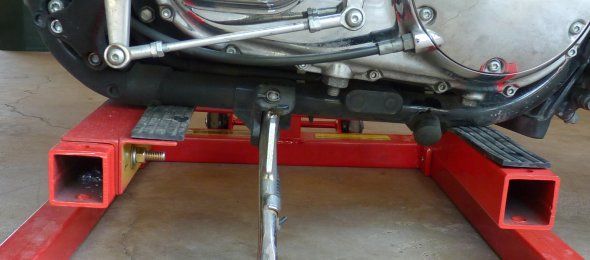
Here you can see why I wanted the extension; the frame curves up where the lifting arm by itself would grab it. This way, the engine mount sits nice and flat on the extension, no danger of slipping or denting the frame.
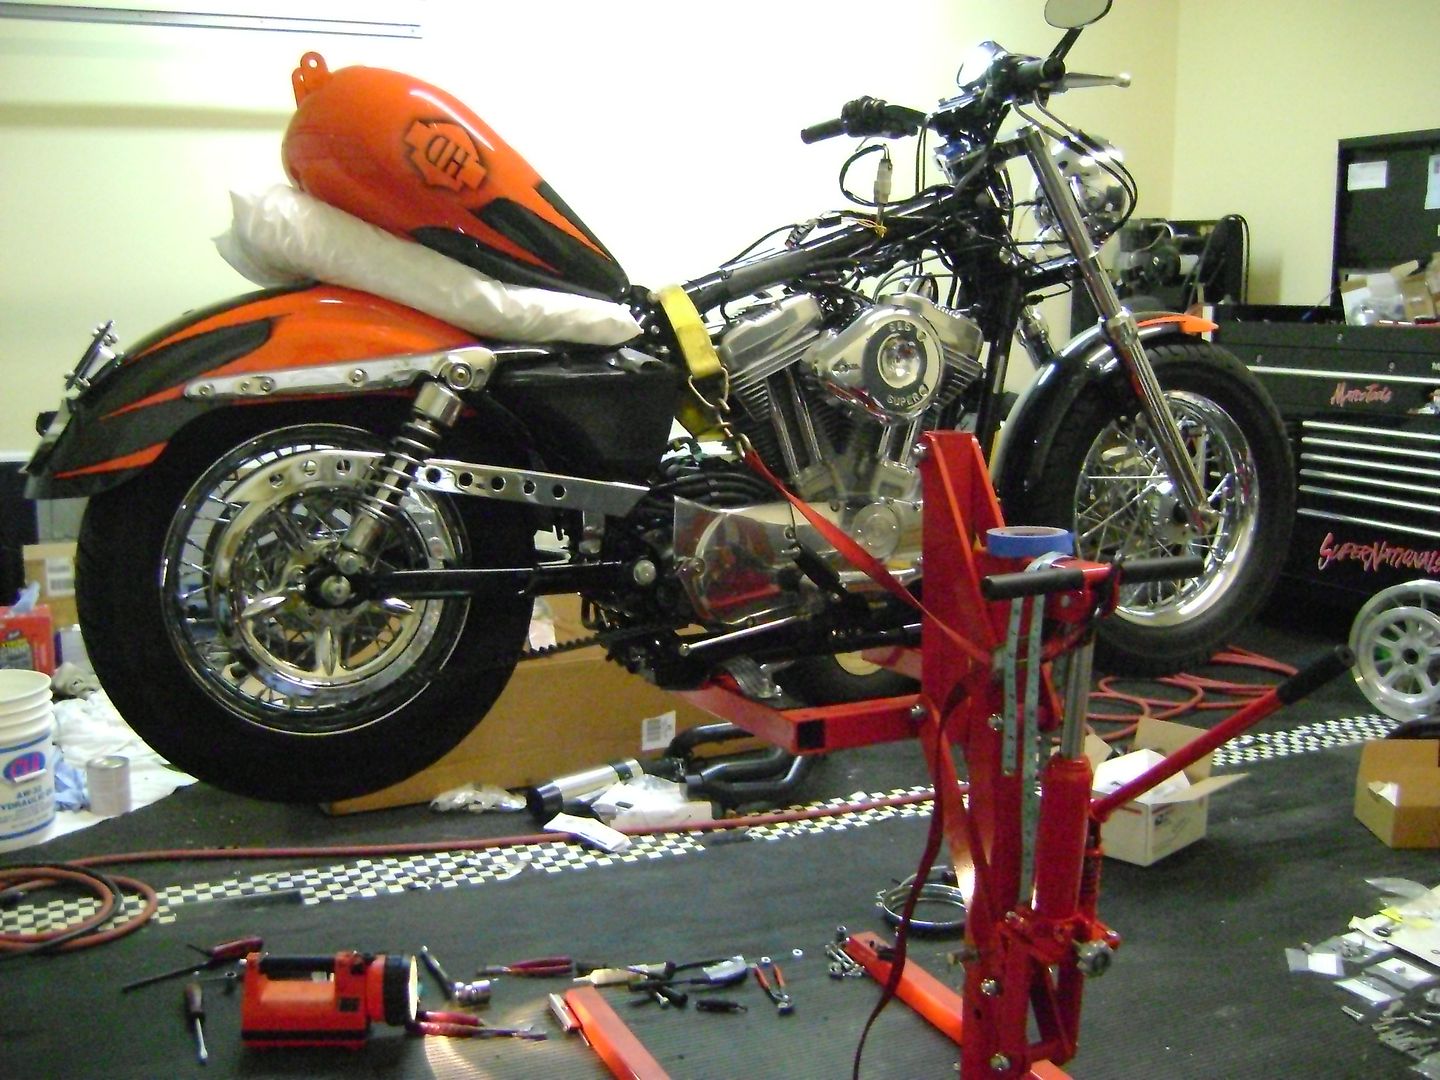
Here's the jack side view of the 1200 lifted. Another thing I like about this jack is being able to straddle it for the last few inches down, and being able to easily reach the release ****. you can creep this jack down without lurching and bouncing around. The arms on this jack extend out as they rise till about the halfway point on the lift. That means you have to start with the jack back from the bike or it'll hit the side cover or air cleaner as the bike starts to come up. It's obvious, just requires moving the jack a lot till you get used to it.
The 1200 sitting on the arms - the kickstand stop is just in front of the rear arm this time:
Issues with the 1200:
The jack has to go behind the kickstand stop; not all models are in the same place.
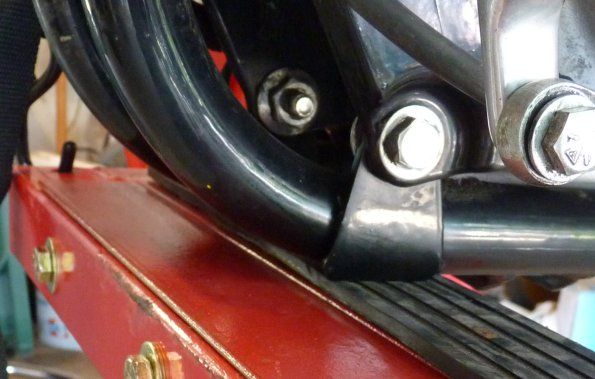
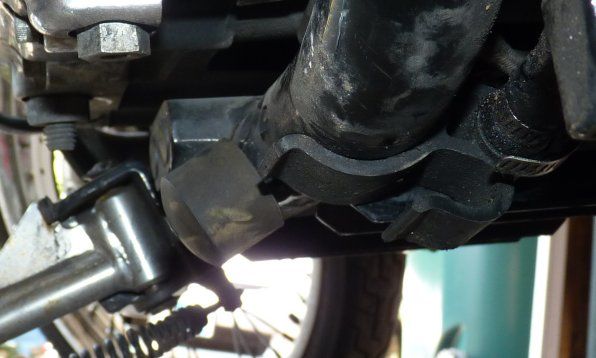
At the rear, there's a bracket across the frame tubes you need to miss; the bike will be very wobbly if you lift on this bracket, it just isn't wide enough for that. It's just behind the kickstand stop in this picture. And yes, I'm aware this bike would like a good cleaning. It did a 400+ mile trip last week, pretty bug splattered, too.

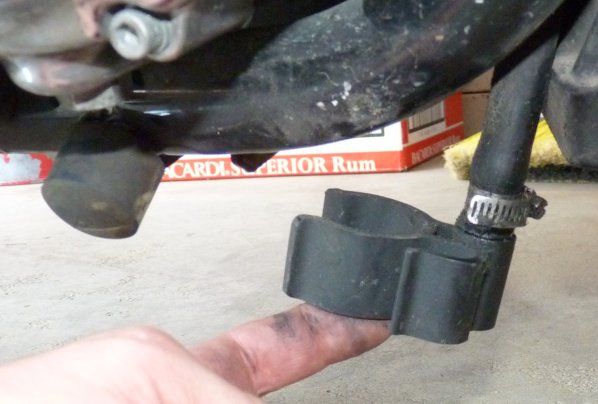
Also, this clamp needs to be pulled out of the way - it pulls off and pushes on easily.
How high is a high position lift? Kind of scares me... But you can see how I can sit on a stool and change clutch plates without bending.
There are a lot of different model sportsters, so you'd want to carefully check obstructions on any of them, but unmodified, I wouldn't want to use this jack on most (any?) of them. The only tools you need to make this is something to cut the angle iron, if you don't get it in 16" lengths, some clamps, and a drill. Warning about the drill: you need to drill slow to avoid ruining the temper on the drill bit and dulling it right away. At long slow drilling speeds the drill will get hot; when you feel it getting warm, pull it out and run at max speed (shift to high range on a 2 speed drill) to cool it off. Feel the battery on a rechargeable - you can burn up a lithium battery, let it cool down if it gets hot.
I wouldn't be surprised if someone sees a better way to do this; feel free to criticize or suggest, I realize I'm not an expert. Also, I'm not saying this is a perfect jack; it's adequate for my uses so far, but does have some areas I'm not entirely comfortable with. It's probably fine for the sporties, but I think I'd want to weld some more metal where that lifting arm attaches to the scissors link before putting a 900 lb bagger on it. Might do it one of these days anyway. The links and bolts that come with it seem plenty beefy. It would really be nice to be able to move it with a bike lifted, but you can't. More like a table in that respect, and a little bit of a pain to position under the bike. To move it on the wheels, tilt it back, but that puts the support legs in the air, so you have to just slide it across the floor to get it under a bike. More of a nuisance than a problem. Once the bike is in the air, it's fine. You can make the jack sway a fair amount in the air, but the sporty feels solid on the arms, and I wouldn't lift without tying it down anyway.
Just something to consider when you feel like you want to get that sporty in the air.
Here's a pic of the jack with the modification - 2 pieces of 2" angle iron bolted to one pickup arm of the jack:
The reason for the extra angle iron is because with the rear arm against that kickstand stop, the front arm catches the frame on the forward curve - on a solid mount engine. On a rubber mount (Custom model at least), it misses the front frame altogether so you have to catch the frame behind the stop, and then it still catches the front of the frame on the curve; that doesn't give much contact surface on the frame, so I worry about slippage or denting the tubes. That extra piece of angle iron lets both bikes sit solid on flat frame sections.
I'll go through the mod step at a time with pictures; I know trying to just write about it might just sound confusing. And if you paint it, try to get something quick drying; mine was tacky for 5 days.
First, cut the angle iron to length (I used 16" so it wouldn't cover the tie down hole), mark one end for front (you don't want to get them mixed up, holes could be all wrong), and clamp one on the jack lifting arm. I used three 3/8 number 8 bolts; just two 1/4" might work, but my philosophy is stronger than necessary is far better than not strong enough, and I'm not an engineer. I centered one hole, and drilled the others 2" from the ends. I drilled just enough with the 3/8 drill bit to mark the center, then drilled through with a 3/16, then finished up with the 3/8 - the 3/8 by itself wouldn't cut very fast. These pictures are after I'd finished and used the jack, by the way, took it apart again for the pictures.
With the first piece drilled, clamp an alignment stop.
Then lay both pieces upside down, back to back as they will be when bolted, and drill the second piece using the first as a pattern.
Here's where you really need that alignment stop. Put the second piece on the outside (undrilled) of the arm, clamp it down, and use it for a pattern to get the holes lined up right on the other side of the lifting arm.
Finished and bolted on, looks like this. I peeled the rubber scuff pads off, and just lay them in place when using the jack. With this arm extended this way, the jack can be used from the right side. For the left side of the bike, move the extension to the other lifting arm. Drill it using the same method (I haven't yet, but will need to). You could even drill another set of angle iron, but since you can't use both at the same time, don't see any reason for it. Maybe on a different kind of bike. You could probably use just one piece of angle iron, and not have one overlapping the lifting arm, but since I had enough angle iron, thought this would be even stronger.
So what's it look like on the bike? Here's the 883 lifted. You can hopefully make out the kickstand stop (rubber pulled off for more clearance) just behind the rear lifting arm; that's the big obstruction to lifting this bike with the unmodified jack. You can see the tie downs on the ends of the lifting arms I left unobstructed - that's a neat feature, once tightened you can lift or lower the bike without the straps getting loose or tighter, like the ones that tie onto the base do. If the lifting arm on this bike was behind the stop, a bracket on the right side of the frame would tilt the bike. A note about this bike: the exhaust is off (for other work, not just the jack). The jack (any jack?) won't fit under the exhaust without some kind of riser on the jack arm. In the future I'll - take the exhaust off if need be, it isn't that hard. Or maybe when I'm feeling bored, make some adapters, but they'd have to be bolt on, don't want anything that could tip in the jacking process. No short sections of 2x4...
Here you can see why I wanted the extension; the frame curves up where the lifting arm by itself would grab it. This way, the engine mount sits nice and flat on the extension, no danger of slipping or denting the frame.
Here's the jack side view of the 1200 lifted. Another thing I like about this jack is being able to straddle it for the last few inches down, and being able to easily reach the release ****. you can creep this jack down without lurching and bouncing around. The arms on this jack extend out as they rise till about the halfway point on the lift. That means you have to start with the jack back from the bike or it'll hit the side cover or air cleaner as the bike starts to come up. It's obvious, just requires moving the jack a lot till you get used to it.
The 1200 sitting on the arms - the kickstand stop is just in front of the rear arm this time:
Issues with the 1200:
The jack has to go behind the kickstand stop; not all models are in the same place.
At the rear, there's a bracket across the frame tubes you need to miss; the bike will be very wobbly if you lift on this bracket, it just isn't wide enough for that. It's just behind the kickstand stop in this picture. And yes, I'm aware this bike would like a good cleaning. It did a 400+ mile trip last week, pretty bug splattered, too.
Also, this clamp needs to be pulled out of the way - it pulls off and pushes on easily.
How high is a high position lift? Kind of scares me... But you can see how I can sit on a stool and change clutch plates without bending.

There are a lot of different model sportsters, so you'd want to carefully check obstructions on any of them, but unmodified, I wouldn't want to use this jack on most (any?) of them. The only tools you need to make this is something to cut the angle iron, if you don't get it in 16" lengths, some clamps, and a drill. Warning about the drill: you need to drill slow to avoid ruining the temper on the drill bit and dulling it right away. At long slow drilling speeds the drill will get hot; when you feel it getting warm, pull it out and run at max speed (shift to high range on a 2 speed drill) to cool it off. Feel the battery on a rechargeable - you can burn up a lithium battery, let it cool down if it gets hot.
I wouldn't be surprised if someone sees a better way to do this; feel free to criticize or suggest, I realize I'm not an expert. Also, I'm not saying this is a perfect jack; it's adequate for my uses so far, but does have some areas I'm not entirely comfortable with. It's probably fine for the sporties, but I think I'd want to weld some more metal where that lifting arm attaches to the scissors link before putting a 900 lb bagger on it. Might do it one of these days anyway. The links and bolts that come with it seem plenty beefy. It would really be nice to be able to move it with a bike lifted, but you can't. More like a table in that respect, and a little bit of a pain to position under the bike. To move it on the wheels, tilt it back, but that puts the support legs in the air, so you have to just slide it across the floor to get it under a bike. More of a nuisance than a problem. Once the bike is in the air, it's fine. You can make the jack sway a fair amount in the air, but the sporty feels solid on the arms, and I wouldn't lift without tying it down anyway.
Just something to consider when you feel like you want to get that sporty in the air.
Last edited by Imold; 12-13-2013 at 11:32 AM. Reason: changed picture
The following users liked this post:
rodeostyle (12-27-2020)
#4
09-02-2012, 05:01 PM
Join Date: Jul 2011
Location: Frozelandia, Minnysota
Posts: 27,076
Received 4,632 Likes
on
2,735 Posts
Thanks. Just thought if someone was passing on this fairly low cost jack because of the size, would show that it's not much work to make it fit. It's a lot sturdier than the same-as-the-rest cheap chinese jack I started out with. Although this one's probably chinese, too.
#5
09-03-2012, 12:34 AM
Road Master


#7
09-03-2012, 10:06 AM
Join Date: Jul 2011
Location: Frozelandia, Minnysota
Posts: 27,076
Received 4,632 Likes
on
2,735 Posts
No, and when I first thought of doing this, didn't even think of two. But I had plenty of iron, and the second one makes a nice template for drilling the holes on the other side of the lifting arm. You probably missed this in the text, too: "You could probably use just one piece of angle iron, and not have one overlapping the lifting arm, but since I had enough angle iron, thought this would be even stronger." It does give another 1/8" to the extension, but I don't think that would ever make any difference. Depending on how long you have the jack, and how much it's used, the extra metal thickness for the bolts might keep the lifting arm holes from elongating, but that would take a lot of use, probably have a worn out jack by then anyway. I lubed every surface of the jack that can rub (like the bolts & scissors links) with moly, should help, too.
Trending Topics
#8
09-03-2012, 10:45 AM
Join Date: Jul 2011
Location: Frozelandia, Minnysota
Posts: 27,076
Received 4,632 Likes
on
2,735 Posts
Can't see the front lifting arm position in this photo; can you get it behind the up curve on the front of your frame? Neither of mine will, why I put the extension on. I actually like this jack better than a table, even though for some jobs you need to move it to the other side of the bike. That's not difficult. I'm just too old to spend much time bent over or on my knees. Need to get a chrome sprocket like yours, that and the aluminum front fork & clamps on my custom seems out of place with all the other major unpainted parts chromed. Like your paint, too.

Thread
Thread Starter
Forum
Replies
Last Post
Rengnath
Sportster Models
5
02-10-2018 01:21 PM