
Nightster Winter Makeover

#662
 05-17-2012 | 04:05 PM
Big Kahuna HDF Member
Joined: Feb 2008
Posts: 25,718
Likes: 41
From: WIMBORNE,DORSET, GREATBRITAIN
thats sweet mate, looks nice clean n simple, wot colour we thinking!!
#663
05-19-2012 | 10:45 AM

Stage IV
Joined: May 2012
Posts: 4
Likes: 0
From: Silverdale
Sir! I applaud your tireless effort. I can trul say I am 4 hours old to your forum site and I have only subscribed because of your thread. I understand the length of time involved to truly do something correct. I will subscribe just as soon as I figure out how. There is so much I will do to my bike... you are an inspiration. Thankyou. And for all the rest, I cannot wait to dig through the wealth of knowledge you have bestowed upon one another. Thanks go to you all as well.
#664
05-20-2012 | 07:36 AM
Thread Starter
|
Road Master
Joined: Jul 2011
Posts: 1,167
Likes: 7
From: NY
Thanks swordy.
Colour for the tins? Going with the same orange and black Nightster paint scheme but changing it up a bit. Less orange, more black. Been playing around with some different ideas and patterns, using some rattle can paint to mock it up. Got some ideas but haven't finalized them yet.
#665
05-20-2012 | 07:40 AM
Thread Starter
|
Road Master
Joined: Jul 2011
Posts: 1,167
Likes: 7
From: NY
Sir! I applaud your tireless effort. I can trul say I am 4 hours old to your forum site and I have only subscribed because of your thread. I understand the length of time involved to truly do something correct. I will subscribe just as soon as I figure out how. There is so much I will do to my bike... you are an inspiration. Thankyou. And for all the rest, I cannot wait to dig through the wealth of knowledge you have bestowed upon one another. Thanks go to you all as well.
Good luck.
#666
05-21-2012 | 07:50 AM
Thread Starter
|
Road Master
Joined: Jul 2011
Posts: 1,167
Likes: 7
From: NY
Made some progress on the wiring over the weekend, but I'm not satisfied with the result.
We got the main harness in the battery box area all soldered up. If you recall, we took the wires from the fuel injectors, extended them, ran them up into the frame and then back and down, out the bottom of the main downtube under the battery box. Then we cut off the big plastic connector on the wiring harness and decided to just hard wire the injector wires right into the harness. That was the last big job to do on the harness before wrapping and stowing the whole thing somewhere in the battery box area under the side covers. This is what it looked like when I started the process of wrapping.
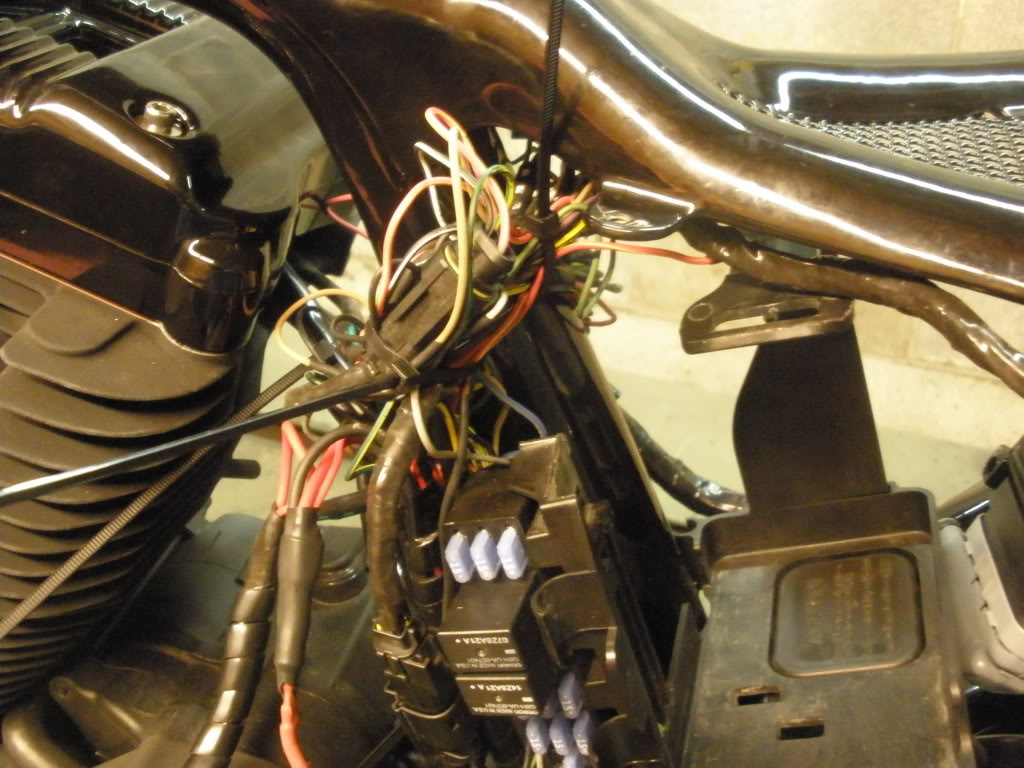
I tried to break the bundle down into branches - one for the ECM, one for the ignition, one for each fuse block, one for the fuel pump/coil/rear cylinder heat sensor. I used some zip ties to sort of segregate the wires and just started wrapping. Here's what I ended up with.

Here it is with the battery box and battery in place. As you can see, it's really cleaned up a lot. But I am just not satisfied with how far out in front of the side cover that bundle protrudes. And I don't like the way the branch for the ignition switch sticks out.


So, I 'm gonna pull it all apart and do it over...
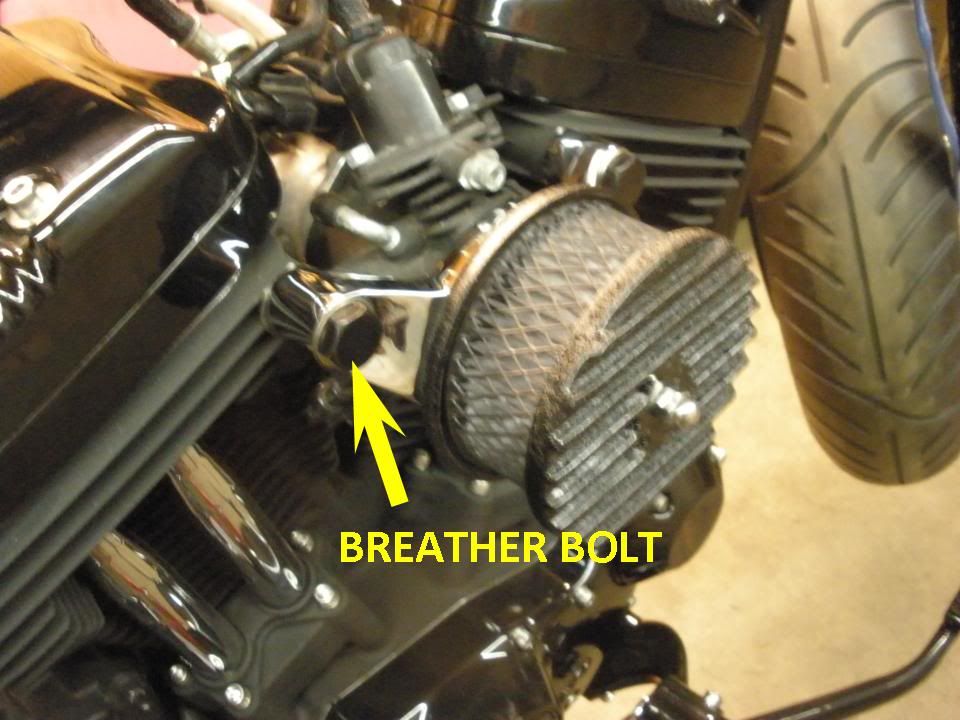
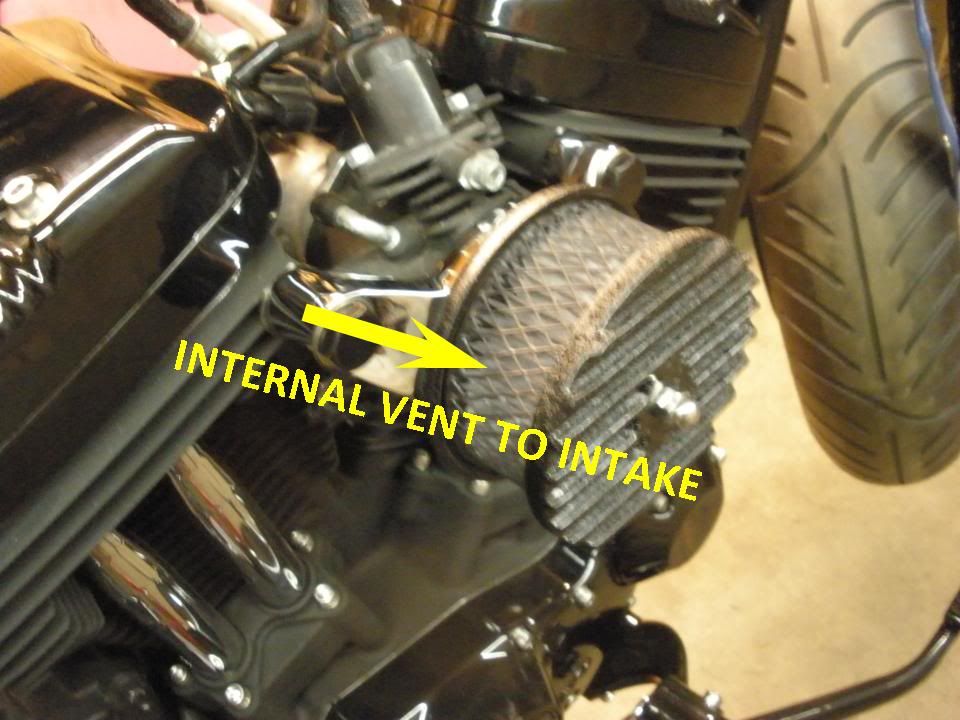
I also ran some new oil lines. For some reason, they were a real bitch getting them to slide onto the nipples on the oil pump. Probably took an hour to get the feed and return lines attached. Not done attaching the return line to the tank and I have to get some new clamps for the vent line, obviously.


We got the main harness in the battery box area all soldered up. If you recall, we took the wires from the fuel injectors, extended them, ran them up into the frame and then back and down, out the bottom of the main downtube under the battery box. Then we cut off the big plastic connector on the wiring harness and decided to just hard wire the injector wires right into the harness. That was the last big job to do on the harness before wrapping and stowing the whole thing somewhere in the battery box area under the side covers. This is what it looked like when I started the process of wrapping.
I tried to break the bundle down into branches - one for the ECM, one for the ignition, one for each fuse block, one for the fuel pump/coil/rear cylinder heat sensor. I used some zip ties to sort of segregate the wires and just started wrapping. Here's what I ended up with.
Here it is with the battery box and battery in place. As you can see, it's really cleaned up a lot. But I am just not satisfied with how far out in front of the side cover that bundle protrudes. And I don't like the way the branch for the ignition switch sticks out.
So, I 'm gonna pull it all apart and do it over...
I also ran some new oil lines. For some reason, they were a real bitch getting them to slide onto the nipples on the oil pump. Probably took an hour to get the feed and return lines attached. Not done attaching the return line to the tank and I have to get some new clamps for the vent line, obviously.

#669
05-21-2012 | 08:50 AM
Thread Starter
|
Road Master
Joined: Jul 2011
Posts: 1,167
Likes: 7
From: NY
I used a combination of electrical tape and self-adhering silicone tape. The silicone is great stuff but it's very hard to work with and trying to wrap it in tight spots is next to impossible.
Something to think about. I was also thinking that Ozzie might be able to extend or modify the side cover, but I haven't talked to him about that yet.
Something to think about. I was also thinking that Ozzie might be able to extend or modify the side cover, but I haven't talked to him about that yet.
#670
05-21-2012 | 09:34 AM

Novice
Joined: Jul 2010
Posts: 17
Likes: 0
WHOA.............
First, I have been following this for since the beginning, HUGE Fan. Huge Fan. What kind of Oil Lines are you running? I see Black AN Lines but I dont remember you going over that before. I have been thinking of doing this forever as well. Let me know what you did. Thanks
First, I have been following this for since the beginning, HUGE Fan. Huge Fan. What kind of Oil Lines are you running? I see Black AN Lines but I dont remember you going over that before. I have been thinking of doing this forever as well. Let me know what you did. Thanks