Nightster Winter Makeover
#371
 03-06-2012 | 03:20 PM

4th Gear
Joined: Oct 2011
Posts: 8
Likes: 0
From: California
Hahaha... Don't feel bad, while I was reading your post, I knew I had seen a description of how to take those suckers apart, but I couldn't for the life of me remember where I saw it. I would have ended up in the boat as you, only I would have been tearing my hair out trying to remember where I saw the directions.

#373
03-06-2012 | 06:55 PM
Thread Starter
|
Road Master
Joined: Jul 2011
Posts: 1,167
Likes: 7
From: NY
Hahaha... Don't feel bad, while I was reading your post, I knew I had seen a description of how to take those suckers apart, but I couldn't for the life of me remember where I saw it. I would have ended up in the boat as you, only I would have been tearing my hair out trying to remember where I saw the directions.

#375
03-07-2012 | 07:09 AM
Thread Starter
|
Road Master
Joined: Jul 2011
Posts: 1,167
Likes: 7
From: NY
#376
03-07-2012 | 12:19 PM
Seasoned HDF Member

Joined: Jul 2011
Posts: 27,077
Likes: 4,633
From: Frozelandia, Minnysota
I've assembled/disassembled thousands of many types of connectors, all kinds of tools & tricks to do it. That kit you bought that didn't work is for a common type you'd find on aircraft, doubt if there are any on a Harley. I have a tip, up to you if you want to do it; when you get all the wiring in place, "pot" those frame holes so the wires can't chafe; they'd probably be ok since you've smoothed the edges so well, but preventing them from working against the metal can't hurt. There's "potting compound" made for the purpose that easily breaks up when you want to remove it, but white bathroom silicon caulk isn't that hard to remove when you need to, either. And pretty durable. Just use something to loosely hold the wires in the middle away from the metal, but not tight, so you can work a little silicon between them, and make a plug maybe a quarter inch thick. Or, if you can get it over all the wires, just run them through a piece of tubing that's fairly thick; it's just easier sometimes to "pot" the wires instead of taking so much apart to get them all in tubing. I'm kind of sensitive to wire chafing since I've run into hundred's of shorts created by it, but I'll admit the wiring you're working with is pretty durable, too. If it's any consolation, I didn't know about the connector stuff in the back of the manual, either. Looks like you're doing a real good job keeping track of where everything goes, saves a lot of potential headache later on. Now that we're digital, I document everything I take apart with photos, too, just in case I hit something unexpected. Wouldn't matter if I liked your design or not, I'd still admire the way you're merging the mechanical with art on this one.
#377
03-07-2012 | 01:13 PM
Thread Starter
|
Road Master
Joined: Jul 2011
Posts: 1,167
Likes: 7
From: NY
Thanks very much Imold! Great advise and information. We have discussed doing something about the wire-to-metal contact where the wires enter and exit the frame. We talked about maybe using a grommet to prevent chaffing, but either way I like the idea of sealing the holes with silicone after everything is in place to prevent at least some moisture from getting in there. Thanks for your input. I really appreciate it.
#378
03-11-2012 | 07:29 PM
Thread Starter
|
Road Master
Joined: Jul 2011
Posts: 1,167
Likes: 7
From: NY
With the wiring sort of figured out and the connectors disassembled we focused on two things this weekend: The frame and the engine. First the frame - Oz spent some time remounting the horn and starting the clean up of the frame. He simply used part of the old horn mounting bracket and bolted it to the lower Voltage Regulator bolt. Plan is for the skid plate to start just below the VR so the horn won't be seen.

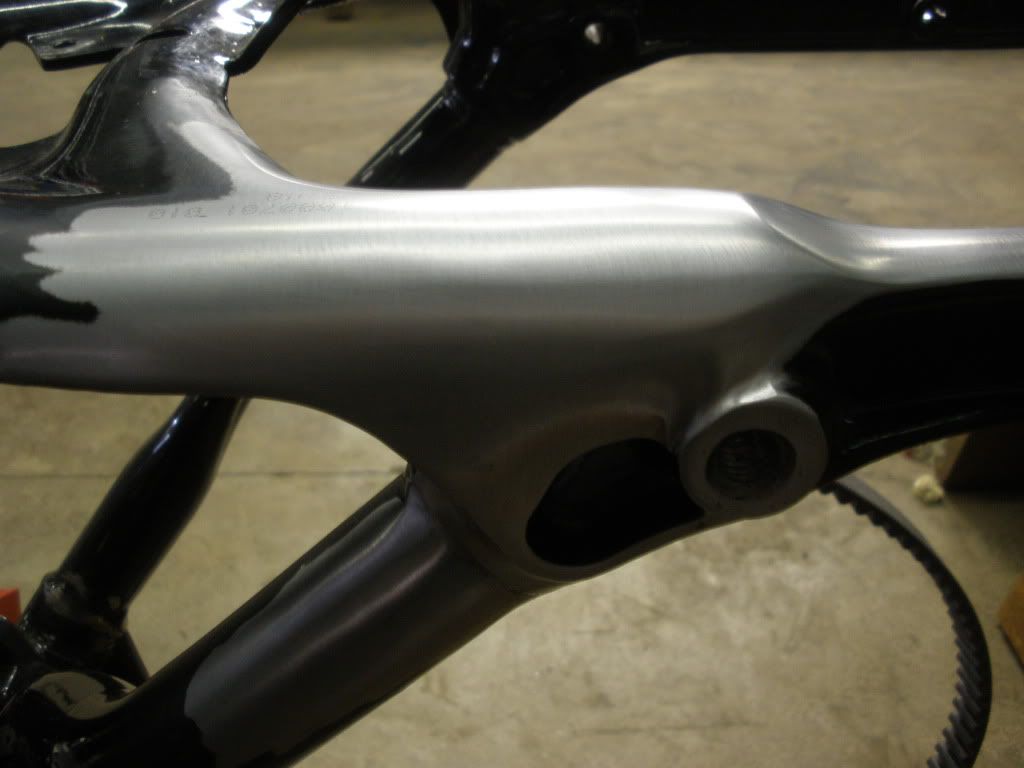
Once the horn was located in place in front of the motor we pulled the motor and Oz started cleaning up the fugly frame welds. There's a lot left to do but here's a sample of what he's gonna be doing over the whole frame. Here's a shot of the unfinished frame where the strut extends back toward the rear.

And here's the opposite side after Oz got done filling, grinding and smoothing.

And for comparison, here's a shot looking down on both struts.

I think this is gonna be one of the nicest parts of the whole make over. He'll be filling all the unnecessary holes and shitty welds, taking off the mid control mounting points and smoothing everything so that the whole frame looks like the strut on the right. It should look amazing under the gloss black powder.
In the meantime, we pulled the motor and carried it directly into the paint booth. I pulled both upper and lower rocker covers on each cylinder, a much easier task than I anticipated. He's a few pics of the process. Pop the four bolts off the upper cover and here's what you're looking at.

Remove the breather (the black plastic thing in the upper right corner) and another series of bolts and the lower cover comes off, exposing the valves and pushrods.

Final step is to disassemble the lower rocker cover by removing the rocker arms. Simply tap the shafts out of the rocker arms, making sure to mark which rocker arm goes with which valve. The whole procedure is in the manual...duh...I actually thought to read it this time, and it's really simple.


Left the engine sitting on the bench looking like this...
...and took the rocker covers outside to clean the oil off. It was sunny and 60 some degrees today and every five minutes someone would ride by on a motorcycle. Impressed on me just how far we still have to go to get mine rideable. Here they are ready to be cleaned up before going to the powder coater.

I packed up two boxes of parts and will be delivering them to the powder guys tomorrow. Oz should have the frame and swing arm done later this week and that will go. That will give me a couple of weeks to get the engine final cleaned and painted.
Once the horn was located in place in front of the motor we pulled the motor and Oz started cleaning up the fugly frame welds. There's a lot left to do but here's a sample of what he's gonna be doing over the whole frame. Here's a shot of the unfinished frame where the strut extends back toward the rear.
And here's the opposite side after Oz got done filling, grinding and smoothing.
And for comparison, here's a shot looking down on both struts.
I think this is gonna be one of the nicest parts of the whole make over. He'll be filling all the unnecessary holes and shitty welds, taking off the mid control mounting points and smoothing everything so that the whole frame looks like the strut on the right. It should look amazing under the gloss black powder.
In the meantime, we pulled the motor and carried it directly into the paint booth. I pulled both upper and lower rocker covers on each cylinder, a much easier task than I anticipated. He's a few pics of the process. Pop the four bolts off the upper cover and here's what you're looking at.
Remove the breather (the black plastic thing in the upper right corner) and another series of bolts and the lower cover comes off, exposing the valves and pushrods.
Final step is to disassemble the lower rocker cover by removing the rocker arms. Simply tap the shafts out of the rocker arms, making sure to mark which rocker arm goes with which valve. The whole procedure is in the manual...duh...I actually thought to read it this time, and it's really simple.
Left the engine sitting on the bench looking like this...
...and took the rocker covers outside to clean the oil off. It was sunny and 60 some degrees today and every five minutes someone would ride by on a motorcycle. Impressed on me just how far we still have to go to get mine rideable. Here they are ready to be cleaned up before going to the powder coater.
I packed up two boxes of parts and will be delivering them to the powder guys tomorrow. Oz should have the frame and swing arm done later this week and that will go. That will give me a couple of weeks to get the engine final cleaned and painted.
Last edited by Ergonight; 03-12-2012 at 07:20 AM.