
Wire cleanup without a tank lift.
#31
 09-08-2011, 03:20 PM

#32
09-08-2011, 03:30 PM

Platinum Sponsor
Join Date: Nov 2010
Location: Red Banks, Mississippi
Posts: 17,729
Received 4,197 Likes
on
2,440 Posts
It still looks like everyone who has done the wire tuck without a lift has had the 48 tank, not the 3.3 gallon Iron tank.
From what I've read, there isn't enough clearance to tuck the connectors under the 3.3 gallon tank without a lift, but there IS enough for the 48.
I just went out and picked up some brackets to do a 1.5" tank lift, now my concern is clearance for the brackets as they will be *right* against the frame.
And then I also have to worry about clearance between the tank and the bars.
Now, I'm going to lift the bars soon, but I have to wait for my speed bleeders to arrive...this is getting pretty complicated lol.
Actually I just checked the shipping info and it looks like my Speed Bleeders may arrive today, if so, I could in theory do this entire job tonight: New brake line, riser lift, coil and ignition relocate, wire tuck.
Here's hoping it all works out!
Plenty of guys with sportys with 3.3 gallon tanks do wire tucks without tank lifts. Look at the pics earlier in this thread of Matt Bakers bike.
But you are correct, they put the wires along side the backbone, not on top of it.
You are also correct, they can really be seen unless someone squats down and looks up under the tank.
Kevin
__________________
Win Up to $350.00 Cash from DK Custom This Month, Click HERE to see How!
DKCustomProducts.com
Win Up to $350.00 Cash from DK Custom This Month, Click HERE to see How!
DKCustomProducts.com

#33
09-08-2011, 03:53 PM
oooo, the picture on your site for the key-relocate only kit ALSO shows a bike that had the coil relocated and I didn't even notice the key way down on the bottom right.. So the $15 kit alone wont clean up all that space, you'd need to do both.. which is the $60 kit.
http://www.dkcustomproducts.com/Coil...-DK-CK-RLC.htm
http://www.dkcustomproducts.com/Coil...-DK-CK-RLC.htm
#34
09-08-2011, 03:55 PM
Yeah, I got the coil relocation kit and the ignition relocation kit seperately, which gives you the option of putting the key in six possible locations.
I am putting the key down on the left side of the bike, behind the rear cylinder.
My only concern is the heat there, which I don't worry about as long as I'm moving, but if I got stuck in stop and go traffic I intend to keep an eye on it to ensure its not damaged.
My locations will be the same as this picture:
#35
09-08-2011, 10:46 PM
Ok, well the project is done and it was a success!
Cliffs on what I did: I did the coil and ignition relocate, and hid the wires without lifting the tank.
However: Anyone who says you can get the wires up in there between the frame rail and the tank without a lift is smoking some serious stuff. Its impossible. Those deutch connectors are HUGE and there is absolutely no way on god's earth that you will get them above the frame rail without a lift. But...as I discovered, you don't need to! You can bundle them up and hide them right where they sit on the bottom of the frame rail...and now I'm going to show you a step by step on how.
I took about 30 pictures and I'll try to post them here, step by step.
First, supplies laid out, and all the tools you will need:


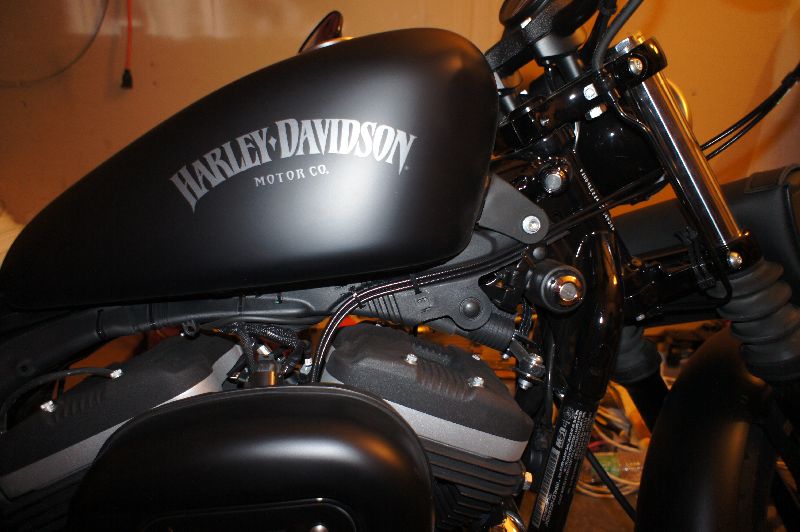
Right side of the bike in its stock form:

Left side of the bike in its stock form:

Step 1: Pull the main fuse under the battery cover.

Step 2: Disconnect the fuel petcock (its a quick disconnect, push up on the sleeve and it pops out, only a few drops of fuel will leak out, catch it with a rag).

Step 3: Prop up the tank with a block of soft wood

Step 4: Cut off the zip ties and remove the left side plastic wire housing

Step 5: Cut off the zip ties and remove the left side wire housing

Step 6: Unbolt the ignition from the mounting bracket and move it to the left side of the bike, wrap the red wires now before you mount it

Step 7: Mount the DK bracket to the primary case ground bolt, you will need a LOOOONG ratchet extension to access the nut from the other side of the bike

Step 8: Mount the ignition to the DK bracket, run the wrapped ignition wires up the side, as far from the rear cylinder wall as possible, zip tie-ing it as you go.

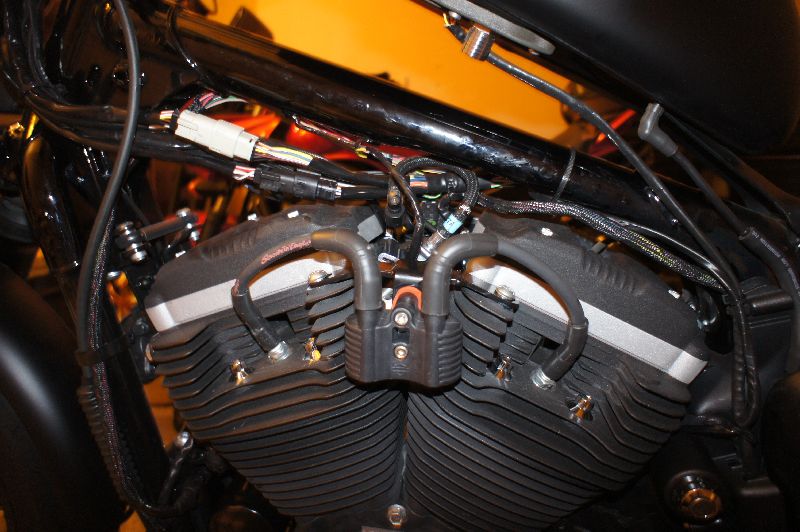
Step 9: Remove the coil mounting bracket, unbolt the coils from it, marking the coil pack to ensure you know which side goes to which cylinder. Unplug the spark plug wires, then unplug the connection from the wiring harness to the coil pack and let it dangle in between the two cylinders. Now is a good time to wrap it with black tape.

Step 10: Mount the coils to the DK bracket, plug the wiring harness back into the coil pack, plug the NEW Screamin Eagle spark plug wires (that come with the DK kit) into the coil pack, mount the coil pack to the cylinders, and then reconnect the spark plugs.

Step 11: Here is where I got excited and forgot to take some pictures. For this next step you will do the following:
11a: Wrap all brightly colored wire bundles with black tape.
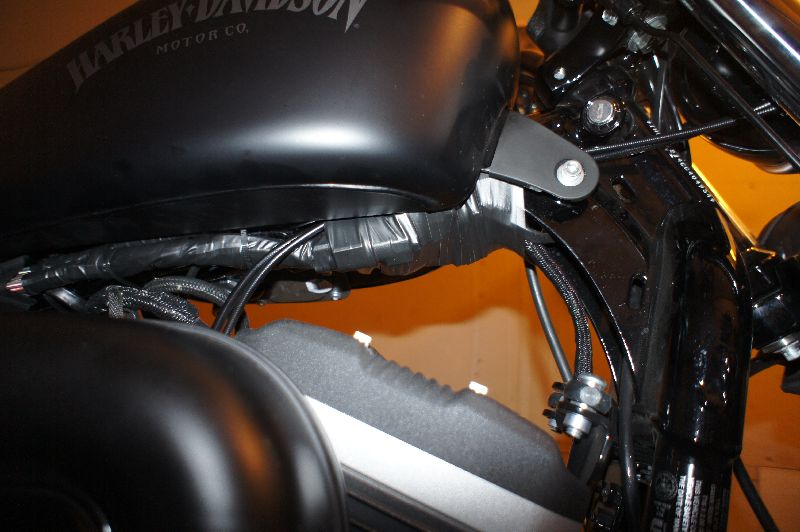
11b: Zip tie the bundles to the bottom of the frame rail LOOSELY, each time, lowering the tank to check the fit. If the tank drops into place, tighten the zip tie, prop up the tank again, and repeat.
11c: Double check the tank fit with the now tight and secure zip ties.
11d: Wrap the entire bundle in black tape from the rear of the frame rail where the seat bolts on, to the front of the steering head, making sure to cover all the wires and connectors. Work from both sides and take your time!!!
When you get done, you can drop the tank back down and it should look like this....
(continued in the next post....)
Cliffs on what I did: I did the coil and ignition relocate, and hid the wires without lifting the tank.
However: Anyone who says you can get the wires up in there between the frame rail and the tank without a lift is smoking some serious stuff. Its impossible. Those deutch connectors are HUGE and there is absolutely no way on god's earth that you will get them above the frame rail without a lift. But...as I discovered, you don't need to! You can bundle them up and hide them right where they sit on the bottom of the frame rail...and now I'm going to show you a step by step on how.
I took about 30 pictures and I'll try to post them here, step by step.
First, supplies laid out, and all the tools you will need:


Right side of the bike in its stock form:
Left side of the bike in its stock form:

Step 1: Pull the main fuse under the battery cover.

Step 2: Disconnect the fuel petcock (its a quick disconnect, push up on the sleeve and it pops out, only a few drops of fuel will leak out, catch it with a rag).

Step 3: Prop up the tank with a block of soft wood

Step 4: Cut off the zip ties and remove the left side plastic wire housing

Step 5: Cut off the zip ties and remove the left side wire housing

Step 6: Unbolt the ignition from the mounting bracket and move it to the left side of the bike, wrap the red wires now before you mount it

Step 7: Mount the DK bracket to the primary case ground bolt, you will need a LOOOONG ratchet extension to access the nut from the other side of the bike

Step 8: Mount the ignition to the DK bracket, run the wrapped ignition wires up the side, as far from the rear cylinder wall as possible, zip tie-ing it as you go.

Step 9: Remove the coil mounting bracket, unbolt the coils from it, marking the coil pack to ensure you know which side goes to which cylinder. Unplug the spark plug wires, then unplug the connection from the wiring harness to the coil pack and let it dangle in between the two cylinders. Now is a good time to wrap it with black tape.

Step 10: Mount the coils to the DK bracket, plug the wiring harness back into the coil pack, plug the NEW Screamin Eagle spark plug wires (that come with the DK kit) into the coil pack, mount the coil pack to the cylinders, and then reconnect the spark plugs.
Step 11: Here is where I got excited and forgot to take some pictures. For this next step you will do the following:
11a: Wrap all brightly colored wire bundles with black tape.
11b: Zip tie the bundles to the bottom of the frame rail LOOSELY, each time, lowering the tank to check the fit. If the tank drops into place, tighten the zip tie, prop up the tank again, and repeat.
11c: Double check the tank fit with the now tight and secure zip ties.
11d: Wrap the entire bundle in black tape from the rear of the frame rail where the seat bolts on, to the front of the steering head, making sure to cover all the wires and connectors. Work from both sides and take your time!!!
When you get done, you can drop the tank back down and it should look like this....
(continued in the next post....)
#36
09-08-2011, 10:51 PM
Step 12: Drop the tank into place and check how it looks from all sides. Now is a good time to reconnect the fuel petcock, then the main fuse, and test all controls (turn signals, headlight, bright headlight, horn, run switch, and start switch) and start the bike to ensure you didn't screw anything up.


A few shots from underneath looking up, to show you the wires...you can't see them at ALL unless you kneel down under the tank:


Seat back on, did the final double check, started the bike, and ran it until it warmed up to ensure nothing caught fire or exploded....


And that is it, you are done, go ride and enjoy it!!!!
Total time: 2.5 hours


Thread
Thread Starter
Forum
Replies
Last Post
98INFINITY
Sportster Models
12
05-19-2014 12:40 AM
Traces72
Sportster Models
19
04-20-2013 10:15 PM