
Saddlemen shock cut-outs?


#12
 08-30-2010, 07:19 PM
Just got them and installed them today, they look great and have tons of room.
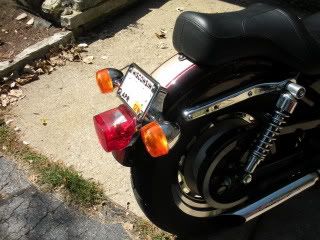
I got the layback plate holder/directional relocation kit from Great Bike Gear, and it works great! The only part that made me nervous was lengthening the wires for the lights, but the provided butt crimp connectors worked fine and are safely tucked behind the side rails. The wiring is ran through the existing top hole in the fender where the stock plate holder bolted in, and I ran it back out through the hole where the directionals used to mount. There is a support on each side of the fender on the inside toward the rear that I zip-tied the wires to so they wouldn't contact the tire to be safe. The holder is sturdy and looks great, comes with all the needed hardware to make it a true bolt on. Total install time was around 1 hr.
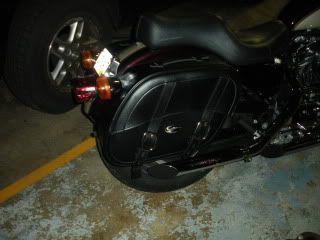
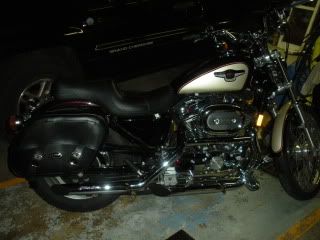
The bags themselves are very well made IMO, and the solid back makes them stiff. I opted to get creative with my mounting, and used the stock side rail/fender bolts to attach them to the bike. Just needed to slightly enlarge the front and rear holes in the bag, add some large washers, and they bolted on fine. A little trimming of the bag itself was needed on the bottom on the excess side of the stitch to provide clearance for the belt pulley and the brake rotor, but the shocks and swingarm prevent the bags from going in at all. I did it for peace of mind. They will take some "breaking in" though, since its a somewhat tight fit with the lights, and opening them is not simplified by the Velcro on the front and back of the bag holding the lid down. It definitely does keep them shut and add a degree of weatherproofing though, I'll just have to get used to it.
I tried using the supplied yoke to mount them under, then over the seat, but I didn't like how the bags were tilted, and the yoke was too long for underseat mounting. All very well made, however. Pics coming later!
I got the layback plate holder/directional relocation kit from Great Bike Gear, and it works great! The only part that made me nervous was lengthening the wires for the lights, but the provided butt crimp connectors worked fine and are safely tucked behind the side rails. The wiring is ran through the existing top hole in the fender where the stock plate holder bolted in, and I ran it back out through the hole where the directionals used to mount. There is a support on each side of the fender on the inside toward the rear that I zip-tied the wires to so they wouldn't contact the tire to be safe. The holder is sturdy and looks great, comes with all the needed hardware to make it a true bolt on. Total install time was around 1 hr.
The bags themselves are very well made IMO, and the solid back makes them stiff. I opted to get creative with my mounting, and used the stock side rail/fender bolts to attach them to the bike. Just needed to slightly enlarge the front and rear holes in the bag, add some large washers, and they bolted on fine. A little trimming of the bag itself was needed on the bottom on the excess side of the stitch to provide clearance for the belt pulley and the brake rotor, but the shocks and swingarm prevent the bags from going in at all. I did it for peace of mind. They will take some "breaking in" though, since its a somewhat tight fit with the lights, and opening them is not simplified by the Velcro on the front and back of the bag holding the lid down. It definitely does keep them shut and add a degree of weatherproofing though, I'll just have to get used to it.
I tried using the supplied yoke to mount them under, then over the seat, but I didn't like how the bags were tilted, and the yoke was too long for underseat mounting. All very well made, however. Pics coming later!
#13
08-30-2010, 08:03 PM

Intermediate


Thread
Thread Starter
Forum
Replies
Last Post
ghira75
General Harley Davidson Chat
10
05-22-2013 11:04 AM