Softtail SLIM - Let's see the Pics!!!
#391
 01-13-2013, 07:45 AM

Advanced
Join Date: Jan 2013
Location: Yorkton Saskatchewan
Posts: 52
Likes: 0
Received 0 Likes
on
0 Posts
#392
01-13-2013, 12:44 PM
Elite HDF Member
That's the HD Spring Solo Seat, like mine. You buy the ecm cover, battery cover hardware separately, also HD. They make that seat in brown, so you're in luck.
Last edited by SoCalSoftailSlim; 01-13-2013 at 06:56 PM.
#393
01-15-2013, 06:05 AM
Advanced
Join Date: Jan 2013
Location: Yorkton Saskatchewan
Posts: 52
Likes: 0
Received 0 Likes
on
0 Posts
Awesome, ill be looking into it. Are the solo spring seats as comfortable as my dealer says they are? How many miles would be average sitting on a solo spring seat? Have the stock slim seat right now but I a two up touring seat coming for when the wife and I go. With the stock I can make it about an hour the first run, then half hour the next runs..... Terrible seat.. Thanks for the help
#394
01-15-2013, 06:36 PM
Elite HDF Member
Awesome, ill be looking into it. Are the solo spring seats as comfortable as my dealer says they are? How many miles would be average sitting on a solo spring seat? Have the stock slim seat right now but I a two up touring seat coming for when the wife and I go. With the stock I can make it about an hour the first run, then half hour the next runs..... Terrible seat.. Thanks for the help
One thing about the stock seat though that is great, you really sit IN the bike with it because it's so low profile and connected to the frame directly.
With the spring solo, you'll ride a bit higher and will feel more ON the bike. However, sitting a little higher does help you hit corners tighter. So it's all give and take.
#395
01-15-2013, 06:44 PM

Cruiser
#396
01-16-2013, 05:20 AM
Ultimate HDF Member
#397
01-17-2013, 02:38 PM
Hi there, new to the forum and just looking threw and seen your bike, I love it. Few questions, I am working on blacking mine out, wondering if its possible to do the front end myself, having some mechanical knowledge, I am looking for the exact same lights that you have on your bike, where did you find them? Also is a primary cover something I can change to black myself ?. Thanks
I asked around and got some good info, especially where it came to taking apart and reassembling the forks. It was far easier than I thought it would be.
First of all, spring for the Service Manual if you haven't already... see pages 2-58 through 2-63.
Here's a really good 3-part video that shows how to disassemble/reassemble the fork sliders. The Slim is nearly identical to this...
Two special items you'll need are a Fork Cap wrench: Fork Cap Socket for HD
and a long 6MM allen socket - I found one at Lowe's of all places: Kobalt 3/8-in Drive Hex 6-in Driver Socket
An impact gun is also recommended, although I found I really didn't need one.
Some say they have a hard time dislodging that bottom damper bolt without one (the long 6MM). Mine just cracked loose without too much trouble - of Of course the bike only had about 400 miles on it so that may have helped...
Correction - I did need to use it once, on those drain screws on the bottom, rear of the forks - those bad boys were IN there...
Tearing the front end down was easy - remove the fender, caliper (10MM metric needed) front wheel, headlight, aux. lights, and tree shrouds. I found I had to unbolt the gas tank and just slide it backwards about 2" to access the headlight connector. Piece of cake.
After all that I took some 13 pieces to get powdercoated - sliders, including the right-side cap at the bottom, slider covers, light trims (3), risers (3 pcs.) and even the two shroud trim strips off the sides - I paid $150 for all of it. The guy even matched the H-D "Vivid Black" perfectly...
To reassemble, save yourself a lot of trouble and just get [2] "Fork Rebuild Kits" from H-D (p/n 49377-09A) and a set of new drain screws and washers (p/n 45858-77) - and don't forget [2] pints of the Type E fork oil.
If I had to do it all over again, I bet I could do the whole job in under 3-4 hours...
The hardest part was getting the fork tube plugs back in after refilling with oil, but if you have a spare set of hands, even this wasn't all that hard. I got both started on the first try - (watch the videos).
======
As far as the Aux. Lights, they're H-D p/n 68000026, but they come with no lamps - you have to buy those separately. I went with H-D p/n 68348-05 since they were an exact match for the stock headlight. I also added the visors to all three lights - the headlight visor is p/n 69734-05 while the aux. light visors are p/n 69732-05. All three came in chrome, but I had those PC'ed as well...
btw - there's already an extra power connector sticking out of the back of the headlight wiring to accomodate these - and they're already switched to go off with the high beams...
======
The primary cover is a no-brainer. Just raise the bike on a jack or a table, and use an oil pan to catch the oil. Get yourself a new pair of gaskets - one for the primary and the other for the derby cover. And don't forget the oil.
There's a lot of satisfaction to be had by doing the work yourself - not to mention all the $$ you'll save.
The dealer wanted $500 to do this for me, and that didn't include the powdercoat. I spent about $100 on the [2] fork rebuild kits and oil.
I did have to buy those two special tools I mentioned, but they were under $30 for both, and now I have them...
One thing I did do differently from those videos, was that I bought a 2' length of 1.5" sch.40 PVC instead of 2". The 2" was just too large, and I would have had to sand so much off as to make it useless. Instead I just bought the 1.5" then split it down one side and it slipped right on. Also, use the old seal, or the old steel seal spacer on top when you go to pound the news seals in, just as extra protection.
EDIT: Oh, and don't forget to remove those reflectors - they're just plastic held on with double-faced tape... soak 'em good with a little WD-40 and they'll pry right off...
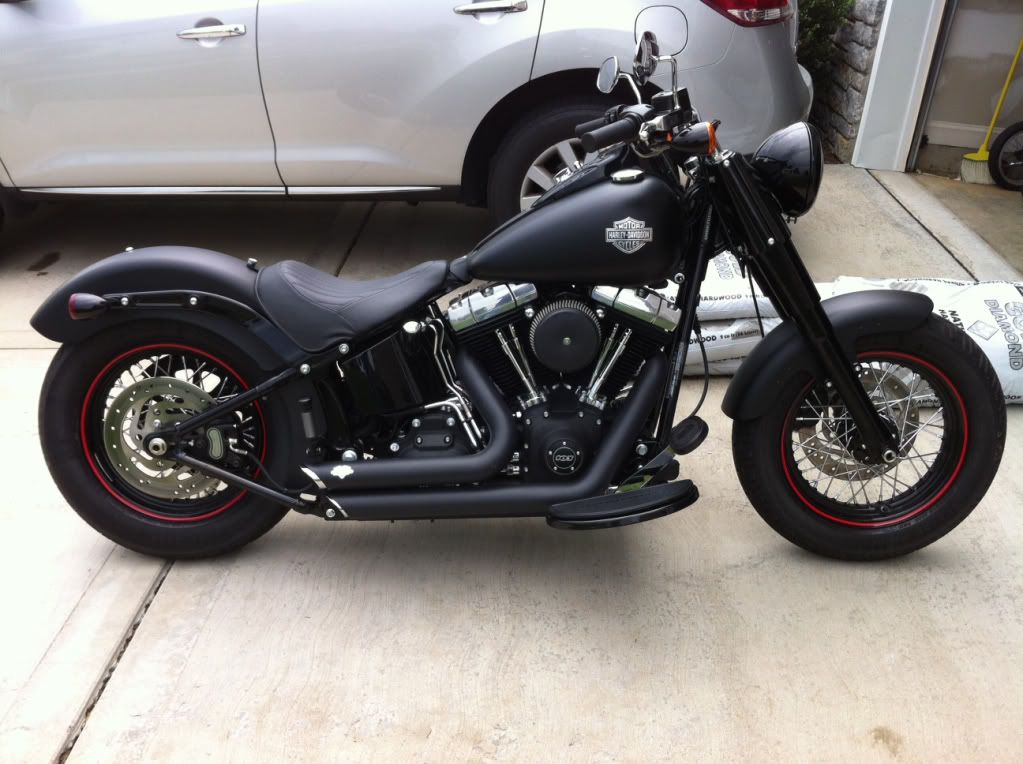
Hope this helps...
Here's mine, before and after:

Last edited by jam436; 01-17-2013 at 03:04 PM.
#398
01-17-2013, 03:15 PM
Advanced
Join Date: Jan 2013
Location: Yorkton Saskatchewan
Posts: 52
Likes: 0
Received 0 Likes
on
0 Posts
I was in the same boat as you.
I asked around and got some good info, especially where it came to taking apart and reassembling the forks. It was far easier than I thought it would be.
First of all, spring for the Service Manual if you haven't already... see pages 2-58 through 2-63.
Here's a really good 3-part video that shows how to disassemble/reassemble the fork sliders. The Slim is nearly identical to this...
Next make sure you have the right tools.
Two special items you'll need are a Fork Cap wrench: Fork Cap Socket for HD
and a long 6MM allen socket - I found one at Lowe's of all places: Kobalt 3/8-in Drive Hex 6-in Driver Socket
An impact gun is also recommended, although I found I really didn't need one.
Some say they have a hard time dislodging that bottom damper bolt without one (the long 6MM). Mine just cracked loose without too much trouble - of Of course the bike only had about 400 miles on it so that may have helped...
Correction - I did need to use it once, on those drain screws on the bottom, rear of the forks - those bad boys were IN there...
Tearing the front end down was easy - remove the fender, caliper (10MM metric needed) front wheel, headlight, aux. lights, and tree shrouds. I found I had to unbolt the gas tank and just slide it backwards about 2" to access the headlight connector. Piece of cake.
After all that I took some 13 pieces to get powdercoated - sliders, including the right-side cap at the bottom, slider covers, light trims (3), risers (3 pcs.) and even the two shroud trim strips off the sides - I paid $150 for all of it. The guy even matched the H-D "Vivid Black" perfectly...
To reassemble, save yourself a lot of trouble and just get [2] "Fork Rebuild Kits" from H-D (p/n 49377-09A) and a set of new drain screws and washers (p/n 45858-77) - and don't forget [2] pints of the Type E fork oil.
If I had to do it all over again, I bet I could do the whole job in under 3-4 hours...
The hardest part was getting the fork tube plugs back in after refilling with oil, but if you have a spare set of hands, even this wasn't all that hard. I got both started on the first try - (watch the videos).
======
As far as the Aux. Lights, they're H-D p/n 68000026, but they come with no lamps - you have to buy those separately. I went with H-D p/n 68348-05 since they were an exact match for the stock headlight. I also added the visors to all three lights - the headlight visor is p/n 69734-05 while the aux. light visors are p/n 69732-05. All three came in chrome, but I had those PC'ed as well...
btw - there's already an extra power connector sticking out of the back of the headlight wiring to accomodate these - and they're already switched to go off with the high beams...
======
The primary cover is a no-brainer. Just raise the bike on a jack or a table, and use an oil pan to catch the oil. Get yourself a new pair of gaskets - one for the primary and the other for the derby cover. And don't forget the oil.
There's a lot of satisfaction to be had by doing the work yourself - not to mention all the $$ you'll save.
The dealer wanted $500 to do this for me, and that didn't include the powdercoat. I spent about $100 on the [2] fork rebuild kits and oil.
I did have to buy those two special tools I mentioned, but they were under $30 for both, and now I have them...
One thing I did do differently from those videos, was that I bought a 2' length of 1.5" sch.40 PVC instead of 2". The 2" was just too large, and I would have had to sand so much off as to make it useless. Instead I just bought the 1.5" then split it down one side and it slipped right on. Also, use the old seal, or the old steel seal spacer on top when you go to pound the news seals in, just as extra protection.
EDIT: Oh, and don't forget to remove those reflectors - they're just plastic held on with double-faced tape... soak 'em good with a little WD-40 and they'll pry right off...
Hope this helps...
Here's mine, before and after:
I asked around and got some good info, especially where it came to taking apart and reassembling the forks. It was far easier than I thought it would be.
First of all, spring for the Service Manual if you haven't already... see pages 2-58 through 2-63.
Here's a really good 3-part video that shows how to disassemble/reassemble the fork sliders. The Slim is nearly identical to this...
Two special items you'll need are a Fork Cap wrench: Fork Cap Socket for HD
and a long 6MM allen socket - I found one at Lowe's of all places: Kobalt 3/8-in Drive Hex 6-in Driver Socket
An impact gun is also recommended, although I found I really didn't need one.
Some say they have a hard time dislodging that bottom damper bolt without one (the long 6MM). Mine just cracked loose without too much trouble - of Of course the bike only had about 400 miles on it so that may have helped...
Correction - I did need to use it once, on those drain screws on the bottom, rear of the forks - those bad boys were IN there...
Tearing the front end down was easy - remove the fender, caliper (10MM metric needed) front wheel, headlight, aux. lights, and tree shrouds. I found I had to unbolt the gas tank and just slide it backwards about 2" to access the headlight connector. Piece of cake.
After all that I took some 13 pieces to get powdercoated - sliders, including the right-side cap at the bottom, slider covers, light trims (3), risers (3 pcs.) and even the two shroud trim strips off the sides - I paid $150 for all of it. The guy even matched the H-D "Vivid Black" perfectly...
To reassemble, save yourself a lot of trouble and just get [2] "Fork Rebuild Kits" from H-D (p/n 49377-09A) and a set of new drain screws and washers (p/n 45858-77) - and don't forget [2] pints of the Type E fork oil.
If I had to do it all over again, I bet I could do the whole job in under 3-4 hours...
The hardest part was getting the fork tube plugs back in after refilling with oil, but if you have a spare set of hands, even this wasn't all that hard. I got both started on the first try - (watch the videos).
======
As far as the Aux. Lights, they're H-D p/n 68000026, but they come with no lamps - you have to buy those separately. I went with H-D p/n 68348-05 since they were an exact match for the stock headlight. I also added the visors to all three lights - the headlight visor is p/n 69734-05 while the aux. light visors are p/n 69732-05. All three came in chrome, but I had those PC'ed as well...
btw - there's already an extra power connector sticking out of the back of the headlight wiring to accomodate these - and they're already switched to go off with the high beams...
======
The primary cover is a no-brainer. Just raise the bike on a jack or a table, and use an oil pan to catch the oil. Get yourself a new pair of gaskets - one for the primary and the other for the derby cover. And don't forget the oil.
There's a lot of satisfaction to be had by doing the work yourself - not to mention all the $$ you'll save.
The dealer wanted $500 to do this for me, and that didn't include the powdercoat. I spent about $100 on the [2] fork rebuild kits and oil.
I did have to buy those two special tools I mentioned, but they were under $30 for both, and now I have them...
One thing I did do differently from those videos, was that I bought a 2' length of 1.5" sch.40 PVC instead of 2". The 2" was just too large, and I would have had to sand so much off as to make it useless. Instead I just bought the 1.5" then split it down one side and it slipped right on. Also, use the old seal, or the old steel seal spacer on top when you go to pound the news seals in, just as extra protection.
EDIT: Oh, and don't forget to remove those reflectors - they're just plastic held on with double-faced tape... soak 'em good with a little WD-40 and they'll pry right off...
Hope this helps...
Here's mine, before and after:
#399
01-17-2013, 07:13 PM

Banned
Join Date: Dec 2010
Location: Minnetonka, MN USA
Posts: 6
Likes: 0
Received 0 Likes
on
0 Posts
Thanks,
ThommyG
 . Trying to upload a pic of my slim, started some mods but lots to go. Hope the link works