71 XLCH Carb Trouble 2
#1
 01-23-2010, 04:44 PM

Join Date: Dec 2009
Location: Ontario California (near LA)
Posts: 69
Likes: 0
Received 0 Likes
on
0 Posts
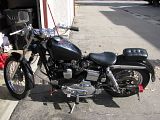
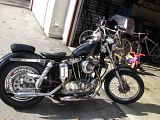
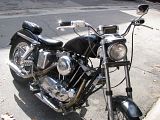
IT'S RUNNING!! Put the carb from ebay on today and finally rode my scooter. Here are some pics ?? I still seem to have trouble with the size. I am going to change the seat (imitation K model) and put staggered duals back on. It still has a little dead spot when you open the throutle (sp?), but now I can monkey with it. Thanks again for all the info.

#3
01-23-2010, 10:56 PM
Dead spot when opening throttle ... Sorry i do not know which carb you have there. S&S? Keihin CV?
Could be the accelerator pump; or a slow jet too small; or a pilot screw needs to be turned out a little more.
Here are my pilot screw setting notes ...
If the carb is old and dirty the pilot screw passage may be gummed up such that you will not be able to "gently seat" the pilot screw reliably. If this is the case remove the carb from the bike and clean it up. Some guys try to do carb work with the carb in the bike. IMO this is a very bad idea.
In the pilot screw passage there should be, in this sequence: screw, spring, washer, o-ring. [Often POs have installed these parts in the wrong sequence; remember that the purpose of the washer is to protect the o-ring from being damaged by the spring]. The screw usually comes out easily. The other parts may require some work. The best technique is to stick a pipe cleaner in the hole, twist it around, and, like magic, out come the other parts on the end of the pipe cleaner.
1. You need to have easy access to the pilot screw, easy enough to reliably judge "screw it in until gently seated". Loosen the front fuel tank mount bolt; remove the rear fuel tank mount bolt; prop the rear of the fuel tank up on a piece of 2X4; on some bikes this will not be necessary.
2. With the engine cold [so you do not burn your fingers] turn the pilot screw in clockwise until it is gently seated. Count the number of 1/4 turns as you do it; write the number down. Back it out to the original setting. You may need to return reliably to this setting after experimenting.
The "normal" starting point for this process is 1,1/4 [according to the 79 - 85 FM] or 1,1/2 [according to usual practice] turns out.
EDIT: An old HotXL magazine article recommends for Keihin butterfly carbs between 1/4 and 1,1/4 turns out. My experience is that this works best. If you are more than 1,1/4 turns out your pilot jet is too small.
3. The engine must be at full warm up. It will have very hot parts; to avoid burned fingers have a well lighted, comfy place to work.
4. Set the engine idling at about 1000 RPM. You want it to be idling at the slowest speed that is consistent with a smooth idle so that you can hear or feel slight changes.
5. Turn the pilot screw in clockwise until the engine idle becomes worse; tending to stall. Count the number of 1/4 turns as you do this. Then turn the pilot screw out counter clockwise until the engine idle gets good, then becomes worse, tending to stall. Count the number of 1/4 turns as you do this.
6. The best setting for your bike will be somewhere between these two settings. The FM says to use the leanest setting [most screwed in] consistent with a good idle quality. Some guys say to go between the two settings.
It should be between 1/2 and 1,1/2 turns out from gently seated. If it is not within this range you should change the slow jet.
EDIT: I follow the advice from the old HotXL mag article - set it between 1/2 and 1,1/4 turns out.
7. You may have to adjust the idle speed.
8. Make sure that the spark plugs are clean, then ride the bike around your neighborhood for 10 minutes. Keep it under about 15 MPH so that you are on the "idle port", not the "idle transfer ports", the "mid range port", or the "main jet" [see carb diagrams in FM]. Hopefully the plugs will come out a nice medium gray or tan color. If they are too dark you can screw it in another 1/4 turn; too light screw it out 1/4 turn, and try the ride again.
9. If they are really light or really dark the problem is not with the pilot screw setting. For example, too light might mean an intake or exhaust leak, and too dark might mean the pilot jet is too large [among other possibilities].
10. My experience with this process is that after making a change i have to clean the plugs and go for a good ride [say, an hour or more] before i can trust that the new results are reliable.
#4
01-24-2010, 08:47 PM
Join Date: Dec 2009
Location: Ontario California (near LA)
Posts: 69
Likes: 0
Received 0 Likes
on
0 Posts
Sorry about not giving specfics, but I was just happy the bike ran and had top end. THe hesitation is just a little when you crack the throttle. The carb is a Kiehen early with butterfly. This card has no idle screw. It is capped. The ad told me the jets but i lost the paper I wrote it on. THe carb looks brand new. The accelerator pump works as it runs great, except for the little hesitation when you crack the throttle. The bike sat for 16 years, and has just come out. I could not ride it too long because I needed to get a new petcock. The straight sportster petcock interfers with the choke. I went to swapmeet today and got another petcock. I will put it on, do the maintence (change fluids and adjust valves) and put some good gas in, octane buster. Then I can ride it for an hour or so to see what up. It hasn't really been run. The guy I bought it from told me a story. After I do this I will post, next weekend. No time during week to fool with her. Once again THANKS for the info.
#5
01-24-2010, 11:04 PM
#7
01-25-2010, 08:28 AM
The bike is a 1971? I wonder about the year of the carb. 52 slow is stock for 1983 to 1985; for those years 160 main is stock but many would up the main to 165.
I am not familiar with the early carbs, but the parts catalog shows very different jets for 1971, so i think it is not the original carb.
Any markings, numbers, etc on it?
I am not familiar with the early carbs, but the parts catalog shows very different jets for 1971, so i think it is not the original carb.
Any markings, numbers, etc on it?
Trending Topics
#8
01-25-2010, 08:06 PM
Join Date: Dec 2009
Location: Ontario California (near LA)
Posts: 69
Likes: 0
Received 0 Likes
on
0 Posts
This carb is definately not stock. 71 XLCH had a Tillotsen (sp). This Keihan model was on the 1977 sportster until the CV took over. I don't know that year?? Looks like the jets are pretty close. This bike was modified in the late 70's or early 80's probably. It has disk brakes, not stock. Ignition key moved. Lots of chrome but very pitted. The new carb is the same as the one the bike came with, but it was part of this modification?? Thanks for feedback!!
#9
01-25-2010, 09:19 PM
We might be able to narrow down the year of the carb. If it has a VOES port, a brass nipple protruding up from the rear mount flange, then it is 1984 or newer. If it has an "evaporative port", usually with a rubber cap on it, near the pilot screw area on top, but no VOES port, then it is 1983. If it does not have a "fast idle cam" and adjusting screw with the choke mechanism on the side then it is 1978 or older.
#10
01-25-2010, 11:35 PM
Sounds a like carb might be normal butterfly Keihin ... Check American Iron magazine 1/2010 there is article how to rebuild that carb.
Correct jet sizes are depending airbox, airfilter, exhaust, camshafts, ingnition timing and advance curve, CR, temperature....but 65-75 intermedia and 165-175 main would be close.
Correct jet sizes are depending airbox, airfilter, exhaust, camshafts, ingnition timing and advance curve, CR, temperature....but 65-75 intermedia and 165-175 main would be close.