Review of the B&W Biker Bar
#1
 11-03-2016, 01:44 AM

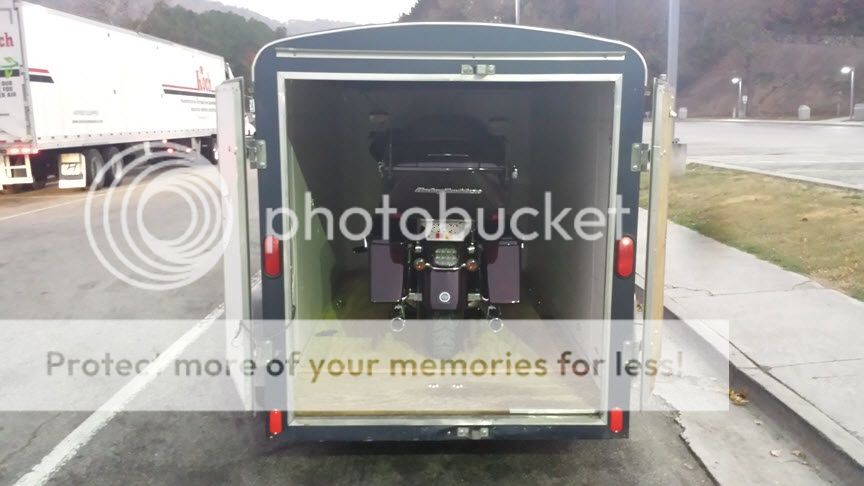
This is the Biker Bar as installed and used on my 2011 Road Glide Ultra. As you can see from the second pic, this is all that is used to secure the bike in the trailer. This also makes the trailer easier to pull because you have only one heavy mass bouncing around, not two. In other words, you bike is not bouncing around IN straps, making the trailer bounce all over the place. Because the bike cannot move up or down or front to back, the bike becomes part of the trailer. I shook my bike around a little and when I did, the trailer moved with the bike. I observed the trailer as it shook around and it was very minimal.
My Biker Bar is "Tail of the Dragon tested" I towed my bike up the Tail on my way from Ohio and then I pulled it thru Cherokee and over the Smokey Mountains on my way back. I had my truck & trailer at speeds a little over 80mph. I never once had the bike move on me. It stayed nice & straight / tight & right WITH NO STRAPS!
The bike / installing the Biker Bar clamp
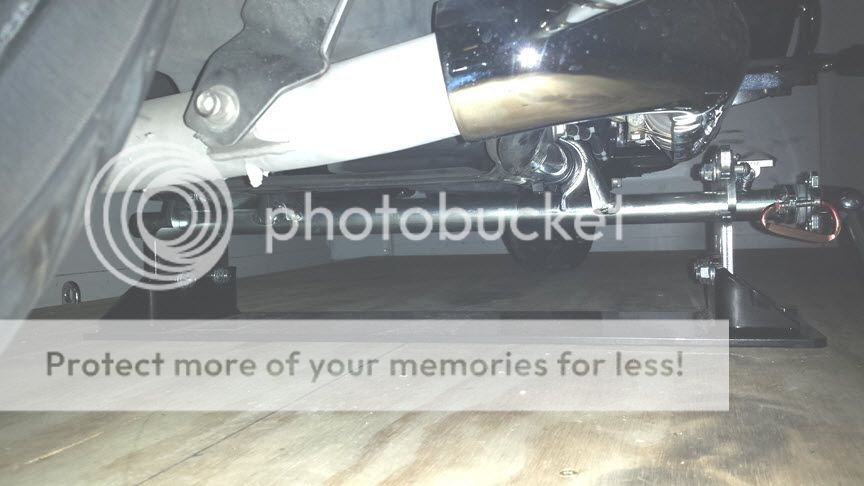
It is a bit of work getting it set up. I had to modify my brake line on the right side. All I had to do was remove a holding clip and bend the line a little to get it away from the Biker Bar clamp I put the brake line in a short piece of windshield washer hose just as a precaution to keep the Biker Bar from rubbing on it. I cut a slit down the middle so I could slip it over the line. I also pulled the main wire tube out of the way. This was nothing major. Another thing to watch out for is make sure the Biker Bar clamp DOES NOT touch the left side of the primary! It can be really close, but not touching! I used a zip tie to make sure there was enough clearance by passing it between the inner primary and the clamp. Once you get a good position, use a sliver Sharpee Marker to mark the location as a reference for next time. The clamp must be square on the frame!
Some have asked about the kick stand. YOU CAN NOT HAVE THE KICK STAND DOWN …IT JUST WILL NOT WORK! You cannot get the front wheel thru the receiving bracket with the kick stand down. It just cannot happen even though the directions claim that some bikes may have to be trailered with the kick stand down. You cannot even have the kickstand up next to and below the bar, it must rest on top of the clamp bar. You will have to reach down and lift the kick stand up and over the clamp.
A couple more points: Please be careful moving your bike around in the trailer. It is real easy to dent and scratch your fender against the receiver. I did this and scratched my front fender a little bit. This happened because I was lining up the front and back wheel on my marked center line in the trailer. Another thing to mention: The bike should be able to be locked into receiving bracket using just your power meaning that you should not have to force the bike into the receiving bracket using the power of the engine. Also – don’t forget to tighten the clamp an additional 1/4 turn after you get it locked into place as per the instructions.
The trailer / installing the receiver bracket
It is a bit of work getting it set up in the trailer. I used an additional sheet of 3/4" plywood on top of the existing 3/4" floor. This was well worth the $25 but again was another precaution. This did help keep the floor from sagging and it was solid as a rock. Because I was going thru 1-1/2" of plywood, I had to swap out the 5/8"x2-1/2" bolts to ones that were 3" long. I also added an additional flat washer to protect the finish of the receiving bracket. It is essential to get the bracket properly and squarely located in the trailer. And paint or mark a line down the center. The bike has to be centered in the trailer and the receiving bracket. You cannot have it skewed at all. If you do, only one side of the clamp bracket will lock into the receiver. A line in the center helps you line up the bike properly.
Parking brakes and wheel chocks

Another thing I did was I installed a rear parking brake. You can see from the pic, all this is is a 1/4” bolt eye that I got from the local hardware store. I removed the bolt in the lower fairing and installed the bolt eye. I then use a tie wrap, zip tie, or whatever you want to call it to run thru the screw eye and over the rear brake pad. When you take the bike out, just cut the tie, throw it away, and get a new one next for next time. I was thinking of some kind of spring or turn buckle arraignment. But I will never use more than handful of ties in my lifetime and it is simple. Yes, you can just put it in gear. But with the slack in the primary chain, I doubt it would work or be of any value. I also did the same thing on the front brake. You can put a sock on your grip and lever if you are worried about scratching anything. The point of applying the brakes or putting it in park as I call it, is to help keep the stress of the bike rolling forward or back during taking off or in an emergency stop. Anything to keep the bike from moving front to back will help reduce stress on the Biker Bar. I just don’t see using a wheel chock working at all because theoretically the bike will never be in the same exact position. A wheel chock may actually put stress on the clamp attached to the frame.
Another helpful hint is to have four wheel chocks to place in front and behind both wheels on the trailer. There is simply too much slack in the ball and hitch that will allow the trailer to move back and forth just enough to allow the ramp to fall off!
.
Last edited by shimaze; 05-05-2017 at 12:58 AM.
#2
11-03-2016, 03:32 AM
Seasoned HDF Member
#3
11-04-2016, 01:42 PM

Seasoned HDF Member

Thread
Thread Starter
Forum
Replies
Last Post