I have an impact wrench but don't have the correct size long allen socket to do the job. I am working on this. The seal driver is not a show stopper as I have watched so many other ways to insert the seal.
Sounds like we are both about is the same spot. My fork seals are perfect also. No leaks no film on tube. But, as I said before somewhere, if I was only riding locally or one day trips, I would not worry about it. However, I am planning a 11,688 mile trip to some of the most remote areas of North America next summer, and given that the maintenance manual calls for a rebuild at 50K miles, I just thought it would be a good time to have the work done.
As I have been taught, PPPPPPP, or something like that.
Pulled my neck bearings down because of of what it said in manual. Total waste.
I would think if the bushing where worn, seals would leak.
Be sure to measure the steel area where it slides in the bushings. Compare it to the non wear area. Quite often, soft bushings pick up grit that wears the steel part.
I cannot locate a wear tolerance for anything in there in my manual.
I would break the glaze with wet 500 carbide paper in the seal area of the slider if it needs it.
You guys are getting me in trouble. I could not find the 12MM hex head long socket locally, so just ordered one from Amazon. I guess I will be doing my forks after I receive the tool.
I had to order a certain amount to get free shipping, so added a fork tube measurement tool, and one other thing.
I will attempt to put the seal in, and if I mess it up, give it to the dealer.
It seems like I have a lot of pots in the fire, and just need to move some into the completed column.
Remember to loosen your top tree pinch bolts and then break loose your fork caps before you pull the legs. They can be a bear otherwise.
Too late. They are both standing in a corner, waiting for the 12mm hex head socket. I have an impact wrench, and I also have 17mm hex head socket for the caps so my plan is to just use the impact wrench on both ends. I will then drain the oil out, disassemble the forks, and then install the seals. what could go wrong?
Status update: Took my fork tubes and using my brand new 12 mm hex head socket and impact wrench, loosened the bolt on bottom of fork, and then removed the 17 mm fork cap. In doing this, when the cap came off the first fork, I overreacted and bashed my hand against the fork tube opening, and cut my finger, right on the knuckle. So now I have a popsicle stick on my finger to keep it closed so it will heal. Looks funny, but we'll see how it works out.
So the fork tubes are now hanging upside down draining. Am hoping I can return back today and measure the oil that came out although I bought the fork measurement tool to make filling it easier and more accurate.
This is my second time draining the tubes, the first time at 28,000 miles the oil was dirty yucky color. Yesterday with just shy of 20,000 miles, the oil was pretty and red.
Broke one fork tube down on 2015 Limited, and after watching a gazillion You tube videos, and immediately found something that was not addressed.
Picture of fork diagram is provided to show the the breakdown.
Next picture is to show the part in question.
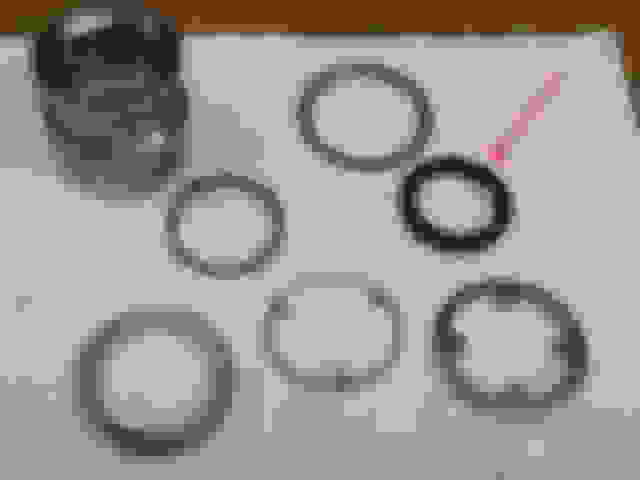
Now look closely up inside the fork tube bottom. There appears to be an O ring about 2" into the tube. I bought the rebuild kit, and it is not in the kit.
It is not listed in the parts breakdown, but it sure is there. \
Can anyone give me insight into this part? I hate to replace all the other seals and O rings, and not this one.
They wouldn't address it, because it's part of a Non Serviceable check valve Assy in the Fork tube.
Don't worry about it ... really is a Non-Wearing Assy
Below is a photo of the assy removed from the fork ... Disassembled through "Destruction" (won't be going back in) ... (photo courtesy of another Forum member )
Last edited by multihdrdr; 12-09-2018 at 01:24 PM.
They wouldn't address it, because it's part of a Non Serviceable check valve Assy in the Fork tube.
Don't worry about it ... really is a Non-Wearing Assy
Below is a photo of the assy removed from the fork ... Disassembled through "Destruction" (won't be going back in) ... (photo courtesy of another Forum member )
Well, that really is good news. i proceeded to do the first fork. Had a bear of a time getting the fork tube cap on, but finally got it. Am now working on the other fork, but it is now 5PM and time for a glass of wine. I am not sure I have enough fluid to complete the other fork, so may wait until Tues to fill it and if I need some more, will get some. Thanks for the help.
.
 12-05-2018, 07:48 AM


 )
)