Tokico front caliper upgrade for ’95 Road King
#1
 12-10-2013, 06:11 AM

My son and I are fitting some four-piston sportbike callipers to the Road Bling, him doing all the grunt work and me as site supervisor due to health issues, so thought I would share what we have learned so far. Any input is welcome.
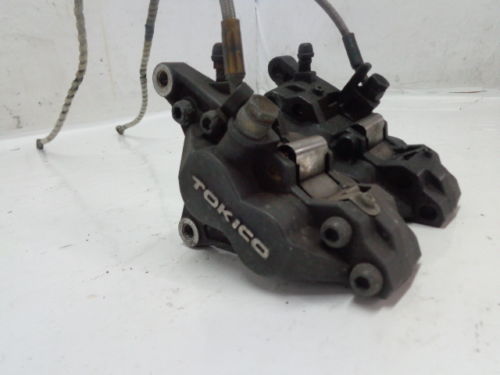
The calipers of choice are off a 2000-2003 Suzuki GSXR-750. Same caliper as the 1000 and 600 Gixers use too. We got them on eBay in the Land of the Almost Free for about $50 -- plus near as much again for shipping to Oz.
The reason we chose these was that there are several companies offering conversion kits using these calipers, so they have a proven track record, of sorts.
They looked like this:
They were then stripped down, cleaned repainted and new seals installed. (Cost $100 for seals from the local Suzuki stealership, so strongly advise to buy the $25 kits off the interweb. ) They were all washed out with denatured alcohol (aka methylated spirits) to get rid of any Dot 4 fluid remainders and reassembled with a thin smear of rubber grease on the new seals and the pistons.
Oh, and the Tokico lettering was filed off the calipers before repainting. Just to confuse the parking lot experts.
You can run DOT 5 in DOT 4 systems if you get rid of all the old DOT 4 first. Been doing it on BMWs and other bikes for years. Around here it is 80 per cent to 100 per cent humidity most of the year and DOT 4 is hygroscopic and just sucks up mucho moisture from the air through old hoses and joints. Plus, for now we are keeping the original master cylinder so that needs DOT 5. You cant run DOT 4 in a DOT 5 system because it will chew up the seals, so I am told. I never tried it myself to find out.
The biggest part of the job was making the adaptor brackets. You can buy commercially made ones, made out of steel. But we got a piece of 10mm (3/8”) aluminium plate from a local boat builder’s scrap box for a couple bucks. It is 6061 grade high tensile alloy, not just regular soft aluminium. It is about T3 hardness for boat building, so it will bend rather than crack under stress or impact.
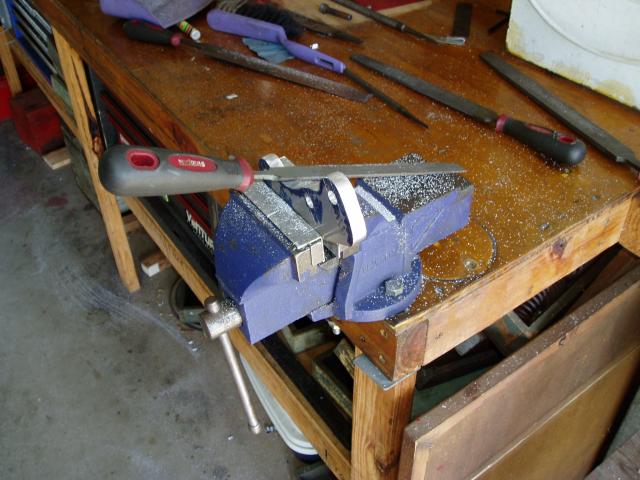
The good thing about being T3 and not the much harder T6 aircraft temper is that it is mucho easiser to machine and cut. Which is good because we marked out the shape and then drilled a line of holes along the edges in a drill press, then finished them off with hacksaw and files.
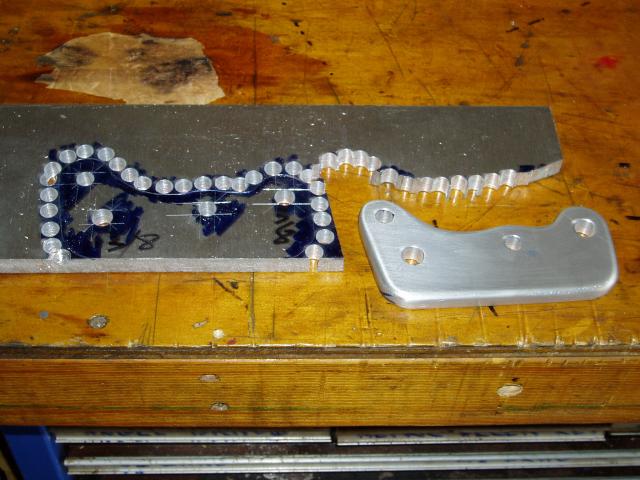
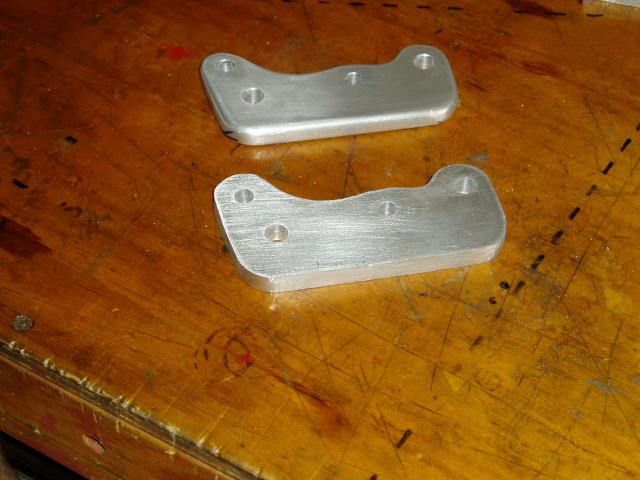
A bit of time spent rounding the edges and finishing the sides with wet rub gave a more “finished” look matching the fork legs than just a piece of flat plate.
Back pedaling a bit, the plate shape and hole locations were decided first by making a cardboard template. To make it, we taped a piece of insulated wire about 3mm diam. (1/8”) around the outer diameter of the stock disk on the bike, after removing the stock caiper.
Then we sat the Suzuki calliper on top of the wire, thus giving an even 3mm gap between the outer edge of the disc and the caliper. (Learned this trick mounting chopper fenders with a piece of fuel hose run around the tire to make an even gap while mounting.)
It is important, real important, to make sure the brake pads are totally on the disc and a little bit in from the very edge. Over time this leaves an unworn ring at the very outer diameter of the disk for strength. If the pads overhang the disc, eventually the unworn parts of the pads will contact each other and the resulting loss of braking power could be rather nasty.
So we sat the caliper where we wanted it to live, then cut a piece of cardboard to fit the caliper body shape and extend up to the fork mounting tabs. A bit of trial and error and it was done.
Then stuck a pencil through the caliper holes and the fork mounting holes and drew them in location. But had no wad punch to cut the holes out with. Aha, used the old homemade gasket making trick and used a small ball peen hammer to tap the cardboard into the holes in the caliper and forks and knock out the centre piece.
The caliper seemed to sit ok with the cardboard template and bolts in place. We made a wooden copy out of plywood and bolted it all up “for real” and made sure it would all work.
Not-so-rapid prototyping: the cardboard template, wooden dummy bracket and finished product.
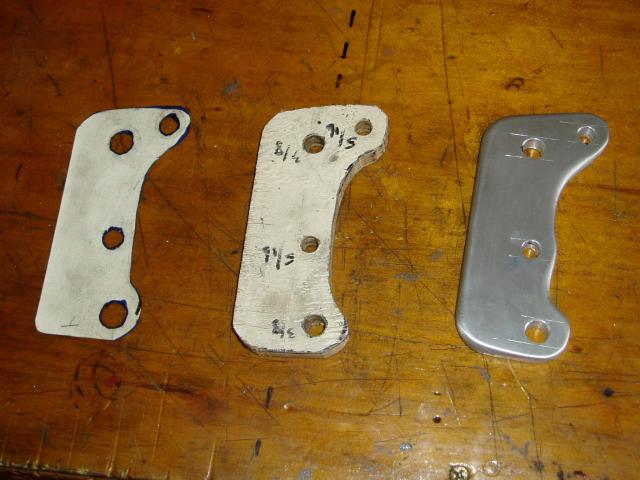
In the final mark up of the aluminium plate, we double checked the centre distances between the holes for caliper and fork tabs with digital caliper just to make sure they were spot on, and drilled the mounting holes right on 3/8 for the fork bolts and 8mm for the caliper bolts so there is no slopping around.
Being a belt and braces kinda guy I designed the plates so the edge of the plate bears on the fork leg and the caliper body bears on the bracket, just in case a bolt ever lets go. I would be more comfortable if the calipers used 10mm bolts, but the commercial suppliers all use the stock 8mm bolts. I guess if it will stop a Gixxer 1000 from 290 kmh it will pull a Harley up from 140 without overstressing the bolts. Momentum equals velocity times mass, IIRC from high school physics. More mass on the Hog but way less velocity. Another reason we went with calipers that have been used by others before us.
Bolting on was done with new high-tensile bolts and nuts all round. And it all fitted straight together without any dicking about.
Well, there was a little dicking about, to tell the truth. The calipers had to be spaced inwards from the plates a little to get them centralized either side of the disk. And there had to be a washer put between the lower fork mount and the plate to take up the recess in the fork mount. A .035” thick washer did the trick here.
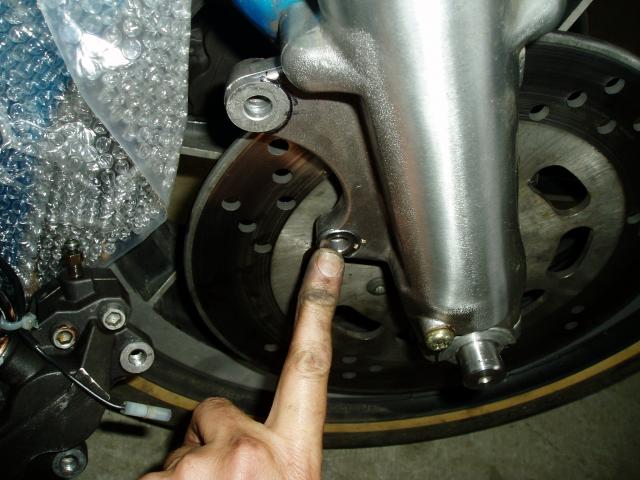
We had to thin down the 3/8" nylock nut that goes behind here too, so it clears the disc by more than a bee's dick.
We ended up using a stack of washers .170” thick on each of the 8mm caliper mounting bolts to centralize the caliper on the disc. There are four little cast tabs on the caliper next to the pads that we measured the gap to the disk with feeler gauges either side and got it bang on centred. We will turn up aluminium alloy spacers .170" thick eventually and have them TIG welded to the plates, just to ensure integrity.
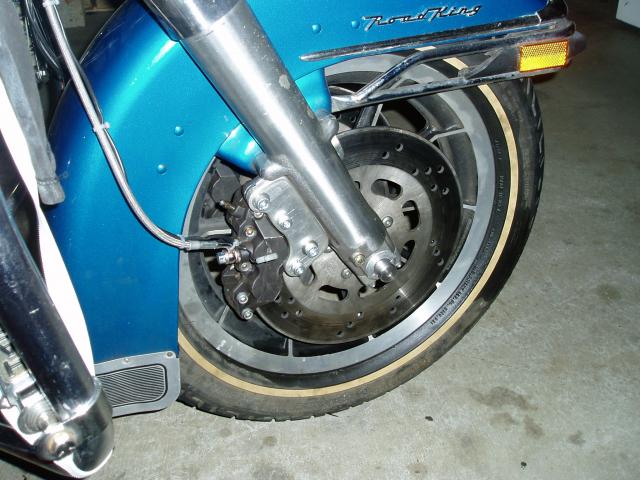
So the mounted caliper looks like this: (Not a good shot, night with flash but more later)
Bracket is identical on the left side.
Caliper paint did not stand up to the methylated spirits when cleaning off some spilled DOT 5 so a bit of touch up in loco will be the go.
The brake hoses are braided Goodridge, purchased as stock length but seemed to be an inch or two longer than the stockers we took off some time back. They reach the new caliper banjo fitting ok, but I’m not sure the slightly shorter stock hoses would. As stock hoses on these bikes are now 20 years or so old, they should all be tossed behind the woodpile anyway.
A trap for young players turned out to be the recess in the Tokico calipers where the copper washer fits for the banjo fitting. It is slightly smaller diameter than some copper washers so they don’t seat properly and leak. Smaller OD copper washers will sort that all out. Went back to using the used Goodridge washers we took off the stock calipers instead of the new ones from the local brake shop.
So that is where we are at right now. Waiting for a master cylinder rebuild kit to come in at the local HD dealer after the local indy shop could not source one. Then the real fun of bleeding will begin. We usually use a syringe full of DOT 5 hooked to the bleed nipple and pump the fluid and air uphill to the master cylinder banjo joint. Bit of teflon tape around the nipple threads stops leakage there, so nothing can go wrong...
Will keep you posted.
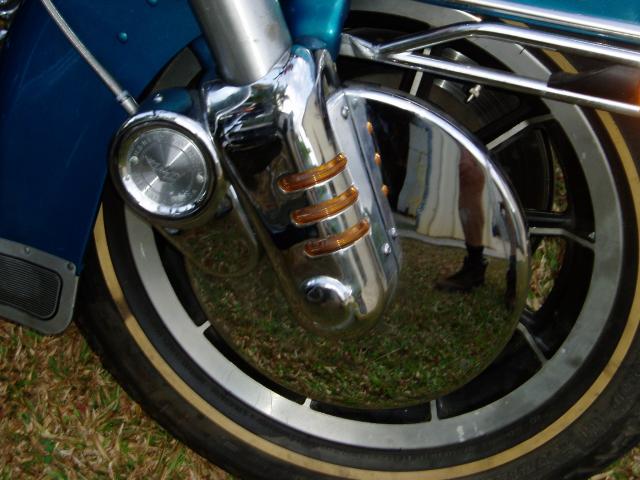
Oh yeah, will have cut out some clearance in these things to fit the new caliper, and figure I will put some air slots in the front to help disc cooling a little.
I was going to take them off and leave them off, but the damn things are so bad they are too good to take off. They are a somewhat uniquely American thing and folks here have never seen them before. Much hilarity ensues.
The calipers of choice are off a 2000-2003 Suzuki GSXR-750. Same caliper as the 1000 and 600 Gixers use too. We got them on eBay in the Land of the Almost Free for about $50 -- plus near as much again for shipping to Oz.
The reason we chose these was that there are several companies offering conversion kits using these calipers, so they have a proven track record, of sorts.
They looked like this:

They were then stripped down, cleaned repainted and new seals installed. (Cost $100 for seals from the local Suzuki stealership, so strongly advise to buy the $25 kits off the interweb. ) They were all washed out with denatured alcohol (aka methylated spirits) to get rid of any Dot 4 fluid remainders and reassembled with a thin smear of rubber grease on the new seals and the pistons.
Oh, and the Tokico lettering was filed off the calipers before repainting. Just to confuse the parking lot experts.
You can run DOT 5 in DOT 4 systems if you get rid of all the old DOT 4 first. Been doing it on BMWs and other bikes for years. Around here it is 80 per cent to 100 per cent humidity most of the year and DOT 4 is hygroscopic and just sucks up mucho moisture from the air through old hoses and joints. Plus, for now we are keeping the original master cylinder so that needs DOT 5. You cant run DOT 4 in a DOT 5 system because it will chew up the seals, so I am told. I never tried it myself to find out.
The biggest part of the job was making the adaptor brackets. You can buy commercially made ones, made out of steel. But we got a piece of 10mm (3/8”) aluminium plate from a local boat builder’s scrap box for a couple bucks. It is 6061 grade high tensile alloy, not just regular soft aluminium. It is about T3 hardness for boat building, so it will bend rather than crack under stress or impact.
The good thing about being T3 and not the much harder T6 aircraft temper is that it is mucho easiser to machine and cut. Which is good because we marked out the shape and then drilled a line of holes along the edges in a drill press, then finished them off with hacksaw and files.


A bit of time spent rounding the edges and finishing the sides with wet rub gave a more “finished” look matching the fork legs than just a piece of flat plate.

Back pedaling a bit, the plate shape and hole locations were decided first by making a cardboard template. To make it, we taped a piece of insulated wire about 3mm diam. (1/8”) around the outer diameter of the stock disk on the bike, after removing the stock caiper.
Then we sat the Suzuki calliper on top of the wire, thus giving an even 3mm gap between the outer edge of the disc and the caliper. (Learned this trick mounting chopper fenders with a piece of fuel hose run around the tire to make an even gap while mounting.)
It is important, real important, to make sure the brake pads are totally on the disc and a little bit in from the very edge. Over time this leaves an unworn ring at the very outer diameter of the disk for strength. If the pads overhang the disc, eventually the unworn parts of the pads will contact each other and the resulting loss of braking power could be rather nasty.
So we sat the caliper where we wanted it to live, then cut a piece of cardboard to fit the caliper body shape and extend up to the fork mounting tabs. A bit of trial and error and it was done.
Then stuck a pencil through the caliper holes and the fork mounting holes and drew them in location. But had no wad punch to cut the holes out with. Aha, used the old homemade gasket making trick and used a small ball peen hammer to tap the cardboard into the holes in the caliper and forks and knock out the centre piece.
The caliper seemed to sit ok with the cardboard template and bolts in place. We made a wooden copy out of plywood and bolted it all up “for real” and made sure it would all work.
Not-so-rapid prototyping: the cardboard template, wooden dummy bracket and finished product.

In the final mark up of the aluminium plate, we double checked the centre distances between the holes for caliper and fork tabs with digital caliper just to make sure they were spot on, and drilled the mounting holes right on 3/8 for the fork bolts and 8mm for the caliper bolts so there is no slopping around.
Being a belt and braces kinda guy I designed the plates so the edge of the plate bears on the fork leg and the caliper body bears on the bracket, just in case a bolt ever lets go. I would be more comfortable if the calipers used 10mm bolts, but the commercial suppliers all use the stock 8mm bolts. I guess if it will stop a Gixxer 1000 from 290 kmh it will pull a Harley up from 140 without overstressing the bolts. Momentum equals velocity times mass, IIRC from high school physics. More mass on the Hog but way less velocity. Another reason we went with calipers that have been used by others before us.
Bolting on was done with new high-tensile bolts and nuts all round. And it all fitted straight together without any dicking about.

Well, there was a little dicking about, to tell the truth. The calipers had to be spaced inwards from the plates a little to get them centralized either side of the disk. And there had to be a washer put between the lower fork mount and the plate to take up the recess in the fork mount. A .035” thick washer did the trick here.

We had to thin down the 3/8" nylock nut that goes behind here too, so it clears the disc by more than a bee's dick.
We ended up using a stack of washers .170” thick on each of the 8mm caliper mounting bolts to centralize the caliper on the disc. There are four little cast tabs on the caliper next to the pads that we measured the gap to the disk with feeler gauges either side and got it bang on centred. We will turn up aluminium alloy spacers .170" thick eventually and have them TIG welded to the plates, just to ensure integrity.
So the mounted caliper looks like this: (Not a good shot, night with flash but more later)
Bracket is identical on the left side.
Caliper paint did not stand up to the methylated spirits when cleaning off some spilled DOT 5 so a bit of touch up in loco will be the go.
The brake hoses are braided Goodridge, purchased as stock length but seemed to be an inch or two longer than the stockers we took off some time back. They reach the new caliper banjo fitting ok, but I’m not sure the slightly shorter stock hoses would. As stock hoses on these bikes are now 20 years or so old, they should all be tossed behind the woodpile anyway.
A trap for young players turned out to be the recess in the Tokico calipers where the copper washer fits for the banjo fitting. It is slightly smaller diameter than some copper washers so they don’t seat properly and leak. Smaller OD copper washers will sort that all out. Went back to using the used Goodridge washers we took off the stock calipers instead of the new ones from the local brake shop.
So that is where we are at right now. Waiting for a master cylinder rebuild kit to come in at the local HD dealer after the local indy shop could not source one. Then the real fun of bleeding will begin. We usually use a syringe full of DOT 5 hooked to the bleed nipple and pump the fluid and air uphill to the master cylinder banjo joint. Bit of teflon tape around the nipple threads stops leakage there, so nothing can go wrong...
Will keep you posted.
Oh yeah, will have cut out some clearance in these things to fit the new caliper, and figure I will put some air slots in the front to help disc cooling a little.
I was going to take them off and leave them off, but the damn things are so bad they are too good to take off. They are a somewhat uniquely American thing and folks here have never seen them before. Much hilarity ensues.

Last edited by Hopper; 12-10-2013 at 06:29 AM.
#2
12-10-2013, 06:32 AM


Seasoned HDF Member
Join Date: Jan 2012
Location: Upstate N.Y.-Rochester Area
Posts: 15,028
Received 14,537 Likes
on
5,852 Posts
#3
12-10-2013, 06:36 AM
#4
12-10-2013, 06:54 AM
Stellar HDF Member
#5
12-10-2013, 07:49 AM
Originally Posted by Tee⋁12074948
best thread within the forum right now as i love this type of nonsense. i have been badmouthing the moco brakes for some time now and will be upgrading mine this winter as well.
well done hopper, very well done in deed. Zimm has done this conversion but left the tokico branding intact.
well done hopper, very well done in deed. Zimm has done this conversion but left the tokico branding intact.
I hear the Harley Brembo brakes of recent years finally got to about where they should be. Dunno why it took them so long. Almost like they deliberately used poor master cylinder to slave cylinder ratios to make it almost impossible for operator error to lock up the front tire.
Maybe now with more new HD riders coming from a sportbike background they figured they had to get with the program?
I must look up Zimm's thread. Saw a few on here when I searched around but not sure if his was one of them.
I'll see if I can get a good photo of my template with a pair of rulers alongside for anyone who might want a starting point for making their own.
Last edited by Hopper; 12-10-2013 at 08:01 AM.
#6
12-10-2013, 09:42 AM
Stellar HDF Member
were u able to reuse the stocker rotors or did you have to upgrade to the 300mm?
this is my big question if going with the 2008+ moco brembos. hmm??? i see some people go both ways but not too sure about it. if brackets are one-off then run what ya got but if mass producing for market is when the questions st-gart for me and my meager means.
this is my big question if going with the 2008+ moco brembos. hmm??? i see some people go both ways but not too sure about it. if brackets are one-off then run what ya got but if mass producing for market is when the questions st-gart for me and my meager means.
#7
12-10-2013, 10:31 AM
Here's my thread:
https://www.hdforums.com/forum/wheel...1996-dyna.html
Here's how they look with some miles on the rotors:

https://www.hdforums.com/forum/wheel...1996-dyna.html
Here's how they look with some miles on the rotors:

Trending Topics

#10
12-10-2013, 07:59 PM
Seasoned HDF Member