FXDXT Saddlebag rebuild
#11
 08-01-2012, 12:45 PM


OK, this is the step by step post on how to do the lock install. I tweeked it a little for this other side because if you really worked it HARD you could get the other bag off. Position of the hole for the lock is critical.

These are the locks to get. There are several versions. Notice it says 1/4" drawer lock. I picked these up at Menards for $3.99 each. They have them keyed different or keyed alike so make sure you look at the key #s so you can use the same key for both bags. Also make sure they have the long cam (flat) that is shown below.

You will need to make 2 bends in this cam, the first one is marked with a black line on the lower one. Put it in a vice at the line and bend it about 45 degrees, then make the second bend. It should match up with the one on top. I took this picture with the pieces on 1/4" graph paper, so you should be able to match it up.
Next, measure straight down 2 3/8" from the top of the rear slot and make a mark. This will be the center of the 3/4" hole for the lock. In the picture, I just started the hole. As I said earlier, placement of this hole is critical. If it is up too far, the hole will start to go down into the molded out area of the plastic and the lock body won't fit straight. If it is too low, the cam won't reach up far enough to secure the bag. When drilling the hole make sure you have the rest of the bag out of the way, when the drill pops through it will mess up the inside of your bag if you don't. (Yes I did)

NOTE: The next three photos were taken of a different bag that has the holes in the wrong place, so don't use them as a reference for your holes.
Next, place the lock body in the hole with the flat sides straight up and down as shown in the photo below.

The next step will be to put the retainer ring in place. There are two different kinds shown in the photo above. They are shown upside down. One has two flat sections that have to get pressed into the plastic. The other one has 4 sharp prongs that have to get pressed in. If you have this kind you may have to drill 4 small holes in the plastic for the prongs to fit into. These pieces need to be secure as they are what prevents the whole lock from turning if someone is trying to steal the bags.

The photo above shows how I press the retainer ring into place. Put a block of wood on the underneath side of the lock, and use a socket (19mm works good, and what else it it good for) and hammer the ring down flush with the plastic.
Next put the retaining nut on (be carefull, as they cross-thread easily) and tighten down until there is just over 1/4" of the lock body showing above the nut.

Now insert the lock cylinder from the inside of the bag. This works best with the key in the lock. You will now need to put the little notched washer in place (an extra one is shown in the photo below). You might have two different kinds in your lock kit. They are to limit the movement of the key to either 90 or 180 degrees. You want to use the one for 90 degrees. What limits the movement is the little stud that sticks up on the lock body (black arrow). Put the washer in place so the notched out area allows you to turn the key the correct way. You will have to use your brain here and figure it out as I can't think of any easy way to explain it.

Next, put your newly bent cam in place and use the little screw with star washer to hold it in place. Use blue Loctite on the screw (these will go on a Harley you know). You may have to bend the cam a little or bend the bracket up a little as shown at the black arrow below to get the lock to turn smoothly. This pic shows the finished job with the FXDXT docking hardware in the slot. With it done like this I could not get the docking hardware off the bag without unlocking it.

Now you can do the other side.
Keep ridin'
Garry
These are the locks to get. There are several versions. Notice it says 1/4" drawer lock. I picked these up at Menards for $3.99 each. They have them keyed different or keyed alike so make sure you look at the key #s so you can use the same key for both bags. Also make sure they have the long cam (flat) that is shown below.
You will need to make 2 bends in this cam, the first one is marked with a black line on the lower one. Put it in a vice at the line and bend it about 45 degrees, then make the second bend. It should match up with the one on top. I took this picture with the pieces on 1/4" graph paper, so you should be able to match it up.
Next, measure straight down 2 3/8" from the top of the rear slot and make a mark. This will be the center of the 3/4" hole for the lock. In the picture, I just started the hole. As I said earlier, placement of this hole is critical. If it is up too far, the hole will start to go down into the molded out area of the plastic and the lock body won't fit straight. If it is too low, the cam won't reach up far enough to secure the bag. When drilling the hole make sure you have the rest of the bag out of the way, when the drill pops through it will mess up the inside of your bag if you don't. (Yes I did)
NOTE: The next three photos were taken of a different bag that has the holes in the wrong place, so don't use them as a reference for your holes.
Next, place the lock body in the hole with the flat sides straight up and down as shown in the photo below.
The next step will be to put the retainer ring in place. There are two different kinds shown in the photo above. They are shown upside down. One has two flat sections that have to get pressed into the plastic. The other one has 4 sharp prongs that have to get pressed in. If you have this kind you may have to drill 4 small holes in the plastic for the prongs to fit into. These pieces need to be secure as they are what prevents the whole lock from turning if someone is trying to steal the bags.
The photo above shows how I press the retainer ring into place. Put a block of wood on the underneath side of the lock, and use a socket (19mm works good, and what else it it good for) and hammer the ring down flush with the plastic.
Next put the retaining nut on (be carefull, as they cross-thread easily) and tighten down until there is just over 1/4" of the lock body showing above the nut.
Now insert the lock cylinder from the inside of the bag. This works best with the key in the lock. You will now need to put the little notched washer in place (an extra one is shown in the photo below). You might have two different kinds in your lock kit. They are to limit the movement of the key to either 90 or 180 degrees. You want to use the one for 90 degrees. What limits the movement is the little stud that sticks up on the lock body (black arrow). Put the washer in place so the notched out area allows you to turn the key the correct way. You will have to use your brain here and figure it out as I can't think of any easy way to explain it.
Next, put your newly bent cam in place and use the little screw with star washer to hold it in place. Use blue Loctite on the screw (these will go on a Harley you know). You may have to bend the cam a little or bend the bracket up a little as shown at the black arrow below to get the lock to turn smoothly. This pic shows the finished job with the FXDXT docking hardware in the slot. With it done like this I could not get the docking hardware off the bag without unlocking it.
Now you can do the other side.
Keep ridin'
Garry
#12
08-03-2012, 11:03 AM

#13
08-08-2012, 09:21 AM

#14
08-25-2012, 06:30 AM
OK, back to the rebuild. In this first pic you can see how I removed the outside pocket from the bag.

We took the pocket completely apart and made pattern pieces and then made a new one WITHOUT a logo.

To sew the pocket back on, I had to remove the entire "face" piece from the bag. It was at this point that I realized that the average DIY guy wasn't going to be able to do this. I was hoping to be able to make kits that guys could use to redo their bags, but other than a new lid install, it is just too difficult. So we will switch gears and concentrate on building a complete replacement bag.
After looking at how much space was wasted in the stock bags by the way they molded the plastic back, I decided to make new molds that incorporated our new patent pending mounting system. Here is a pic of the rough plug mold mounted on the bike with the new bracket.
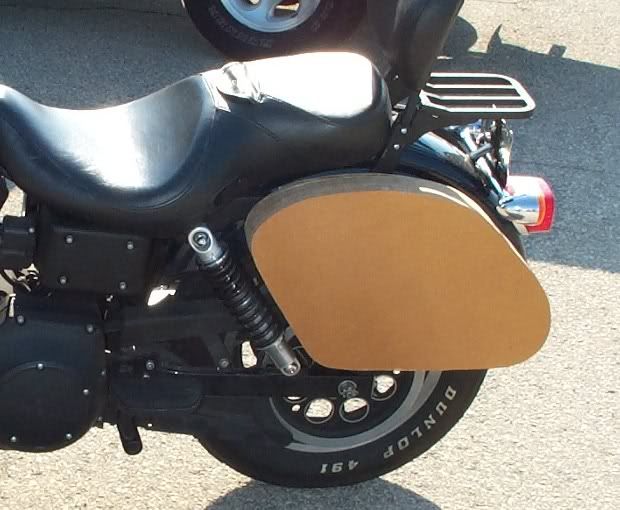
I laid a piece of the cordura material on top of the mold in this next pic to simulate where the back of the bag will be and measured the distance from the fender to the "bag" with the bracket mounted. 1 1/2" on the tape. The next pic shows the stock bag at 2".


This pic from rear shows how close the bag will be to the bike. I wanted to close the gap as much as possible.

This pic shows just the bracket mounted on the bike. This is what I have been spending so much time on. It is our patent pending mounting system modified to be as close as possible to the bike. It clamps down really tight and is REALLY strong due the compound angled bends. Although it doesn't look like it in the pic, it clears the belt guard by about an inch.

This next pic shows the rough plug mold with the bracket attached. The clamping handle is shown in the "off" position where it also doubles as a carrying handle for the bag.

Next week I will be finishing out the molds and forming the plastic backs. I would appreciate feedback from you guys as far as ideas and how it is going so far. Also how many of you use detachable backrests or fender racks? They make the bags stick out another inch, but I have an idea of how to make new sideplates (cnc plasma cutters are great) that would mount differently and only make the bags stick out an extra 1/4".
Later
Garry
We took the pocket completely apart and made pattern pieces and then made a new one WITHOUT a logo.
To sew the pocket back on, I had to remove the entire "face" piece from the bag. It was at this point that I realized that the average DIY guy wasn't going to be able to do this. I was hoping to be able to make kits that guys could use to redo their bags, but other than a new lid install, it is just too difficult. So we will switch gears and concentrate on building a complete replacement bag.
After looking at how much space was wasted in the stock bags by the way they molded the plastic back, I decided to make new molds that incorporated our new patent pending mounting system. Here is a pic of the rough plug mold mounted on the bike with the new bracket.
I laid a piece of the cordura material on top of the mold in this next pic to simulate where the back of the bag will be and measured the distance from the fender to the "bag" with the bracket mounted. 1 1/2" on the tape. The next pic shows the stock bag at 2".
This pic from rear shows how close the bag will be to the bike. I wanted to close the gap as much as possible.
This pic shows just the bracket mounted on the bike. This is what I have been spending so much time on. It is our patent pending mounting system modified to be as close as possible to the bike. It clamps down really tight and is REALLY strong due the compound angled bends. Although it doesn't look like it in the pic, it clears the belt guard by about an inch.
This next pic shows the rough plug mold with the bracket attached. The clamping handle is shown in the "off" position where it also doubles as a carrying handle for the bag.
Next week I will be finishing out the molds and forming the plastic backs. I would appreciate feedback from you guys as far as ideas and how it is going so far. Also how many of you use detachable backrests or fender racks? They make the bags stick out another inch, but I have an idea of how to make new sideplates (cnc plasma cutters are great) that would mount differently and only make the bags stick out an extra 1/4".
Later
Garry
#15
08-25-2012, 06:41 AM

Tourer

#17
08-25-2012, 11:53 AM

Outstanding HDF Member
This setup looks great!
If I have some reliable ( not saggy ) when empty saddlebags I will not be using a sissy bar OR a luggage rack.
I have two questions.
1. Are these bags gonna be made in leather or cordura?
2. Is the carrying handle gonna be visible in the locked position once the bag is built?
Thank You for doing this!!

#19
08-26-2012, 12:40 AM
Tourer