Hinged Shovel fender install, w/ pics.
#31
 11-29-2010, 08:08 AM

Elite HDF Member
Looks good Neil ...
Yesterday was a pretty day; but, it got really chilly after the sun went down ....
I rode back to the Tidewater from DC yesterday afternoon ... I-95 South was a parking lot ... I got off at Fredericksburg and took 17 from there ... (it was 29* when I passed through Tappahannock) ....
How are you securing the rear part (aft of the hinge) ...? Do you have a strap bolting it to the strut on the inside ...?
Work on mine is progressing ... I must be using a different fender, because I need some spacers to take up the gap between the struts and the fender ... I am making them to 'elongate' the strut to reach the rear mounting hole, aft of the hinge ....
I'll start a thread to show what I've done in a couple of days ....
R/
'Chop
p.s. did the front of your fender require any cutting or shaping to clear the swingarm and fit properly ...?
Last edited by SURFOR Chop; 11-29-2010 at 08:11 AM.
#32
11-29-2010, 09:37 AM
How are you securing the rear part (aft of the hinge) ...? Do you have a strap bolting it to the strut on the inside ...?
Work on mine is progressing ... I must be using a different fender, because I need some spacers to take up the gap between the struts and the fender ... I am making them to 'elongate' the strut to reach the rear mounting hole, aft of the hinge ....
I'll start a thread to show what I've done in a couple of days ....
R/
'Chop
p.s. did the front of your fender require any cutting or shaping to clear the swingarm and fit properly ...?
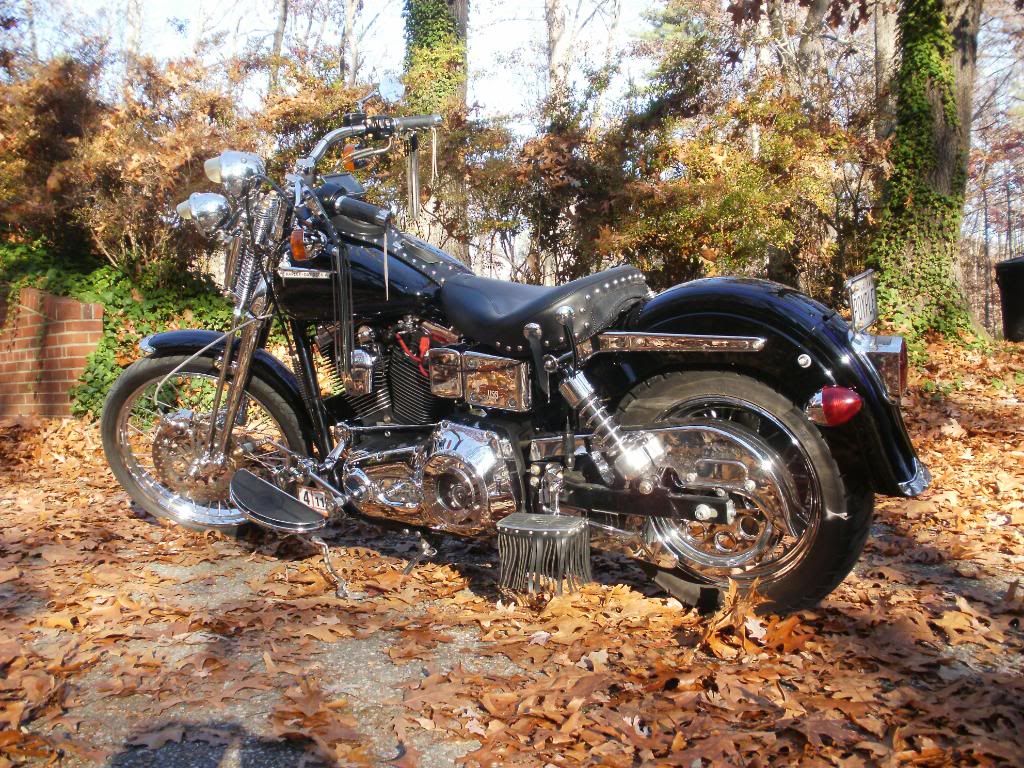
The second thing you mentioned was locking the hinged rear section down. At least with this particular rear fender, I did not have that concern. From the factory there are two fairly stout steel brackets welded to the inside of the front section of the fender. They extend back threw the rear section, and a bolt threw each side of the rear section bolts that rear section to the bracket. Those bolts, in addition the the riveted hinge itself and the 4 additional welded alignment tabs (that Shovels used from the factory) hold the rear section extremely tight. Believe me, before I had this monster in my possession, I was already assuming it was a pile of lightweight dog-poop like the debrix fender was. I had already visited my local welder about handing it over to him to weld up supporting brackets, but when it got here I was shocked how heavy, thick and strong the fender was. If you notice in my pictures, the bolt between the rear tip of the strut and the turn signal is that bolt. It a little too noticeable right now because in my haste to finish I used bright white nylon washers between the bolts and the fender to protect the paint from chipping. I will switch those nylon washers to black sooner or later, but at the time all I had was the white ones.

Also, let me offer you one tip since you mentioned extending your strut by means of a bracket to secure the hinged section. Make sure you check clearance for accessories such as sissy bars and passenger seats. Because at least on my fender, had I tried to use the Shovelhead hole pattern that came pre drilled, the fender would have sat so high the sissy bar brackets would never have fit, and would have been in total contact the fender. Using that hole pattern would have meant not being able to install the sissy bar and I would have lost my backrest and luggage rack. So check that fender with every single accessory you "may" want to use one day down the road, even if you don't use it now, because once its on and painted, its too late! If you look closely at where my bright white rear section lock down bolt actually is, you can really see how much farther I had to slide the fender down in the struts than where the factory Shovelhead holes would have put it.
Lastly.....geeez I'm rambling.....Yes, I did have to trim the fender. When I first bolted it to the bike it didn't appear as if I was going to need to do that, but once I really got it to where I liked it I wound up cutting about two inches off the front tip and over the belt guard. I just free handed it with a sharpie pen and cut it with a jigsaw, then smoothed the cut with a 5 inch grinder. Not very much trouble or work at all. I hope all this rambling is a little helpful.
Neil
Last edited by bikerlaw; 11-29-2010 at 09:42 AM.
#34
11-29-2010, 03:57 PM

Advanced
Join Date: Mar 2010
Location: Livingston, Texas
Posts: 68
Likes: 0
Received 0 Likes
on
0 Posts
#35
11-29-2010, 09:15 PM
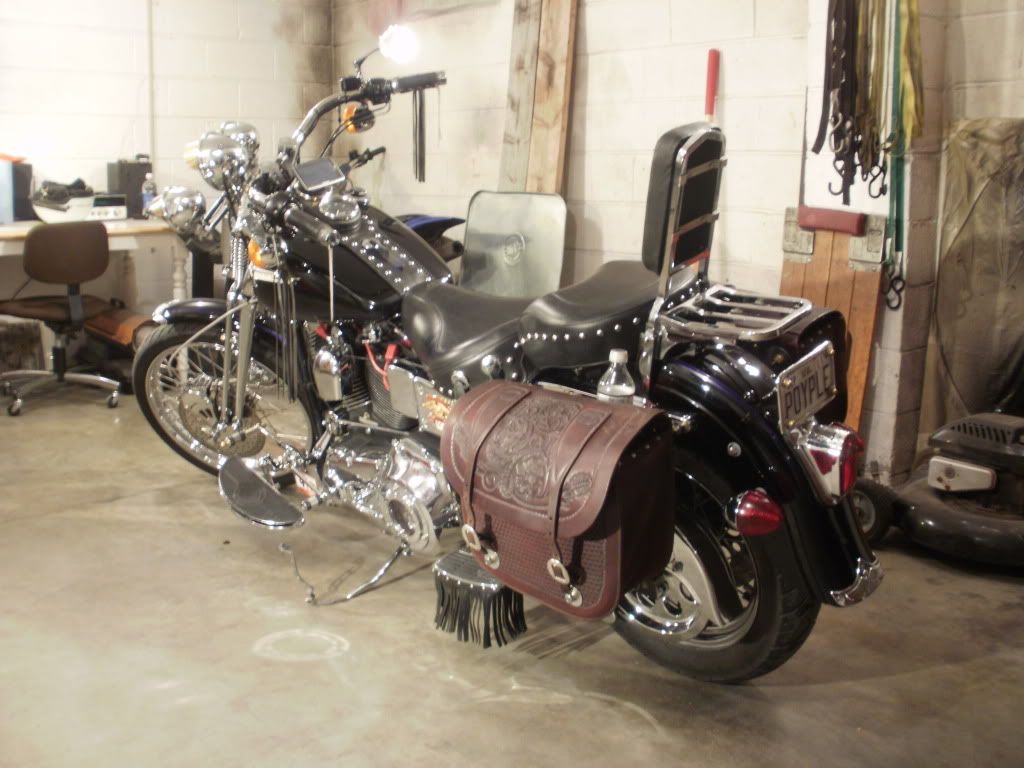
Phew! I put the seat, bags, sissy bar, pad, brackets and luggage rack on. Now the fender sits exactly how I hoped it would. I was a tad worried about sitting too high in the rear, but I think now that its all finished its sitting where it ought to. I would have put the lowering blocks back on, but I'd rather not run them unless theres a true need for them. Thanks for all the props and comments along the way. Now, all the wife and myself need is a few sunny weekends to enjoy the old girl. She's done for a while....thats for sure.
#36
12-02-2010, 09:16 PM
Elite HDF Member
An update with a few photos ...
The first three show the cut-off to the front edge of the fender ... my cut to the belt guard side did not take enough ... I hadn't looked at the stock fender ... the cutout needs to extend all the way around the side ....


These two photos show where the fender contacted the frame downtubes ... so, I needed to flatten the spot down the way the stock fender is ....


The first three show the cut-off to the front edge of the fender ... my cut to the belt guard side did not take enough ... I hadn't looked at the stock fender ... the cutout needs to extend all the way around the side ....
These two photos show where the fender contacted the frame downtubes ... so, I needed to flatten the spot down the way the stock fender is ....
#37
12-02-2010, 09:35 PM
Elite HDF Member


#38
12-02-2010, 09:52 PM
Elite HDF Member
Put my seat in place ... fits about the same as with my stock fender ...


A little gap ... but, once I get the fasteners worked out, should pull it up snug ... I think I am going to use studs with stainless steel or chrome acorn nuts ....

bikerlaw advised checking clearance with any accessory I plan on using ... this is my QD rack/back rest on the stock fender ... there appears to be enough space to clear the new fender ... I'll try it on the fender when I work on it tomorrow ... I need to mark it up for holes for the seat nut, tombstone tail lamp and turn signal bar ... I think that's all I'll do for now ... the license plate mounts on the top of the tombstone ...

So far, turning out about how I was hoping ....
A little gap ... but, once I get the fasteners worked out, should pull it up snug ... I think I am going to use studs with stainless steel or chrome acorn nuts ....
bikerlaw advised checking clearance with any accessory I plan on using ... this is my QD rack/back rest on the stock fender ... there appears to be enough space to clear the new fender ... I'll try it on the fender when I work on it tomorrow ... I need to mark it up for holes for the seat nut, tombstone tail lamp and turn signal bar ... I think that's all I'll do for now ... the license plate mounts on the top of the tombstone ...
So far, turning out about how I was hoping ....
#40
12-03-2010, 08:28 AM
Elite HDF Member