Installing Docking Hardware on '10 Fat Bob
#1
 05-05-2010, 03:08 AM


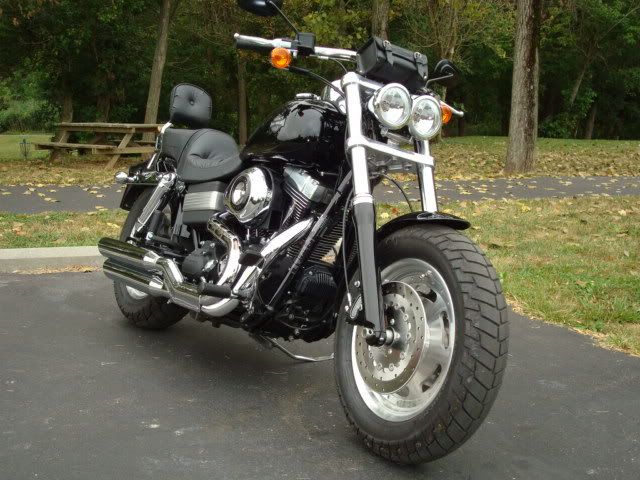
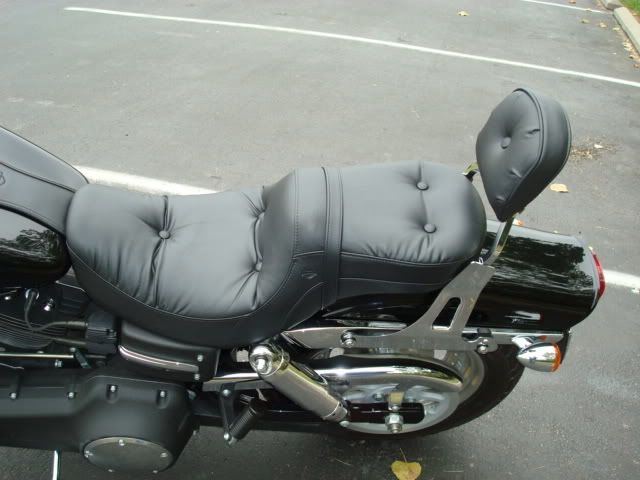
I'm going tomorrow to pick up all the parts for a detachable sissy bar, back rest and luggage rack. Does anybody have any pics or pointers on installing the docking hardware on a Fat Bob.
I know I'll need a torque wrench and blue loctite. I don't have a jack for my bike, will that make it a pain in the ***? It looks pretty straight forward but I wanted to get some opinions before I try to tackle it on my own.
The dealer wants 1 hour labor ($80) to do it and I'd rather spend that on more stuff for my bike.
#3
05-05-2010, 06:50 AM
#4
05-05-2010, 11:34 AM

Cruiser
#6
05-05-2010, 02:35 PM
Easy to do just make sure to loctite all of the bolts with blue. A little tip on the mounting hardware, put about one wrap of electrical tape around the docking points for the sideplates. When I first put mine on I didn't and on decel you get a pretty good rattle that's more than mildly annoying.
#7
05-05-2010, 08:04 PM
I installed the docking hardware and put the detachable side plates and sissy bar together and It was no problem at all.
Tools Used:
3/8 ratchet
3/8 torque wrench ( 5-80 ft lbs) Remember 12 inch lbs = 1 ft lb
T45 Torx bit (to remove the stock fender support bolts)
7/32 Hex bit (to install the new hardware)
T27 Torx bit (to install the sissy bar onto the side plates)
Red Loctite (all applications called for Red loctite 262, but I had 271 so I used that)
Installation was very straight forward. Remove stock bolts one at a time in a criss cross method (i.e. left front, right rear, right front, left rear) and install the corresponding hardware using red loctite and the proper torque. Took about half an hour for everything.
I'm still waiting on the luggage rack and backrest pad to come in next week. The idea of putting on electric tape sounds good. There was a bit of play once everything was mounted that would be sure to cause some rattle.
Final word: Don't forget to unload your torque wrench before you put it away.
Trending Topics
#8
05-05-2010, 08:32 PM
Tourer
I didn't use a torque wrench but I did use blue loctite.
I still don't have a picture with the luggage rack yet.
Here is a copy and paste I keep for quick seat answers.
I have added the luggage rack as well.
#52159-06 pillow look seat $229.95
#52656-04 backrest pad $59.95
#52877-08 kit upright (sissy bar) $84.95
#52866-06 detachable sideplates $139.95
#53964-06 docking hardware $24.95
#53982-08 luggage rack $134.95
Tim
#9
05-05-2010, 10:25 PM
I'm going tomorrow to pick up all the parts for a detachable sissy bar, back rest and luggage rack. Does anybody have any pics or pointers on installing the docking hardware on a Fat Bob.
I know I'll need a torque wrench and blue loctite. I don't have a jack for my bike, will that make it a pain in the ***? It looks pretty straight forward but I wanted to get some opinions before I try to tackle it on my own.
The dealer wants 1 hour labor ($80) to do it and I'd rather spend that on more stuff for my bike.
I know I'll need a torque wrench and blue loctite. I don't have a jack for my bike, will that make it a pain in the ***? It looks pretty straight forward but I wanted to get some opinions before I try to tackle it on my own.
The dealer wants 1 hour labor ($80) to do it and I'd rather spend that on more stuff for my bike.
Love the detachable hardware. I have two different backrests for mine, and detachable saddlebags ... can change the look in less than a minute.
Last edited by sanlyn; 05-05-2010 at 10:29 PM.
#10
05-06-2010, 05:18 AM
Just a quick word about the use of Loctite for those who don't know.
The red is considered permanent and will only be removed with the application of heat. (the heating of the bolt with a torch will break the bond)
The blue is removable. It will lock the bolt but still be removable (with difficulty) at a future date.
The red is considered permanent and will only be removed with the application of heat. (the heating of the bolt with a torch will break the bond)
The blue is removable. It will lock the bolt but still be removable (with difficulty) at a future date.
The following users liked this post:
SHOWTIME564 (01-08-2018)