Relocating the ignition to the dash (Street Bob).
#1
 10-01-2008, 06:09 PM


Join Date: Jul 2008
Posts: 25
Likes: 0
Received 0 Likes
on
0 Posts
#2
10-01-2008, 06:22 PM
#5
10-01-2008, 06:50 PM

#6
10-01-2008, 07:12 PM
Cruiser
Join Date: Jun 2008
Location: Brunswick, Ohio
Posts: 156
Likes: 0
Received 0 Likes
on
0 Posts
https://www.hdforums.com/forum/showt...8Street+Bob%29
One in the forum I found, I'm looking to do the same thing soon.
One in the forum I found, I'm looking to do the same thing soon.
Last edited by Aeromech; 10-01-2008 at 07:39 PM.
#7
10-01-2008, 08:36 PM
Road Captain
Join Date: Feb 2007
Location: Upstate NY
Posts: 619
Likes: 0
Received 0 Likes
on
0 Posts
Trending Topics
#8
10-01-2008, 09:44 PM

I did mine also...There are pics in my album. It's an easy mod and just took a couple of hours. Ordered everything from Zanotti. Switch uses the same key as the now fork lock on the neck. Even ordered a new fork lock label to go on the neck. 07 StreetBob has moded his also.
#9
10-01-2008, 10:14 PM

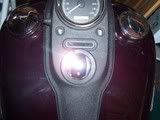
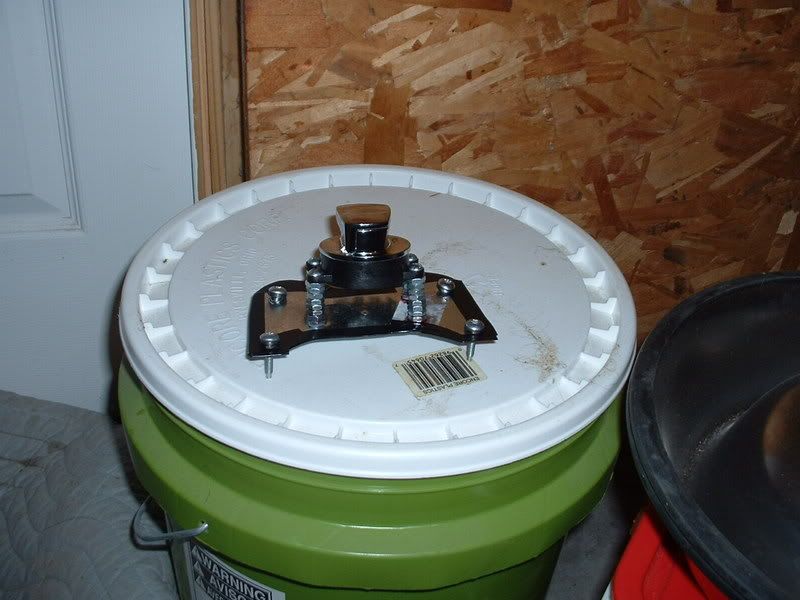
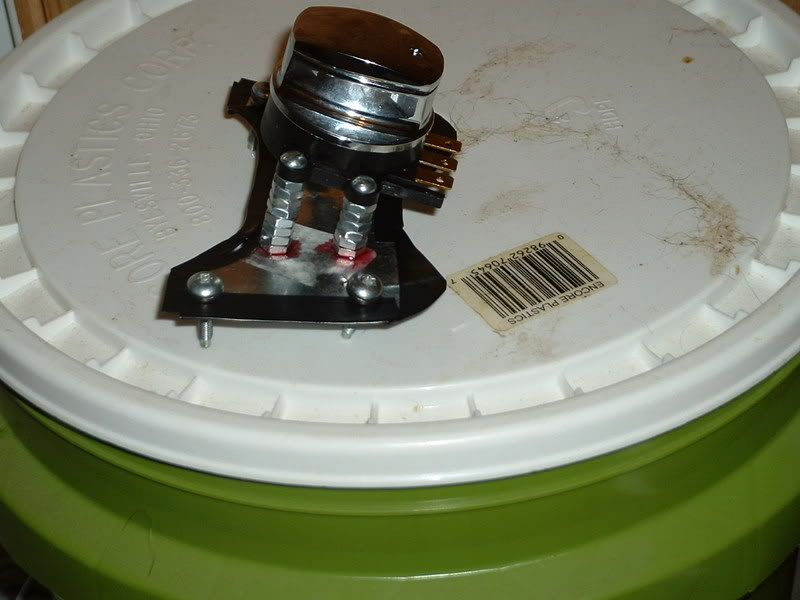
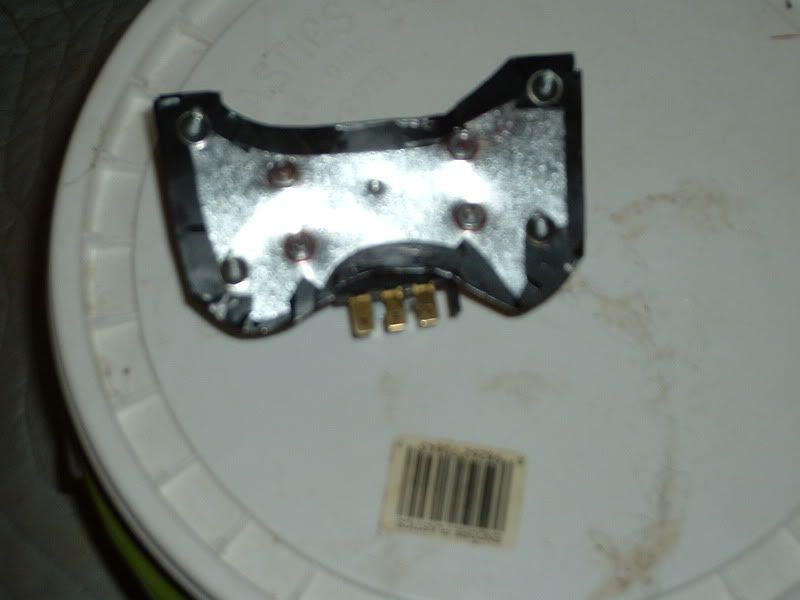
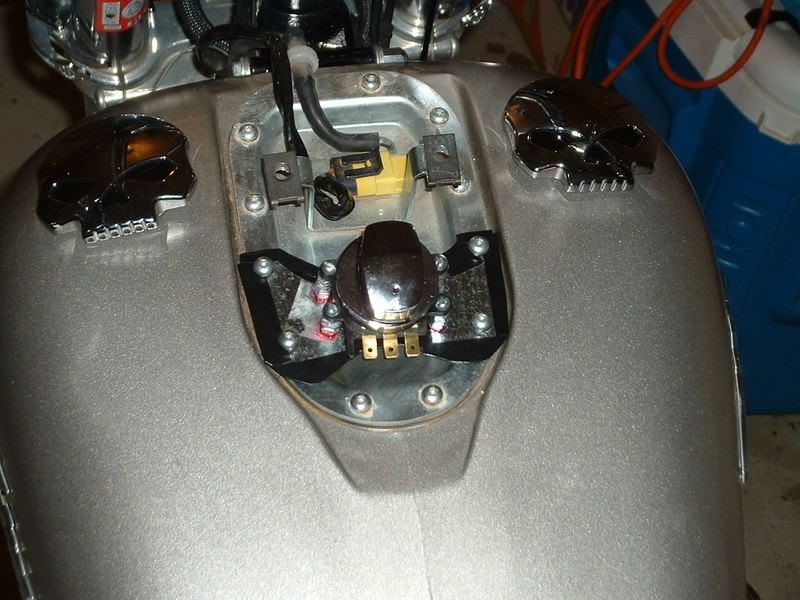
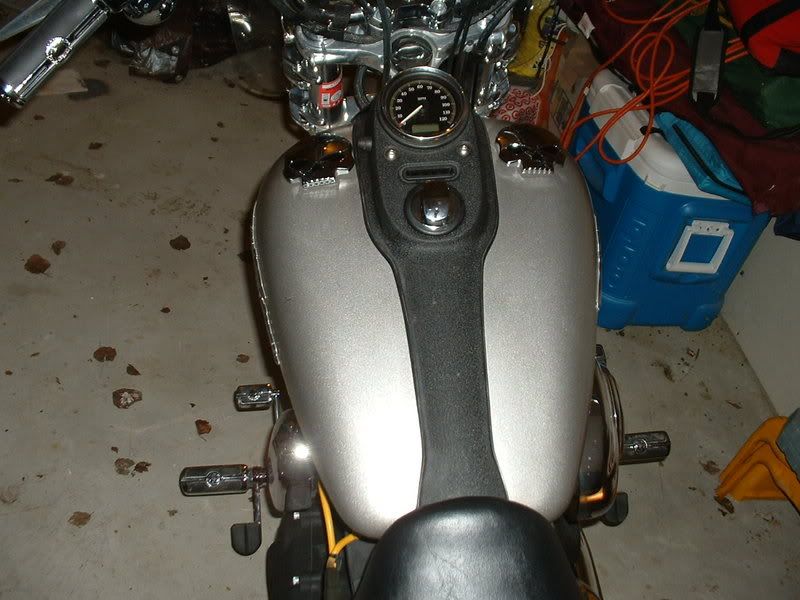
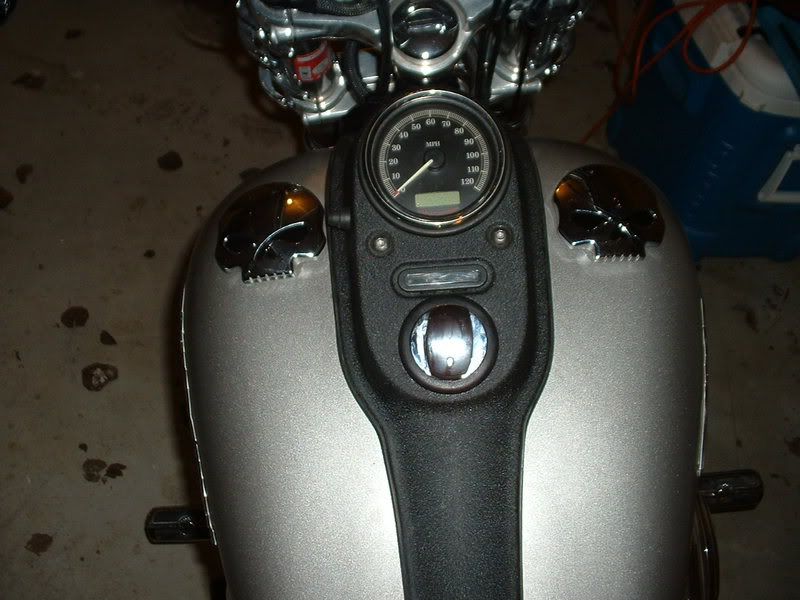
A few Pixz of My Street bob Ignition Mod
I love the way it turned it out!!


__________________
Here is also abunch of different posts and info I have compiled some of may be redundant but better to have too much then not enuff also harley does make a chrome dash you can get with the hole in the dash ready to go
A few tips: if you don't have a drill press, consider having a local machine shop drill the hole in the dash.
Disconnect the ignition cable connector before attempting to fish the wires through the frame neck.
You'll need to add wire to reach the new switch; I used wireless terminals and covered with heat shrink to prevent coming undone.
Pick up a few new sealing washers from your dealer for when you attach your mounting plate to the tank bulk head. Make sure they give you the correct ones
If you have any other questions if you go ahead with it just let me know.
Chrome Dash
61712-08
looks great, you can buy it from Zanotti online for 197.00
https://www.hdforums.com/m_1449279/tm.htm
Hi Guys, I just finished re-locating my ignition from that PITA frame neck switch. It�s
easy. Needless to say this is on your own head: I�m not quite sure about photobucket so
tell me if the links to the pics don�t work!
Take off the seat and the console. Disconnect the harness to the instruments to free the
console. Note the rubber boot on the press switch needs unscrewing a little before you
pry (carefully) on the boot.
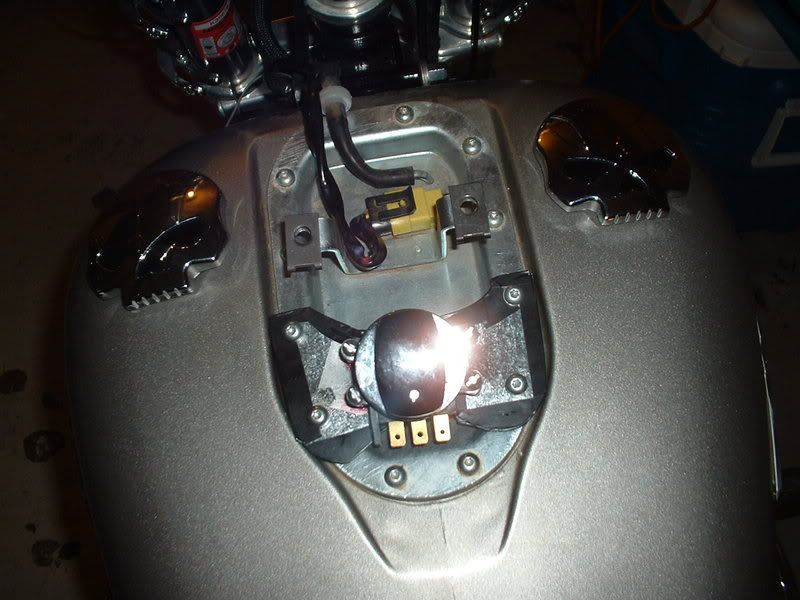
Assuming you are using a pattern switch like mine you will need to hole saw around
2�/51mm diameter. If you mark this carefully you should take out all the little
indentations in this area of the console. I used a pillar driller (and a pilot hole).
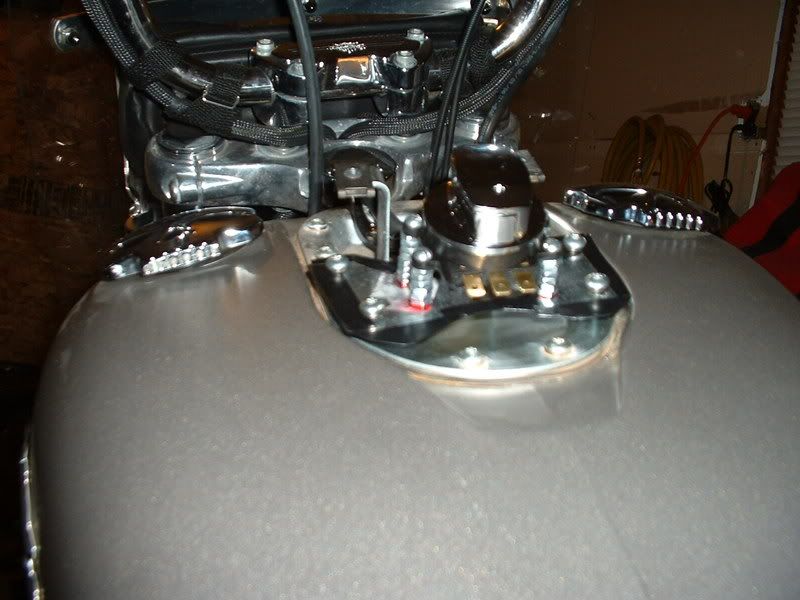
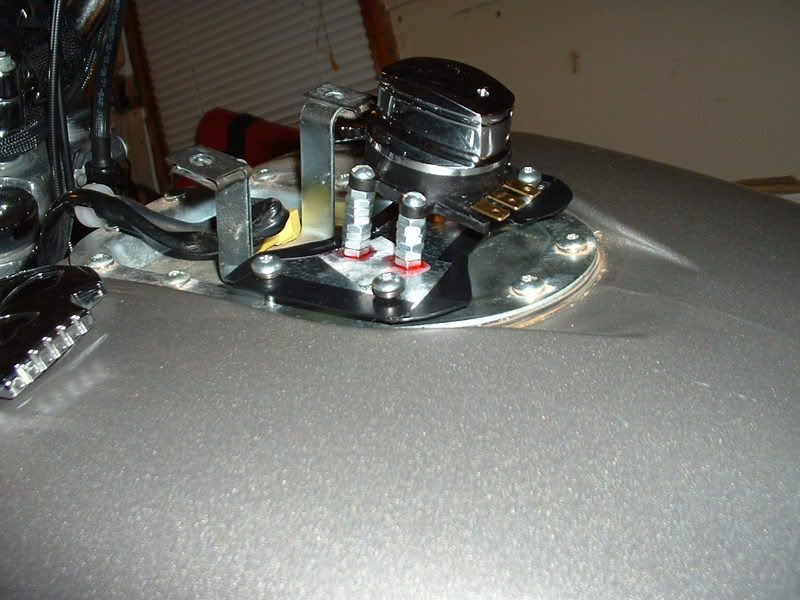
Make up a small sub-plate (I used 1/16� thick aluminium) and fix it using some of the
screws holding the petrol tank top bulkhead plate on.
Use double sided tape on the base of the new switch. Pull the switch back into the new
hole in the console and offer them up to the tank. Align the console over its fixing spire
nuts and when you�re happy with the switch position drop it down and press it onto the
tape to fix it down.
Take off the console carefully and mark the switch fixing hole points on the new subplate.
Bolt together, I used brass BA screws. I also put an extra nut UNDER the front 2
fixing holes so the slope of the switch reflected the slope of the console.
Re-assemble and check concentricity with the hole and the slope. You can slot the holes
for position and use washers to jack up the slope till you get it spot on. Once you have it
right, fix the switch & plate down. Trim the edge of the hole in the console with plastic
trim. Make sure the switch moves freely, mine is a bit tight. Loctite or superglue the nuts!
Access the existing ignition feed via the plastic cover plate at the back of the frame neck,
inside the fame down tubes at the top. You can feel the 3 way connector on the back of
the neck switch. Pop the clips each end and you can pull back the lead.
At the LHS of the frame neck, remove the rubber grommet. Use a wire hook to slip inside
this hole, catch the ignition cable and pull it out. Replace the grommet and the plastic
frame plate.
Route this ignition cable over the tank front along with the other cables into the console
area. I left the connector on so I can de-convert if I want to. Connect in using spades and
extend down to the new switch. Terminate on the switch with ring crimps. Mine is an
HDI model. Red is the common feed, Red/black to the ignition and Red/Grey (only gray
in U.S.!) to the accessories.
Fire it up. Put it back together. Ensure you don�t crimp the gas line which is bundled
together with the electrics under the console edge.
I took the opportunity to (satin) black out the screws on assembly.
I can now ride with my keys in my pocket and my HDSS auto-arms as soon as I switch
off and walk away.
Not the most complicated mod in the world but so satisfying. I don�t know why HD
didn�t get it right in the first place!
Sorry about the photo quality � forgot my camera. Thank heavens for mobile phones.
All the best. WW.
http://i176.photobucket.com/albums/w...Photo-0043.jpg
http://i176.photobucket.com/albums/w...Photo-0042.jpg
http://i176.photobucket.com/albums/w...Photo-0041.jpg
http://i176.photobucket.com/albums/w...Photo-0037.jpg
http://i176.photobucket.com/albums/w...Photo-0031.jpg
http://i176.photobucket.com/albums/w...Photo-0030.jpg
http://i176.photobucket.com/albums/w...Photo-0029.jpg
http://i176.photobucket.com/albums/w...Photo-0028.jpg
http://i176.photobucket.com/albums/w...Photo-0026.jpg
http://i176.photobucket.com/albums/w...Photo-0025.jpg
http://i176.photobucket.com/albums/w...Photo-0024.jpg
____________________
Hi Guys - some quickfire answers to your queries:-
SOB - The hardest part is plucking up the courage to hack into a new bike BUT you
would find it handy to use a pillar driller or drill press to make the hole in the console. It
would be an SOB to try and holesaw 2" with a hand drill.
Greg3131 - The closest I ever got to Las Vegas was Wayne in NJ!!!
mikeurig - Other than the switch, which is a pattern part off ebay (around 20 semoleans)
all you need is a bit of alloy plate, some wire and crimps, plastic trim for the hole and
some small nuts and bolts.
aceman64 - The pattern switch I used is designed to suit almost everything including
sloptails.
FJ4069 - The steering lock/key arrangement in the frame neck stays exactly as-is. It just
doesn't do anything electrical any more.
damadam - You need some plastic trim U section for capping the raw edge of the hole. I
didn't have any (and I still don't yet). I split down the length of some black PVC electrical
cable, pulled out the copper and used the plastic for the trim. It looks fine but I'll change
it out when I get something better - prob in about 5 years knowing me!!
I tell you all, this mod is easy peasy lemon squeezy. MAINLY YOU JUST NEED THE
***** TO GO FOR IT AND A SENSE OF ADVENTURE. I didn't even disconnect the
battery! Just make sure when you're playing with the wiring you don't flash any lives
around when you have the little screws out of the gas tank plate - not a good thing.
You won't regret it. Jumping on it and just turning the switch and hitting the button is so
much easier than swinging over the tank like a monkey and fumbling with the key.
All the best. WW.
_________________
Stop Press!! I just went for my first proper ride since the switch change and I have no
turn signals, no horn and no back lights!
I think I've found out what the problem is. I wired the red feed to the common on the
switch, the red/black (ignition) to one side of the switch and the red/gray (accessories) to
the other side. This means at the moment you can either switch red to red/black OR red to
red/gray. I do have (half) a copy of the wiring diagram and I think I should have wired as
follows:
Switch pos 1 - no feed
Switch Pos 2 - red Feed to red/black AND red/gray
Switch pos 3 - red Feed to red/gray only.
Looking at the half a diagram I have if you don't have power to the red/black AND the
red/gray under normal riding half the circuits don't work.
Does anyone know for sure whether the 'regular' ignition switch feeds power to the
red/black AND the red/gray for normal riding and then only to the red/gray for
accessories?
I know, I know, I should have bought the manual but these are 130 bucks over here.
Robbing bastards.
All the best. WW
_________________
Problem fixed:
1/ You do indeed need to have a connection between the live (red) and the red/black
AND the red/gray all together to have everything working (turn signals, rear lights etc).
2/ You only need to have the red/gray connected to live for the accessories.
All the best. W.
_____________
the gasket was two, one and a half inch gromets cut and glued together. the switch was
about 25 dollars i think i got it on ebay.
______________
if not ebay, maybe this is the best option?
http://www.jpcycles.com/productgroup...D6B-3D19-439E-
9CF7E96940FF96F1&search=ignition+switch&store=Harl ey&page=4
___________________
Well I kinda f**ked up on this mod.
Things I learned:
1. Buying the switch from JP with the 3 prongs makes this mod easier
2. The switch from JP will be shorter then the one used in the first post of this thread
3. figure out number 2 before cutting the hole or your f**ked
4. if you buy a hole saw and the package says 2", check the bit itself because it maybe a
2"1/4" bit in a 2" box. And, well, your F**ked
5. if you cut a hole to fit a grommet and plan on mounting the switch to a plate on the
tank, well your f**ked
6. If you realize this after your on to assembly, you will be calling the dealer and forking
over 100 bucks for a new dash.
Although i got the switch working with a little hack job, I will be redoing it a little better
next week. One thing I did do was build a wire Harness for the ignition. this came out
looking stock. I want the switch housing to look stock also, so I will cut the hole 1/32 to
small and rotor sand it out for an exact fit with no grommet. Then use the four mounting
holes form the switch through the dash with harley Allen nuts.
______________
Got my grommet from cableorganizer.com
part# O-RPD-G3311
2"X1/8"
O-RPD-G3311
2" x 1/8" x 2 1/4" x 2 5/8" x 3/8" Rubber Grommet
I love the way it turned it out!!
__________________
Here is also abunch of different posts and info I have compiled some of may be redundant but better to have too much then not enuff also harley does make a chrome dash you can get with the hole in the dash ready to go
A few tips: if you don't have a drill press, consider having a local machine shop drill the hole in the dash.
Disconnect the ignition cable connector before attempting to fish the wires through the frame neck.
You'll need to add wire to reach the new switch; I used wireless terminals and covered with heat shrink to prevent coming undone.
Pick up a few new sealing washers from your dealer for when you attach your mounting plate to the tank bulk head. Make sure they give you the correct ones
If you have any other questions if you go ahead with it just let me know.
Chrome Dash
61712-08
looks great, you can buy it from Zanotti online for 197.00
https://www.hdforums.com/m_1449279/tm.htm
Hi Guys, I just finished re-locating my ignition from that PITA frame neck switch. It�s
easy. Needless to say this is on your own head: I�m not quite sure about photobucket so
tell me if the links to the pics don�t work!
Take off the seat and the console. Disconnect the harness to the instruments to free the
console. Note the rubber boot on the press switch needs unscrewing a little before you
pry (carefully) on the boot.
Assuming you are using a pattern switch like mine you will need to hole saw around
2�/51mm diameter. If you mark this carefully you should take out all the little
indentations in this area of the console. I used a pillar driller (and a pilot hole).
Make up a small sub-plate (I used 1/16� thick aluminium) and fix it using some of the
screws holding the petrol tank top bulkhead plate on.
Use double sided tape on the base of the new switch. Pull the switch back into the new
hole in the console and offer them up to the tank. Align the console over its fixing spire
nuts and when you�re happy with the switch position drop it down and press it onto the
tape to fix it down.
Take off the console carefully and mark the switch fixing hole points on the new subplate.
Bolt together, I used brass BA screws. I also put an extra nut UNDER the front 2
fixing holes so the slope of the switch reflected the slope of the console.
Re-assemble and check concentricity with the hole and the slope. You can slot the holes
for position and use washers to jack up the slope till you get it spot on. Once you have it
right, fix the switch & plate down. Trim the edge of the hole in the console with plastic
trim. Make sure the switch moves freely, mine is a bit tight. Loctite or superglue the nuts!
Access the existing ignition feed via the plastic cover plate at the back of the frame neck,
inside the fame down tubes at the top. You can feel the 3 way connector on the back of
the neck switch. Pop the clips each end and you can pull back the lead.
At the LHS of the frame neck, remove the rubber grommet. Use a wire hook to slip inside
this hole, catch the ignition cable and pull it out. Replace the grommet and the plastic
frame plate.
Route this ignition cable over the tank front along with the other cables into the console
area. I left the connector on so I can de-convert if I want to. Connect in using spades and
extend down to the new switch. Terminate on the switch with ring crimps. Mine is an
HDI model. Red is the common feed, Red/black to the ignition and Red/Grey (only gray
in U.S.!) to the accessories.
Fire it up. Put it back together. Ensure you don�t crimp the gas line which is bundled
together with the electrics under the console edge.
I took the opportunity to (satin) black out the screws on assembly.
I can now ride with my keys in my pocket and my HDSS auto-arms as soon as I switch
off and walk away.
Not the most complicated mod in the world but so satisfying. I don�t know why HD
didn�t get it right in the first place!
Sorry about the photo quality � forgot my camera. Thank heavens for mobile phones.
All the best. WW.
http://i176.photobucket.com/albums/w...Photo-0043.jpg
http://i176.photobucket.com/albums/w...Photo-0042.jpg
http://i176.photobucket.com/albums/w...Photo-0041.jpg
http://i176.photobucket.com/albums/w...Photo-0037.jpg
http://i176.photobucket.com/albums/w...Photo-0031.jpg
http://i176.photobucket.com/albums/w...Photo-0030.jpg
http://i176.photobucket.com/albums/w...Photo-0029.jpg
http://i176.photobucket.com/albums/w...Photo-0028.jpg
http://i176.photobucket.com/albums/w...Photo-0026.jpg
http://i176.photobucket.com/albums/w...Photo-0025.jpg
http://i176.photobucket.com/albums/w...Photo-0024.jpg
____________________
Hi Guys - some quickfire answers to your queries:-
SOB - The hardest part is plucking up the courage to hack into a new bike BUT you
would find it handy to use a pillar driller or drill press to make the hole in the console. It
would be an SOB to try and holesaw 2" with a hand drill.
Greg3131 - The closest I ever got to Las Vegas was Wayne in NJ!!!
mikeurig - Other than the switch, which is a pattern part off ebay (around 20 semoleans)
all you need is a bit of alloy plate, some wire and crimps, plastic trim for the hole and
some small nuts and bolts.
aceman64 - The pattern switch I used is designed to suit almost everything including
sloptails.
FJ4069 - The steering lock/key arrangement in the frame neck stays exactly as-is. It just
doesn't do anything electrical any more.
damadam - You need some plastic trim U section for capping the raw edge of the hole. I
didn't have any (and I still don't yet). I split down the length of some black PVC electrical
cable, pulled out the copper and used the plastic for the trim. It looks fine but I'll change
it out when I get something better - prob in about 5 years knowing me!!
I tell you all, this mod is easy peasy lemon squeezy. MAINLY YOU JUST NEED THE
***** TO GO FOR IT AND A SENSE OF ADVENTURE. I didn't even disconnect the
battery! Just make sure when you're playing with the wiring you don't flash any lives
around when you have the little screws out of the gas tank plate - not a good thing.
You won't regret it. Jumping on it and just turning the switch and hitting the button is so
much easier than swinging over the tank like a monkey and fumbling with the key.
All the best. WW.
_________________
Stop Press!! I just went for my first proper ride since the switch change and I have no
turn signals, no horn and no back lights!
I think I've found out what the problem is. I wired the red feed to the common on the
switch, the red/black (ignition) to one side of the switch and the red/gray (accessories) to
the other side. This means at the moment you can either switch red to red/black OR red to
red/gray. I do have (half) a copy of the wiring diagram and I think I should have wired as
follows:
Switch pos 1 - no feed
Switch Pos 2 - red Feed to red/black AND red/gray
Switch pos 3 - red Feed to red/gray only.
Looking at the half a diagram I have if you don't have power to the red/black AND the
red/gray under normal riding half the circuits don't work.
Does anyone know for sure whether the 'regular' ignition switch feeds power to the
red/black AND the red/gray for normal riding and then only to the red/gray for
accessories?
I know, I know, I should have bought the manual but these are 130 bucks over here.
Robbing bastards.
All the best. WW
_________________
Problem fixed:
1/ You do indeed need to have a connection between the live (red) and the red/black
AND the red/gray all together to have everything working (turn signals, rear lights etc).
2/ You only need to have the red/gray connected to live for the accessories.
All the best. W.
_____________
the gasket was two, one and a half inch gromets cut and glued together. the switch was
about 25 dollars i think i got it on ebay.
______________
if not ebay, maybe this is the best option?
http://www.jpcycles.com/productgroup...D6B-3D19-439E-
9CF7E96940FF96F1&search=ignition+switch&store=Harl ey&page=4
___________________
Well I kinda f**ked up on this mod.
Things I learned:
1. Buying the switch from JP with the 3 prongs makes this mod easier
2. The switch from JP will be shorter then the one used in the first post of this thread
3. figure out number 2 before cutting the hole or your f**ked
4. if you buy a hole saw and the package says 2", check the bit itself because it maybe a
2"1/4" bit in a 2" box. And, well, your F**ked
5. if you cut a hole to fit a grommet and plan on mounting the switch to a plate on the
tank, well your f**ked
6. If you realize this after your on to assembly, you will be calling the dealer and forking
over 100 bucks for a new dash.
Although i got the switch working with a little hack job, I will be redoing it a little better
next week. One thing I did do was build a wire Harness for the ignition. this came out
looking stock. I want the switch housing to look stock also, so I will cut the hole 1/32 to
small and rotor sand it out for an exact fit with no grommet. Then use the four mounting
holes form the switch through the dash with harley Allen nuts.
______________
Got my grommet from cableorganizer.com
part# O-RPD-G3311
2"X1/8"
O-RPD-G3311
2" x 1/8" x 2 1/4" x 2 5/8" x 3/8" Rubber Grommet