* HOW TO * under fifty bux *
#521
 02-01-2008, 10:19 PM

.
mudindex
.
post# 962 ��Oil Pressure Gauge Mount�......Posted by mud
.
post# 971 ��extended shift rod�...............Posted by 0ut1aw
.
post# 972 ��relocate idiot lights�..........Posted by 0ut1aw
.
post# 981 ��breather reRoute parts list�� Posted by mud
.
post# 982 ��12 volt energee source�.............Posted by mud
.
post# 995�� brake bleeder (part 1).....Posted by SC-Longhair
.
post# 1001 �� brake bleeder (part 2).......Posted by SC-Longhair
.
post# 1009 �� internal bar wiring.......Posted by dklozik
.
post# 1010 �
................�� choke ****.......
................�� sissy bar/back rest bracket.....Posted by chengdave2003
.
post# 1013 �� memphis shades free mod.......Posted by SuperFastGlide
.
post# 1014 �� temporary pillion.....Posted by slomotion
.
post# 1018 �� can crusher.......Posted by mud
.
post# 1022 �� black out spokes.....Posted by JRK5892
.
post# 1024 �� inspection sticker relocation....Posted by Slipstrm
.
post# 1025 �� side mount plate tail light......Posted by Slipstrm
.
post# 1029 �� touch up paint......Posted by buellrider76
.
post# 1030 �� rear running lights (part 1)....... Posted by buellrider76
.
Thanks for the feedback Ray.
No feedback and this topic turns into -HO HUM.
On second thought,
HO HUM hmnhmnnm don't sound all that bad.
mud
mudindex
.
CLICK BELOW for INDEXES
.
post# 956 ��reminder�..................Posted by mud
..
post# 956 ��reminder�..................Posted by mud
post# 962 ��Oil Pressure Gauge Mount�......Posted by mud
.
post# 971 ��extended shift rod�...............Posted by 0ut1aw
.
post# 972 ��relocate idiot lights�..........Posted by 0ut1aw
.
post# 981 ��breather reRoute parts list�� Posted by mud
.
post# 982 ��12 volt energee source�.............Posted by mud
.
post# 995�� brake bleeder (part 1).....Posted by SC-Longhair
.
post# 1001 �� brake bleeder (part 2).......Posted by SC-Longhair
.
post# 1009 �� internal bar wiring.......Posted by dklozik
.
post# 1010 �
................�� choke ****.......
................�� sissy bar/back rest bracket.....Posted by chengdave2003
.
post# 1013 �� memphis shades free mod.......Posted by SuperFastGlide
.
post# 1014 �� temporary pillion.....Posted by slomotion
.
post# 1018 �� can crusher.......Posted by mud
.
post# 1022 �� black out spokes.....Posted by JRK5892
.
post# 1024 �� inspection sticker relocation....Posted by Slipstrm
.
post# 1025 �� side mount plate tail light......Posted by Slipstrm
.
post# 1029 �� touch up paint......Posted by buellrider76
.
post# 1030 �� rear running lights (part 1)....... Posted by buellrider76
.
ORIGINAL: RazorFXDB
First picture below shows both ends, which are shaped slightly different,
and a leather mallet.

Very, very nice! ... Excellent description
thank you for the follow-up.
Ray.
First picture below shows both ends, which are shaped slightly different,
and a leather mallet.
Very, very nice! ... Excellent description
thank you for the follow-up.
Ray.
No feedback and this topic turns into -HO HUM.
On second thought,
HO HUM hmnhmnnm don't sound all that bad.
mud
Last edited by mud; 01-16-2011 at 05:46 PM.
#522
02-01-2008, 10:30 PM


Road Warrior
#523
02-01-2008, 11:07 PM
ORIGINAL: metal_mike
mud.... i'm considering the "breather-vent-mud-mod" and am curious as to how often one would have to empty that "catch-can"?
any idea?
mud.... i'm considering the "breather-vent-mud-mod" and am curious as to how often one would have to empty that "catch-can"?
any idea?
Not sure, I have only checked on mine once or twice,
but never did rinse it off.
2500 or 3000 on the new motor.
I am seeing some oil now that is apparently blowing out
and onto the lifter housings.
More often, obviously, would be better, in my case.
I will do a rinse off tomorrow and make note of the milage,
for future reference.
Good question.
mud
Last edited by mud; 01-03-2009 at 09:37 AM.
#524
02-01-2008, 11:13 PM
May our Moderator Rest in Peace
Here's a cheap way to help get good solder connections when you need to lengthen, shorten, or add lines in the bikes electrical system.
The biggest problem with soldering wires on a bike is you need to be an octopus. You need a couple of extra hands to hold the wires whileyou use solder with one hand and the iron in the other. So I came up with a simple and cheap way to make a couple of different wire holders.
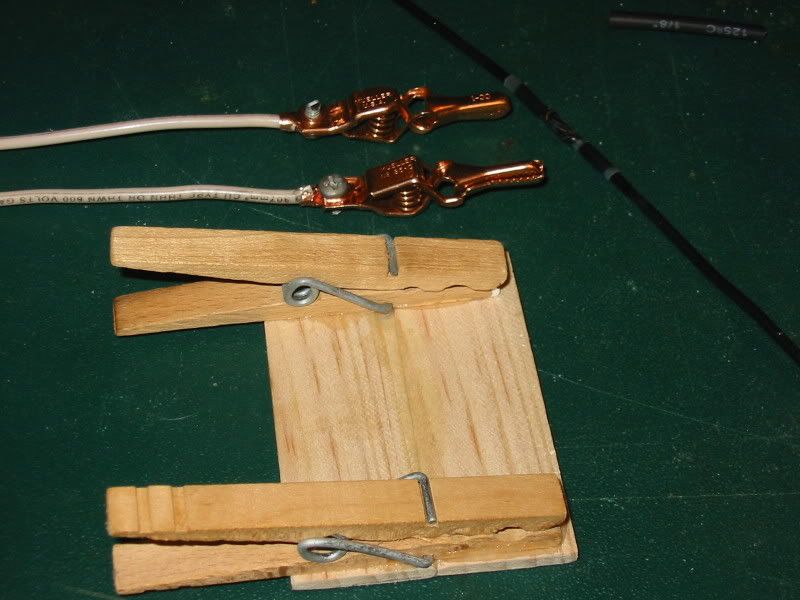
I think I spent a grand total of less than a buck for both of them, and that's because I wanted to get a new pair of alligator clips. The wood one was made from a pair of cloths pins glued to a couple of pieces of a paint mixing stick I got from Home Depot for free. The clips I swiped off the wife. This one is good for any wires that you can lay on a table, or you can glue a magnet to the back and stick it to any steel surface.
The other one with the alligator clips I mademade from the clips and a one foot long piece of scrap 12ga solid copper wire. Its great for using where you can use a clamp or vise grips on the wire between the clips and bend the ends to wherever you need them. Just be careful of using metal clips like these. A hot iron on the wores will have the teeth melting through the wire insulation. So you might considerfiling the teeth down a little and covering them with some tape or shrink tubing.
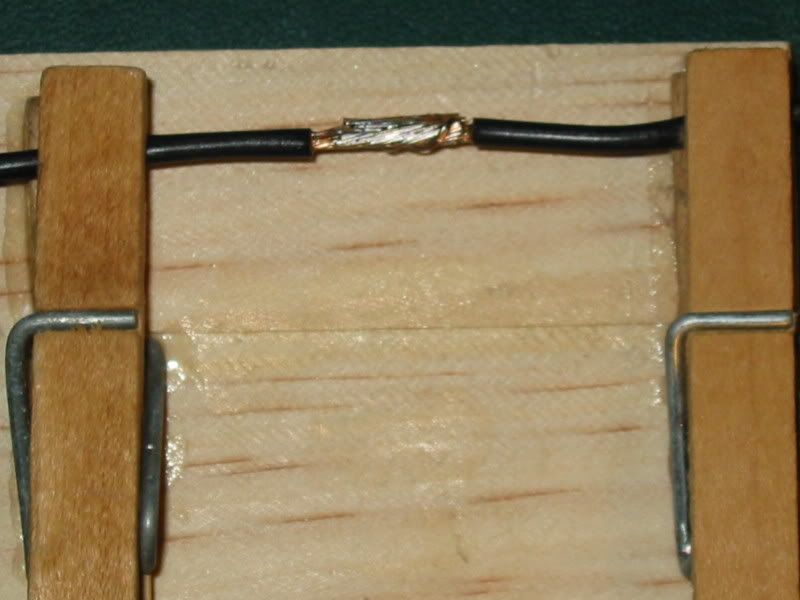
Soldering wires isn't rocket science, but it does take a little practice to do well all the time. But here's a tip for making solder connections that are nearly bullet proof. Once you get the wires soldered properly, like this.
Get some of the wives nail polish or some of this liguid tape and paint the exposed wire and solder connection.
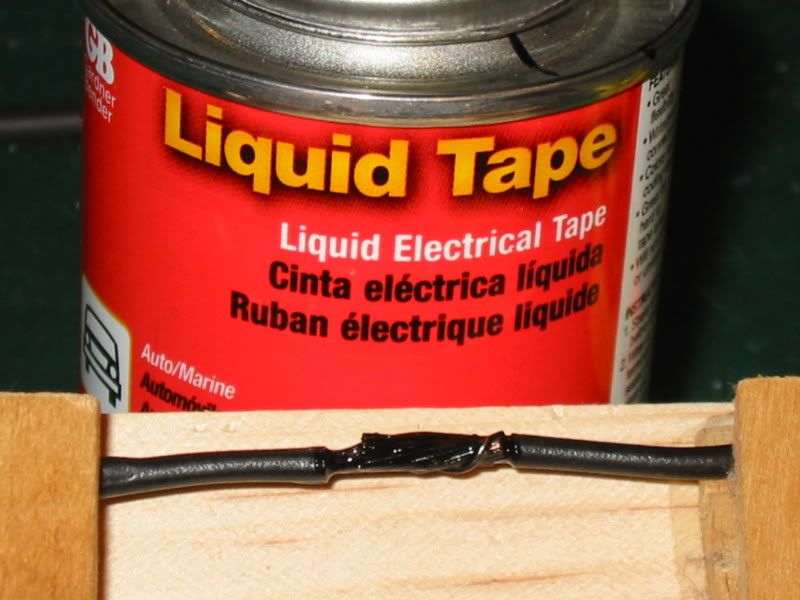
When you ‘paint’ the connection pay particular attention to the ends of the insulation and make sure its well coated. This will prevent any moisture from migrating up the wire strands and corroding them. It won't bother anything today, but a couple of years down the road it will drive you nuts trying to find the electrical gremlins.
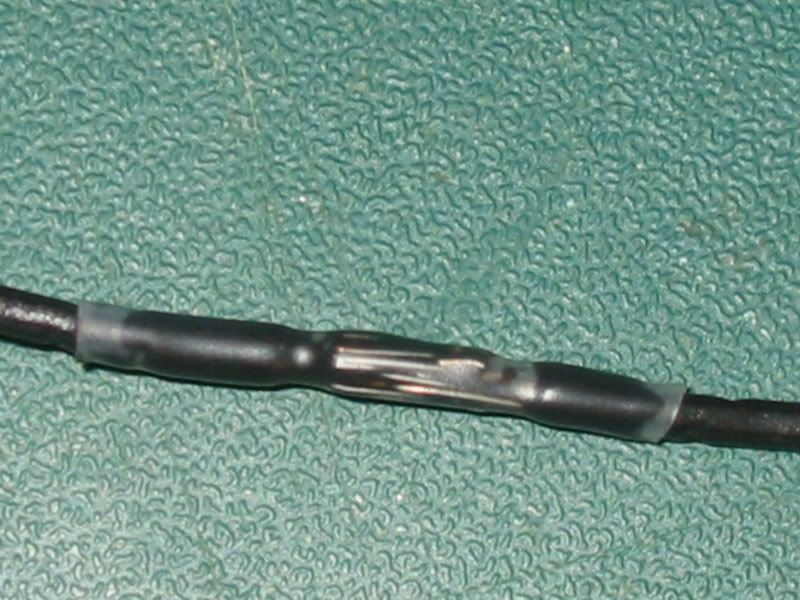
Once its dry use a good grade of heat shrink tubing to seal and protect the connection.
Done right the connection will be only slightly larger than the original wire size and last a lifetime.
This is what it looks like before I heated the shrink tubing.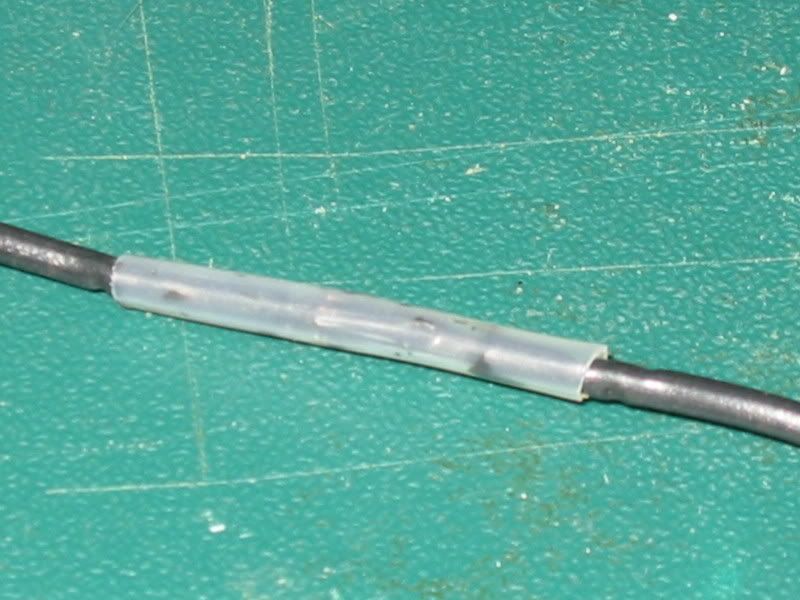
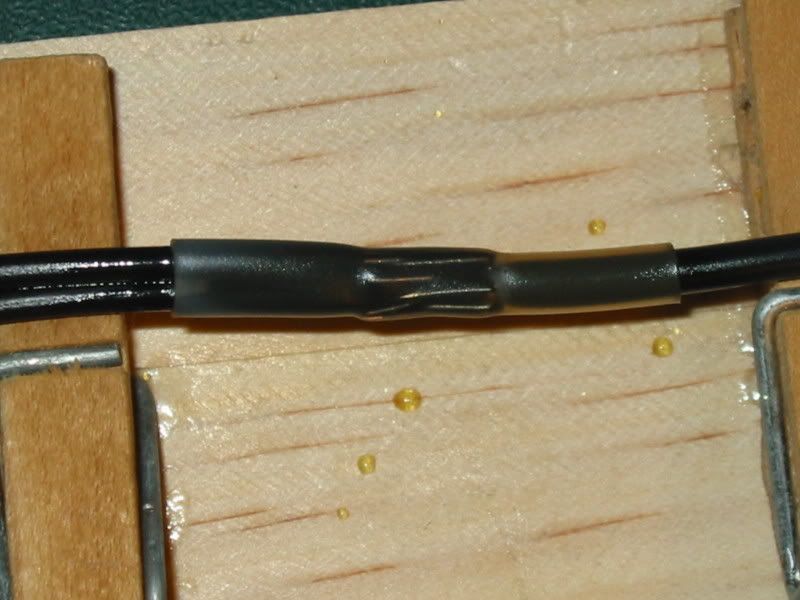
And after.
And here's one where I spliced one wire to an existing line.
Ride safe.
The biggest problem with soldering wires on a bike is you need to be an octopus. You need a couple of extra hands to hold the wires whileyou use solder with one hand and the iron in the other. So I came up with a simple and cheap way to make a couple of different wire holders.
I think I spent a grand total of less than a buck for both of them, and that's because I wanted to get a new pair of alligator clips. The wood one was made from a pair of cloths pins glued to a couple of pieces of a paint mixing stick I got from Home Depot for free. The clips I swiped off the wife. This one is good for any wires that you can lay on a table, or you can glue a magnet to the back and stick it to any steel surface.
The other one with the alligator clips I mademade from the clips and a one foot long piece of scrap 12ga solid copper wire. Its great for using where you can use a clamp or vise grips on the wire between the clips and bend the ends to wherever you need them. Just be careful of using metal clips like these. A hot iron on the wores will have the teeth melting through the wire insulation. So you might considerfiling the teeth down a little and covering them with some tape or shrink tubing.
Soldering wires isn't rocket science, but it does take a little practice to do well all the time. But here's a tip for making solder connections that are nearly bullet proof. Once you get the wires soldered properly, like this.
Get some of the wives nail polish or some of this liguid tape and paint the exposed wire and solder connection.
When you ‘paint’ the connection pay particular attention to the ends of the insulation and make sure its well coated. This will prevent any moisture from migrating up the wire strands and corroding them. It won't bother anything today, but a couple of years down the road it will drive you nuts trying to find the electrical gremlins.
Once its dry use a good grade of heat shrink tubing to seal and protect the connection.
Done right the connection will be only slightly larger than the original wire size and last a lifetime.
This is what it looks like before I heated the shrink tubing.
And after.
And here's one where I spliced one wire to an existing line.
Ride safe.
#525
02-01-2008, 11:20 PM
Mud,
-Nice job on the tank. Always thought the indented tank was a classic look.
- Saw your upclose pics of your beating tool, take it those were the before shoots. Anyway, its more about the artisan than the tools. Great work to have the skill and patients to evenly match the dish on both sides without damaging the tank.
- Like many here, look forward to seeing your bike after paint.
- Lot of good info you started in this thread - hopefully the mods will put this in the top of the Dyna forum.
#526
02-02-2008, 08:15 AM

#527
02-02-2008, 10:24 AM
ORIGINAL: Citoriplus
Here's a cheap way to help get good solder connections when you need to lengthen, shorten, or add lines in the bikes electrical system.
The biggest problem with soldering wires on a bike is you need to be an octopus. You need a couple of extra hands to hold the wires whileyou use solder with one hand and the iron in the other. So I came up with a simple and cheap way to make a couple of different wire holders.
Great pictures and write up.
mud
Last edited by mud; 01-03-2009 at 09:39 AM.
#528
02-02-2008, 10:25 AM
ORIGINAL: icecaps
Mud,
-Nice job on the tank. Always thought the indented tank was a classic look.
- Saw your upclose pics of your beating tool, take it those were the before shoots. Anyway, its more about the artisan than the tools. Great work to have the skill and patients to evenly match the dish on both sides without damaging the tank.
- Like many here, look forward to seeing your bike after paint.
- Lot of good info you started in this thread -
hopefully the mods will put this in the top of the Dyna forum.
No, the tool pix are after I redressed the ends by sawing off the surfaces slightly.
I wanted good crisp lines to illustrate for Ray's question.
After beating there were a few light blemishes.
That's one of the things I like about using wood.
Redressing is easy.
Reshaping is easy.
Does not mar surfaces.
Cheap.
As for putting this all at the top,
I think it's fine floating just as it is now.
mud
Last edited by mud; 01-03-2009 at 09:39 AM.
#529
02-02-2008, 10:26 AM
ORIGINAL: x2lee
I aint trying to tout my mod over muds, except you dont ever have to dump the oil on mine it dumps itself every time you ride,
and not on the crankcase. Of course it dont have the cool k&n filter dangling down like muds does
I aint trying to tout my mod over muds, except you dont ever have to dump the oil on mine it dumps itself every time you ride,
and not on the crankcase. Of course it dont have the cool k&n filter dangling down like muds does
mud


Last edited by mud; 01-03-2009 at 09:40 AM.

