* HOW TO * under fifty bux *
#31
 12-04-2007, 11:45 PM

ORIGINAL: XKROME
wrapped my grips with leather and they feel and look great IMO
and best of all they aren't KROME
i just started from the out side bottom and went in and back.
then tied the two ends together so its double thickness and makes them way more comfy.

wrapped my grips with leather and they feel and look great IMO
and best of all they aren't KROME
i just started from the out side bottom and went in and back.
then tied the two ends together so its double thickness and makes them way more comfy.
Details on width and length required to execute this??
I like the random spaced wrap,
as opposed to a disciplined uniform spacing.
Touch of the artiste. Character.
I want to add this on the MudGlide.
The lever covers look interesting as well.
mud
Last edited by mud; 01-03-2009 at 07:52 AM.
#32
12-04-2007, 11:45 PM
ORIGINAL: XKROME
Tool-Latteralis CD air cleaner cover

Tool-Latteralis CD air cleaner cover
Who??
http://www.battersbyornamental.com/sicklesongs.htm
mud
Last edited by mud; 01-03-2009 at 07:52 AM.
#33
12-04-2007, 11:47 PM

I just tucked the wires in on my Street Bob. Complete free Mod...if you dont count the dremel disks I used. Your stock bars are notched for the wires to go into the control, just cut a notch there for wires to enter, then one more under the center of the bars, between the clamps. Just time consuming is all.
#34
12-04-2007, 11:47 PM
#35
12-04-2007, 11:49 PM
ORIGINAL: dklozik
I just tucked the wires in on my Street Bob.
Complete free Mod...if you dont count the dremel disks I used.
Your stock bars are notched for the wires to go into the control,
just cut a notch there for wires to enter,
then one more under the center of the bars, between the clamps.
Just time consuming is all.
mud
#36
12-05-2007, 01:11 AM

few more... and i like the cheesy ebay look... ha ha ha....
Tint turn signal lenses.... 10 bucks
I know peopel are going to complain that this is dangerous... but it is a mod i did it, and you can see JUST fine when my lights are on and blinking... take sand paper and rough up stock lense, then light dustings with (TINTSHADES) spray tint, (go light or it will run, just take you time and let them sit between coats like 15 min, another light coat and repeat till they are the shade you want... then you can wet sand if you want a gloss wet look, or what i did just clear them a few times and get a matt style look... here are some pics sorry it was durring the summer i took the pics but you i hope you can seethe pics of them lit (remember that is at noon)
Bend down muffler fin SEII slip ons....
again you will need to tune your bike after you do this in some cases...again I did it and the bike runs just fine (i just figured out how to use the SE race tuner deal so i am stoked about spring)
how to: put bar in muffler... bend.... done.... do not snap the pipe off the bike be careful when bending.... here is a pic
[IMG]local://upfiles/26534/3FD3089B820D4CBBB20EB197DECBB7EE.jpg[/IMG]
[IMG]local://upfiles/26534/1FFCE6281F61493496F2F12ED9DE3D2E.jpg[/IMG]
[IMG]local://upfiles/26534/BD5AEF704E6D47B78EC278C0C193E4AD.jpg[/IMG]
[IMG]local://upfiles/26534/54A0B18A2DC441259BCD814C9BFFC95F.jpg[/IMG]
[IMG]local://upfiles/26534/E017510216F0495A96210C6F32B01CF0.jpg[/IMG]
#37
12-05-2007, 03:39 AM
£2 ($5) seat mod ...
Took out the centre and fitted memory foam and trimmed the sides. Its a very easy job to do and the seat is far more comfortable. Just used an old knife and heated it in a flame to cut smoothly and evostick glue to put it all back together. A few trys to get it perfect so don't reglue the cover till you are happy ... duck tape is your friend. Under the top piece of foam are several layers to get the right depth and some back support. Leave the original firmer foam on the sides to balance the seat.
I'm very happy with it but you really need lumbar support for a longer trip, I do this by strapping a bag on my luggage rack ... 500mile days are no problem. Longer reach for my legs on the highway pegs plus they don't feel so 'spread' anymore after a ride.
I'm now in the process of making a new seat as a winter project but I'm struggling to get it even close to being as comfortable as this seat !
Mat
Cover off

memory foam installed

back on the bike

Took out the centre and fitted memory foam and trimmed the sides. Its a very easy job to do and the seat is far more comfortable. Just used an old knife and heated it in a flame to cut smoothly and evostick glue to put it all back together. A few trys to get it perfect so don't reglue the cover till you are happy ... duck tape is your friend. Under the top piece of foam are several layers to get the right depth and some back support. Leave the original firmer foam on the sides to balance the seat.
I'm very happy with it but you really need lumbar support for a longer trip, I do this by strapping a bag on my luggage rack ... 500mile days are no problem. Longer reach for my legs on the highway pegs plus they don't feel so 'spread' anymore after a ride.
I'm now in the process of making a new seat as a winter project but I'm struggling to get it even close to being as comfortable as this seat !
Mat
Cover off
memory foam installed
back on the bike
#38
12-05-2007, 06:13 AM
ORIGINAL: mudpuddle
Cain't get any cheaper than a Tool-Latteralis CD.
Who??
http://www.battersbyornamental.com/sicklesongs.htm
mud
ORIGINAL: XKROME
Tool-Latteralis CD air cleaner cover
Tool-Latteralis CD air cleaner cover
Who??
http://www.battersbyornamental.com/sicklesongs.htm
mud
The following users liked this post:
rocket23 (02-01-2020)
#39
12-05-2007, 06:47 AM
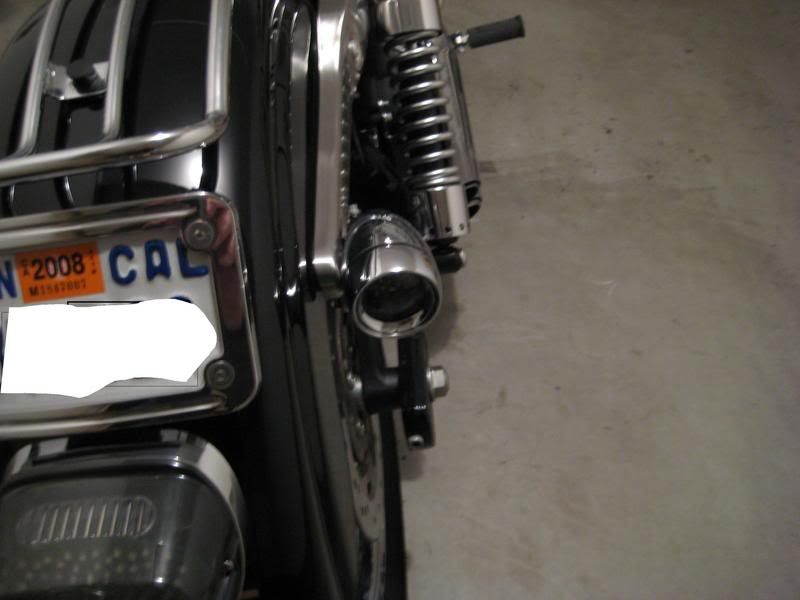
i already had the HD rearturn signal relocate but it didn't work with Quick release bag brackets so i got some 1/2 " pipe drilled, powdercoated, JB weld thethreaded post'sinto the ends and bolted it to license plate bracket.
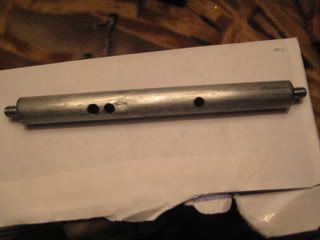
Last edited by XKROME; 02-01-2009 at 03:05 PM.
#40
12-05-2007, 07:02 AM
Outstanding HDF Member
The following users liked this post:
Patrick Knowlton (03-22-2020)