* HOW TO * under fifty bux *
#1681
 04-09-2011, 01:33 PM

Advanced
Hi
Here's a couple of small things I did,not quite in your league Mud ! ,but I figured every little thing can help and they certainly don't cost much!
If you have a fender extension you can make it more effective by the addition of an extension piece,I made this using a piece of 'sit on' rubber flooringcoving,the type used by floorlayers for vinyls in hospitals and the like (guess what I do for a living),its just held on by the one bolt but has been fine.
I also made a cover to protect the front of the motor it hard to see but it is actually a cut downthin plastic ring binder,I used the rings to attatch to a mount under the motor and a couple of zip ties on the downtubes.
The side mounted tool bag is a cheap(£8)'Adventure bag' off roaders use,inside the tools are kept in a couple of cut down plastic bottles that fit tightly together so the tools stay dry and rust free.
I use the same typebag on my bars,its great for keeping small change etc.
#1682
04-09-2011, 09:32 PM
#1683
04-10-2011, 01:17 AM
Club Member
Join Date: Dec 2010
Location: Anchorage, AK
Posts: 501
Likes: 0
Received 0 Likes
on
0 Posts
Here's the closest I can get to given someone an idea for their FXD. I bought "good" spray paint \\; and top clear coat from the auto parts store. They let me take cans out and compare to my paint and I actually came up real close. I was just going to do some pre painting to see if I liked it then buy the real stuff from Harley but hell I'm not entering into any bike shows so this ended up being good enough for a hack like me. \\;The speedo has to be taken apart but with a shop manual was easy. I did not sand the wrinkle black since I was just testing and didnt know it was going to look so good so I now need to go back and sand it better and smoother then repaint. The fuel cap trim ring comes right off and it was easy to prep and paint. I had to remove the console to pull the fuel gauge and then had to tape it off since I do not believe it can be disassembled. $10.00 for all materials used.
#1684
04-10-2011, 02:29 PM
Club Member
Join Date: Dec 2010
Location: Anchorage, AK
Posts: 501
Likes: 0
Received 0 Likes
on
0 Posts
Diggin' this site, but don't have time to comment on all the mods and weed thru the extra minutia. Taken a while, but up to page 95. If you could just compile the mods, it'd be better. Also, way too many pics have disappeared and have no idea what some of these mods are from the description. If folks could post the pics in their photo albums it would be helpful. Thanks to all for the idea pool. Next winter, for sure.
#1685
04-10-2011, 11:42 PM
Club Member
Join Date: Dec 2010
Location: Anchorage, AK
Posts: 501
Likes: 0
Received 0 Likes
on
0 Posts
Here is another cheap/free modification. You will need a torch for this to make it easy and get the right bends to the mirror stems.
I have a great field of view from behind now versus having them mounted above the bars, plus it kind of gives the bike a lower/sleeker appearance now.
I have a great field of view from behind now versus having them mounted above the bars, plus it kind of gives the bike a lower/sleeker appearance now.
#1686
04-11-2011, 12:27 AM

6th Gear
Join Date: Aug 2010
Location: Albuquerque, NM
Posts: 13
Likes: 0
Received 0 Likes
on
0 Posts
http://motors.shop.ebay.com/innovati..._from=&_ipg=25
Lots of stuff there, or just plug in "Harley Bullet" to the search field and sort through all the bullet turn signal stuff.
#1687
04-11-2011, 12:29 AM
Club Member
Join Date: Dec 2010
Location: Anchorage, AK
Posts: 501
Likes: 0
Received 0 Likes
on
0 Posts
cheap way to black out spokes... doing this for a cafe project i am building... figured i would share the rims i am doing:
did not want to unlace to powder... so here is what i did:
well i first washed the whole wheel in simple green 5-1 ratio with water...
then i used a wire wheel ultra fine to scuff it up a bit... from here i cleaned the hell out of the wheel with water and scrub brush...
taped it all up... found that if i cut a piece of tape in half i could wrap the nipples real fast then run a piece between each spoke... then wrap the rest of the wheel... wipe it all down with some rubbing alchole and a tack cloth... and shot the wheel in black epoxy paint (primer not recomended for this paint):
total cost 7 bucks (paint and tape)
#1688
04-11-2011, 02:18 PM
Most of us Dyna owners are aware of that infamous "Buzz" associated with the front rubber motor mount coming in contact with the motor mount bracket.
Many have resorted to using "shims" to take up some of the pre-load gap. Some have bought new motor mounts, which seem to have a different rubber isolator position to eliminate this contact.
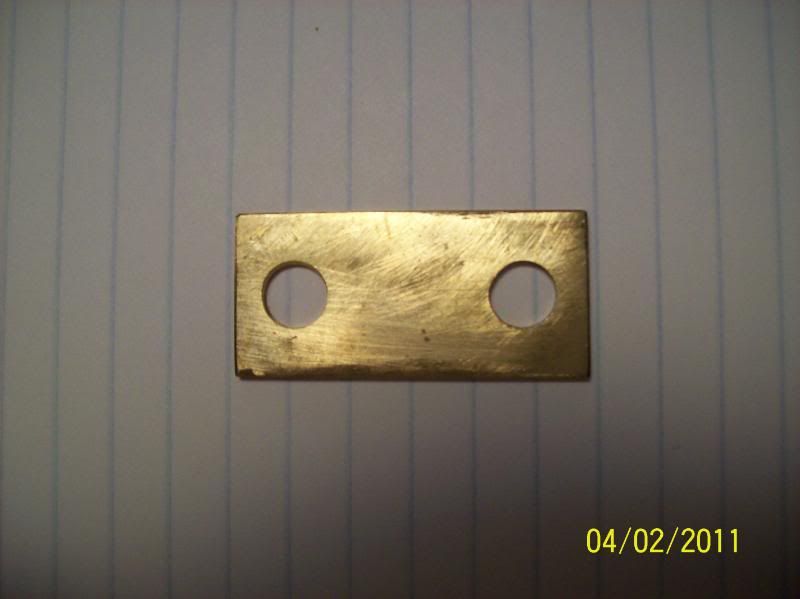
I was going to add a brass shim when I installed my Sputhe Positrac; but, I did not have an issue with any pre-load gap. Therefore no need for the shims I milled.
In checking the isolator, I decided to check the clearance between the rubber isolator and motor mount. When I went to the tool box for my feeler gauge I noticed that I have several various "needle files" in the drawer. "why not file the rubber for clearance!! Next I noticed a sabre-saw blade with coarse teeth and I got the idea to use that also.
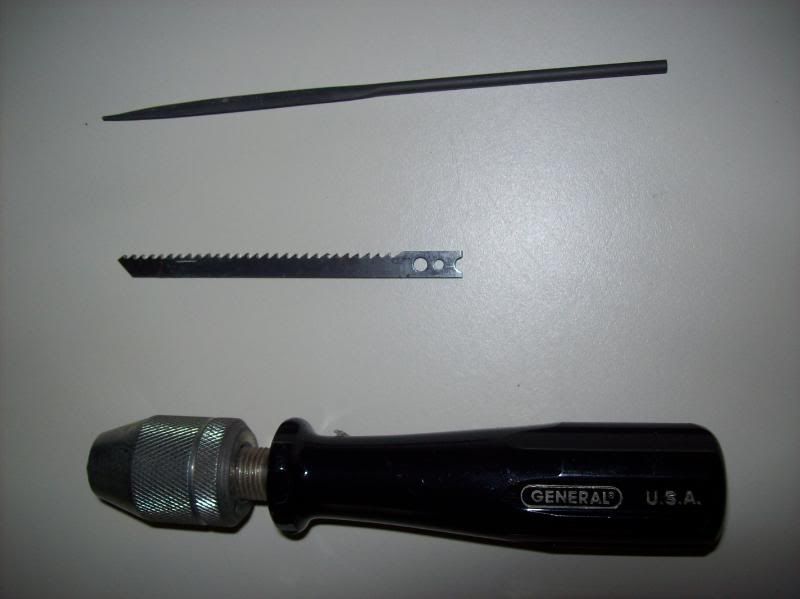
I put tape on the file and blade to prevent scratching the solid mount.
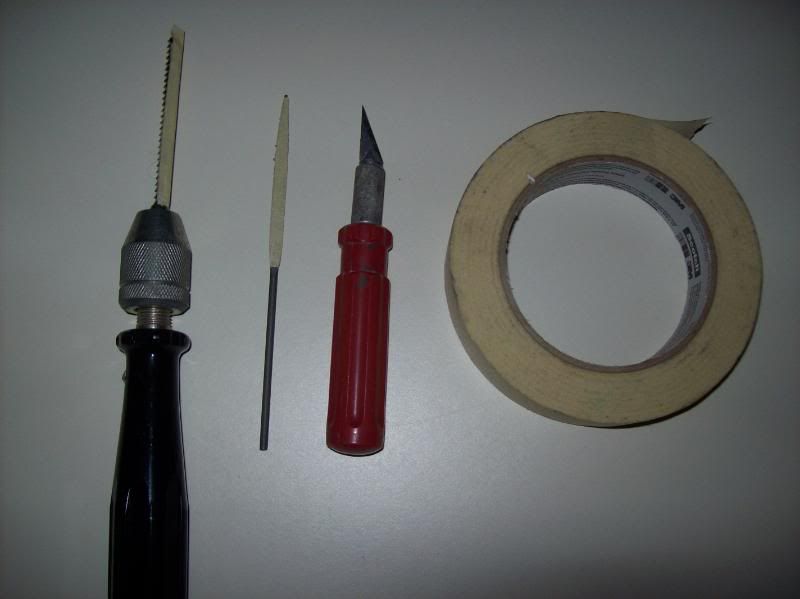
Took a few minutes and I gained the necessary clearance. Works great and no wrenching involved. I used the "pin-drill" as my handle for the saw blade. I used the file to smooth out the rubber.
Many have resorted to using "shims" to take up some of the pre-load gap. Some have bought new motor mounts, which seem to have a different rubber isolator position to eliminate this contact.
I was going to add a brass shim when I installed my Sputhe Positrac; but, I did not have an issue with any pre-load gap. Therefore no need for the shims I milled.
In checking the isolator, I decided to check the clearance between the rubber isolator and motor mount. When I went to the tool box for my feeler gauge I noticed that I have several various "needle files" in the drawer.
I put tape on the file and blade to prevent scratching the solid mount.
Took a few minutes and I gained the necessary clearance. Works great and no wrenching involved. I used the "pin-drill" as my handle for the saw blade. I used the file to smooth out the rubber.
Last edited by dlstanf2; 05-11-2011 at 06:31 PM. Reason: PhotoBucket Photos for Better Viewing
#1689
04-11-2011, 03:32 PM

Most of us Dyna owners are aware of that infamous "Buzz" associated with the front rubber motor mount coming in contact with the motor mount bracket.
Many have resorted to using "shims" to take up some of the pre-load gap. Some have bought new motor mounts, which seem to have a different rubber isolator position to eliminate this contact.
I was going to add a brass shim when I installed my Sputhe Positrac.

but, I did not have an issue with any pre-load gap.
In checking the isolator, I decided to check the clearance between the rubber isolator and motor mount. When I went to the tool box for my feeler gauge I noticed that I have several various "needle files" in the drawer. "why not file the rubber for clearance!! Next I noticed a sabre-saw blade with coarse teeth and I got the idea to use that also.

.
.

.
I put tape on the file and blade to prevent scratching the solid mount.
Took a few minutes and I gained the necessary clearance. Works great and no wrenching involved. I used the "pin-drill" as my handle for the saw blade. I used the file to smooth out the rubber.
Many have resorted to using "shims" to take up some of the pre-load gap. Some have bought new motor mounts, which seem to have a different rubber isolator position to eliminate this contact.
I was going to add a brass shim when I installed my Sputhe Positrac.
but, I did not have an issue with any pre-load gap.
In checking the isolator, I decided to check the clearance between the rubber isolator and motor mount. When I went to the tool box for my feeler gauge I noticed that I have several various "needle files" in the drawer.
.
.
.
I put tape on the file and blade to prevent scratching the solid mount.
Took a few minutes and I gained the necessary clearance. Works great and no wrenching involved. I used the "pin-drill" as my handle for the saw blade. I used the file to smooth out the rubber.
.
.
good job... good pix... good thinking..
keep us updated.
.
.
.
Last edited by mud; 04-11-2011 at 03:34 PM.
#1690
04-11-2011, 04:15 PM
Club Member
Join Date: Feb 2008
Location: Passaic County, NJ
Posts: 11,474
Likes: 0
Received 23 Likes
on
18 Posts
See quote from Joe:
yes, it comes in a spray can.

I've seen epoxy ("appliance") paint at walmart, so chances are you can get it just about anywhere spray paint is sold.
and shot the wheel in black epoxy paint
I've seen epoxy ("appliance") paint at walmart, so chances are you can get it just about anywhere spray paint is sold.