* HOW TO * under fifty bux *
#151
ORIGINAL: RazorFXDB
Great stuff ...
I think I'll try relocating my horn.
Anyone want to discuss the wiring involved with this.
What the difficulty level is? I'd like to hide it behind the batter box ... a la Mud, I think.
Keep 'em coming ... Just got a foot of snow up here in Ka-na-Da and I've got no money!
Ray.
Great stuff ...
I think I'll try relocating my horn.
Anyone want to discuss the wiring involved with this.
What the difficulty level is? I'd like to hide it behind the batter box ... a la Mud, I think.
Keep 'em coming ... Just got a foot of snow up here in Ka-na-Da and I've got no money!
Ray.
What level proficiency are you with tools and such??
My method is fairly easy.
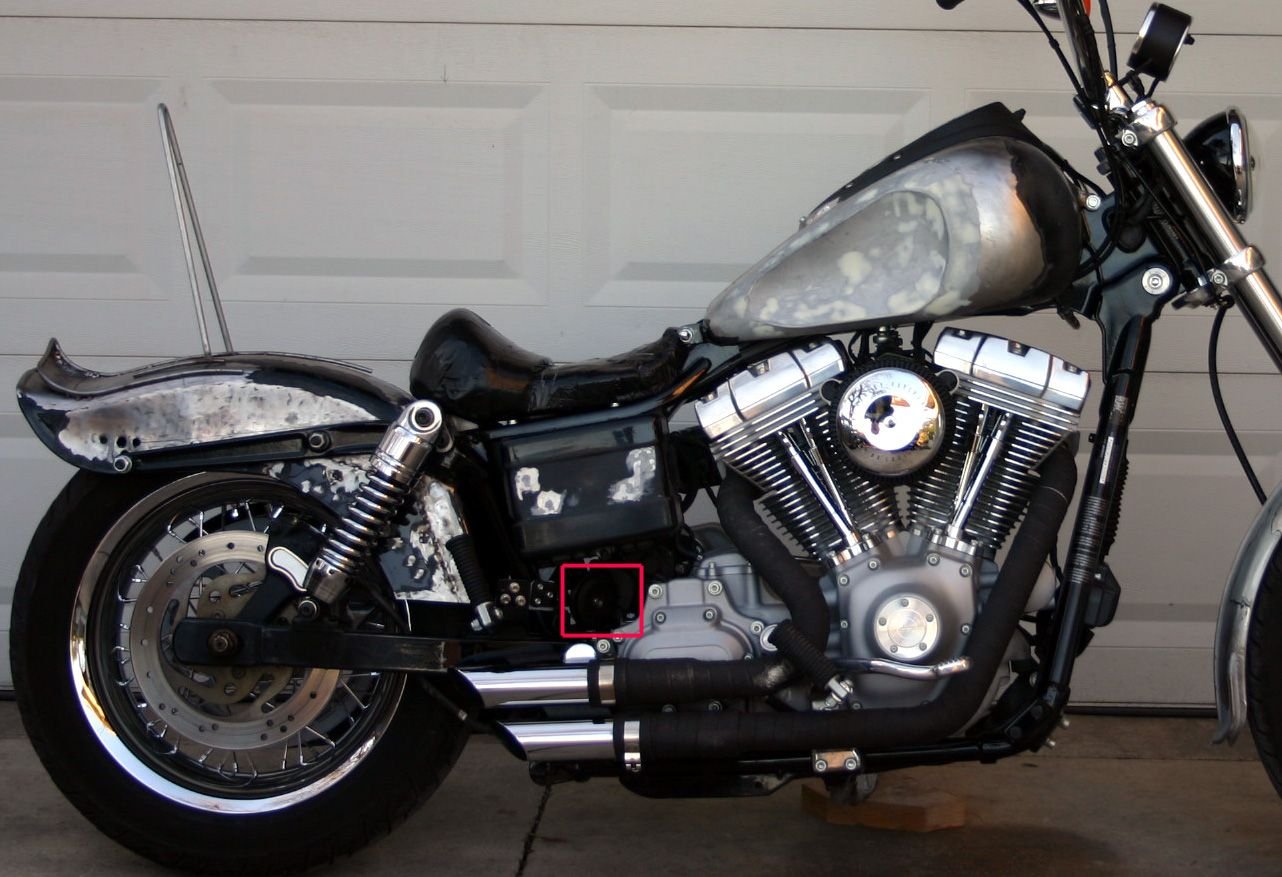
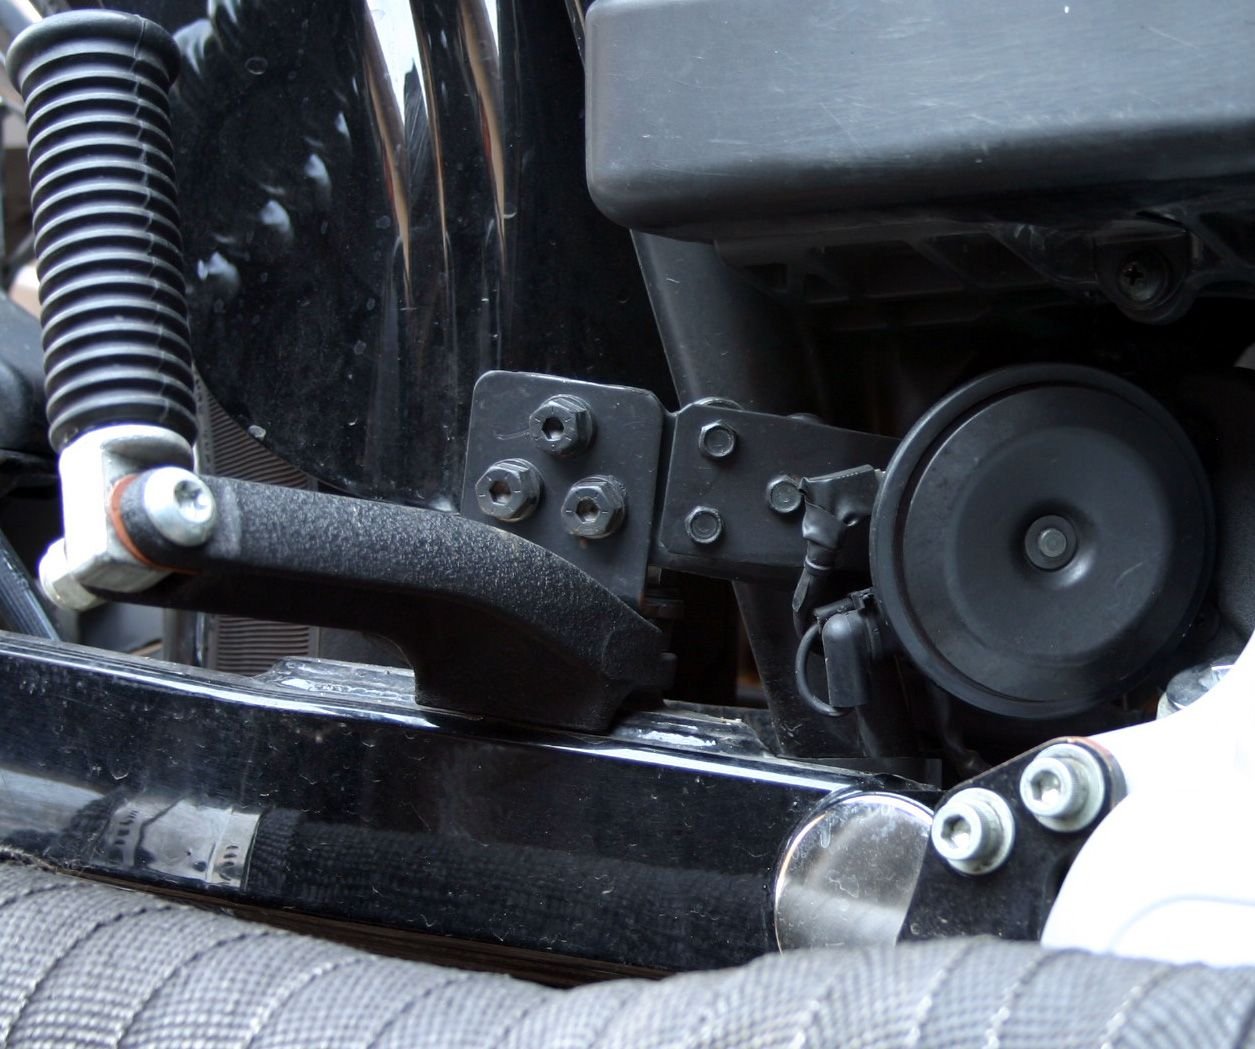
I didn't hide the squaker though, it's just outta the way.
red box in picture below
Let me know if you're serious, I'll walk you through it here.
I started by picking up the HD part #69178-02
.
.
.
.
Last edited by mud; 01-15-2020 at 07:33 AM.
#152
OK this may be well known but here goes
I am a 6'4" rider on a FXDL. I like to ride long rides and I have a very thin low seat. When I bought my bike it had forwad control which I considera must. My A$$ gets really numb when I ride. I got on ebay and bought some stock mid controls removed the brake pedal and bolted them on. Now i can move around any position I want and it only cost me about 20.00.....
I am a 6'4" rider on a FXDL. I like to ride long rides and I have a very thin low seat. When I bought my bike it had forwad control which I considera must. My A$$ gets really numb when I ride. I got on ebay and bought some stock mid controls removed the brake pedal and bolted them on. Now i can move around any position I want and it only cost me about 20.00.....
#153
ORIGINAL: mudpuddle
Hey Ray. The wiring is not difficult.
What level proficiency are you with tools and such??
My method is fairly easy.
I didn't hide the squaker though, it's just outta the way.
red dot in picture below
Let me know if you're serious, I'll walk you through it here.
I started by picking up the HD part #69178-02
mud

ORIGINAL: RazorFXDB
Great stuff ...
I think I'll try relocating my horn.
Anyone want to discuss the wiring involved with this.
What the difficulty level is? I'd like to hide it behind the batter box ... a la Mud, I think.
Keep 'em coming ... Just got a foot of snow up here in Ka-na-Da and I've got no money!
Ray.
Great stuff ...
I think I'll try relocating my horn.
Anyone want to discuss the wiring involved with this.
What the difficulty level is? I'd like to hide it behind the batter box ... a la Mud, I think.
Keep 'em coming ... Just got a foot of snow up here in Ka-na-Da and I've got no money!
Ray.
What level proficiency are you with tools and such??
My method is fairly easy.
I didn't hide the squaker though, it's just outta the way.
red dot in picture below
Let me know if you're serious, I'll walk you through it here.
I started by picking up the HD part #69178-02
mud

I see your horn now.
I amserious. I like how it opens up the engine.
... will do a search for HD part #69178-02 as soon as I'm done this reply.
May not do exactly as you've done ... then again, I may.
I feel very proficient with tools ... but never really entered the realm of wiring, so I wasn't sure if I would have the tools needed for the job.
Ray.
#154
Indicator lights in headlight, courtesy of SWAMPHUNTER (excellent job):
https://www.hdforums.com/m_2423863/tm.htm
[quote]Swamphunter
titleAndStar(75,0,0,false,",")Hang Around
Posts: 75
Joined: 8/28/2007
Status: offline
OK...here is how we did it. I ordered the proper colored LED Button Head bolts from Custom Dynamics (extremely fast shipping), and they were a bit more than I had wanted to spend, but the quality is worth it. I spent just over $88.00 for 4 different colored packages (green - blue- red - amber). They come 2 to a package so you will have extras. You can find them cheaper on Ebay, but then have to wait for them to come a bit longer.
http://www.customdynamics.com/led_button_head_bolts.htm
When we started, we took blue painters tape and masked off the top of headlight and anywhere else you may drip solder, or hit with a wrench or a screwdriver. Also be careful with the center punch and the drilling, not to slip. We then took a compass and scribed a line parallel with the trim ring on the front of the headlight, the distance back to where you want them positioned. We then determined the center bolt location on the top of the headlight and measured off either side to where the other 4 lights will be and made all the appropriate marks. We center punched each hole location and started drilling out the holes one at a time and increasing the size of the bit until it got to the proper size for the threaded part to just slip through the hole, but not too loose. After all the holes were drilled, we filed the edges of the holes we just drilled and then prepared to drill the hole out the back of the lights for the additional wires. I purchased a small rubber grommet (35 cents), at my local hardware store and after drilling this hole, and filing it smooth, we put the grommet in place. After determining the hot and ground wires off the original wires, and marking them, we dropped the bolts in place, placed a rubber O-ring on the bolt on the inside of the headlight bezel and tightened it down with the nylon nut they supply with the LED lights. We then pulled the LED button head bolt lights wires, out the hole we just drilled in the back of the headlight and made a nice soldered connection with heat shrink around each to the original respective corresponding indicator light wire off the harness. (We disconnected it from under the dash to give more play to the wires for this purpose). We had slipped a piece of heat shrink over the entire wiring job that we did before making the connections, but later removed it because it looked too bulky and just looked like crap. I ordered some pre slit wiring harness sleeves (Black wrap-it sleeving by Russell) from J&P, to finish the job off more neatly.
http://www.jpcycles.com/productgroup...ley&page=7
We then reconnected the wiring harness under the dash, put the dash back on, put the headlight back together and re-adjusted it, and called it a day. We had maybe three hours into the whole project, but it was definitely worth it to relocate those dang lights and make them presentable. I had seen some
https://www.hdforums.com/m_2423863/tm.htm
ORIGINAL: Swamphunter
My brother and I just finished relocating these to the headlight bezel. Please excuse the no front fender....just switched over to a wide glide front end and need to get the proper spacers to mount it.
[IMG]local://upfiles/41505/E3EE600397654D3AA82887E9C12698C5.jpg[/IMG]
[IMG]local://upfiles/41505/CCE79FC7820944308D786D2220CAC797.jpg[/IMG]
[IMG]local://upfiles/41505/8434F691D90B415C86FF1A39F1D1A578.jpg[/IMG]
titleAndStar(75,0,0,false,",")Hang Around
Posts: 75
Joined: 8/28/2007
Status: offline
OK...here is how we did it. I ordered the proper colored LED Button Head bolts from Custom Dynamics (extremely fast shipping), and they were a bit more than I had wanted to spend, but the quality is worth it. I spent just over $88.00 for 4 different colored packages (green - blue- red - amber). They come 2 to a package so you will have extras. You can find them cheaper on Ebay, but then have to wait for them to come a bit longer.
http://www.customdynamics.com/led_button_head_bolts.htm
When we started, we took blue painters tape and masked off the top of headlight and anywhere else you may drip solder, or hit with a wrench or a screwdriver. Also be careful with the center punch and the drilling, not to slip. We then took a compass and scribed a line parallel with the trim ring on the front of the headlight, the distance back to where you want them positioned. We then determined the center bolt location on the top of the headlight and measured off either side to where the other 4 lights will be and made all the appropriate marks. We center punched each hole location and started drilling out the holes one at a time and increasing the size of the bit until it got to the proper size for the threaded part to just slip through the hole, but not too loose. After all the holes were drilled, we filed the edges of the holes we just drilled and then prepared to drill the hole out the back of the lights for the additional wires. I purchased a small rubber grommet (35 cents), at my local hardware store and after drilling this hole, and filing it smooth, we put the grommet in place. After determining the hot and ground wires off the original wires, and marking them, we dropped the bolts in place, placed a rubber O-ring on the bolt on the inside of the headlight bezel and tightened it down with the nylon nut they supply with the LED lights. We then pulled the LED button head bolt lights wires, out the hole we just drilled in the back of the headlight and made a nice soldered connection with heat shrink around each to the original respective corresponding indicator light wire off the harness. (We disconnected it from under the dash to give more play to the wires for this purpose). We had slipped a piece of heat shrink over the entire wiring job that we did before making the connections, but later removed it because it looked too bulky and just looked like crap. I ordered some pre slit wiring harness sleeves (Black wrap-it sleeving by Russell) from J&P, to finish the job off more neatly.
http://www.jpcycles.com/productgroup...ley&page=7
We then reconnected the wiring harness under the dash, put the dash back on, put the headlight back together and re-adjusted it, and called it a day. We had maybe three hours into the whole project, but it was definitely worth it to relocate those dang lights and make them presentable. I had seen some
#156
[/quote]
Hey Ray. The wiring is not difficult.
What level proficiency are you with tools and such??
My method is fairly easy.
I didn't hide the squaker though, it's just outta the way.
red dot in picture below
Let me know if you're serious, I'll walk you through it here.
I started by picking up the HD part #69178-02
mud

[/quote]
Found this part on-line
HD part #69178-02 - Highoutputhorn for sportster.
Is this unit smaller than stock?
What was the motivation for using this model?
#157
ORIGINAL: JRK5892
you can move your horn real real easily and not have to rewire anything! just unplug it and run your wires back... I then bolted my horn to my starter right next to the passanger pegs with a small L bracket... plug it back in... took 5 min!
you can move your horn real real easily and not have to rewire anything! just unplug it and run your wires back... I then bolted my horn to my starter right next to the passanger pegs with a small L bracket... plug it back in... took 5 min!
I wasn't sure how far I could move it with the existing wiring.
Did you use an existing hole to bolt the bracket, or did you have to drill one?
Ray.
#158
ORIGINAL: RazorFXDB
Hey Ray. The wiring is not difficult.
What level proficiency are you with tools and such??
My method is fairly easy.
I didn't hide the squaker though, it's just outta the way.
red dot in picture below
Let me know if you're serious, I'll walk you through it here.
I started by picking up the HD part #69178-02
mud
Found this part on-line
HD part #69178-02 - High output horn for sportster.
Is this unit smaller than stock?
What was the motivation for using this model?
Hey Ray. The wiring is not difficult.
What level proficiency are you with tools and such??
My method is fairly easy.
I didn't hide the squaker though, it's just outta the way.
red dot in picture below
Let me know if you're serious, I'll walk you through it here.
I started by picking up the HD part #69178-02
mud
HD part #69178-02 - High output horn for sportster.
Is this unit smaller than stock?
What was the motivation for using this model?
Yes it is smaller Ray.
That was one motivating factor.
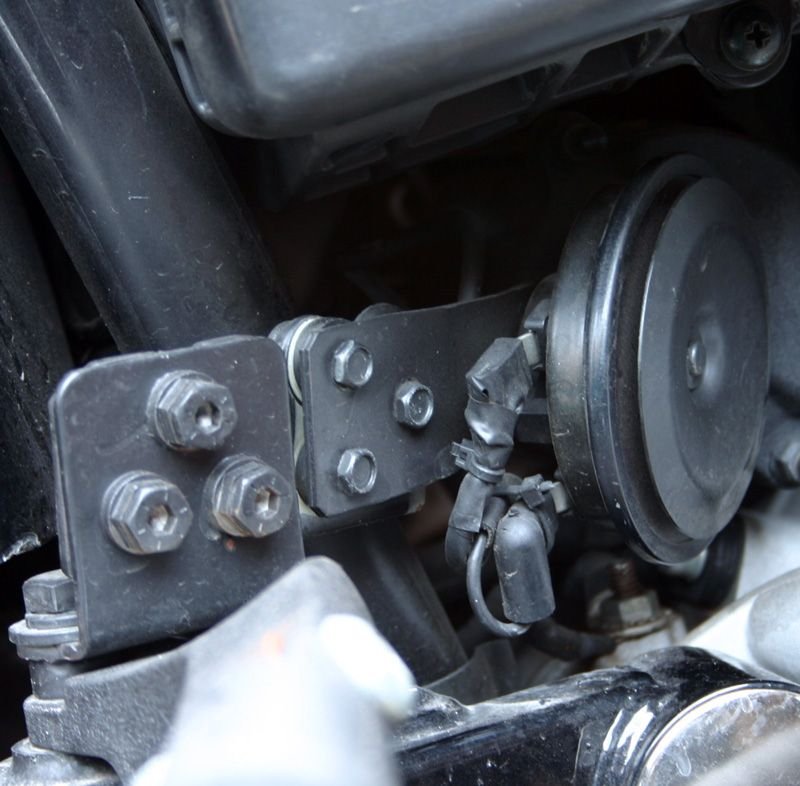
Also comes with a very nice rubber insulated mount,
two piece bracket comes along.
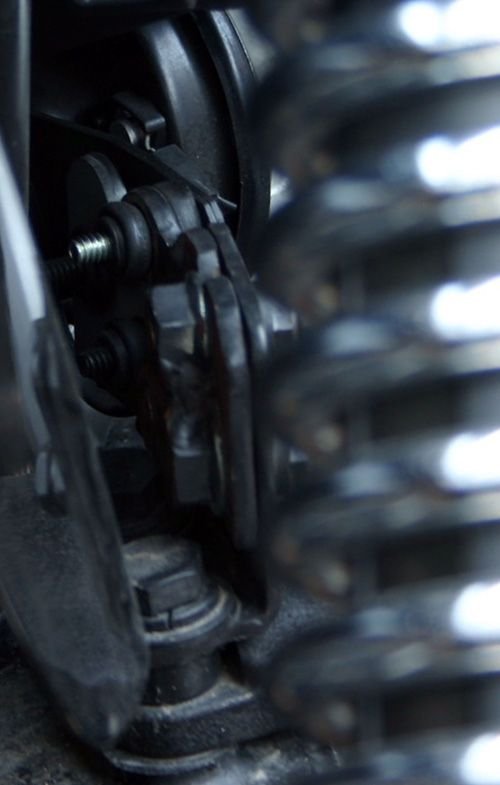
I built a third one so I could turn 90 degrees.
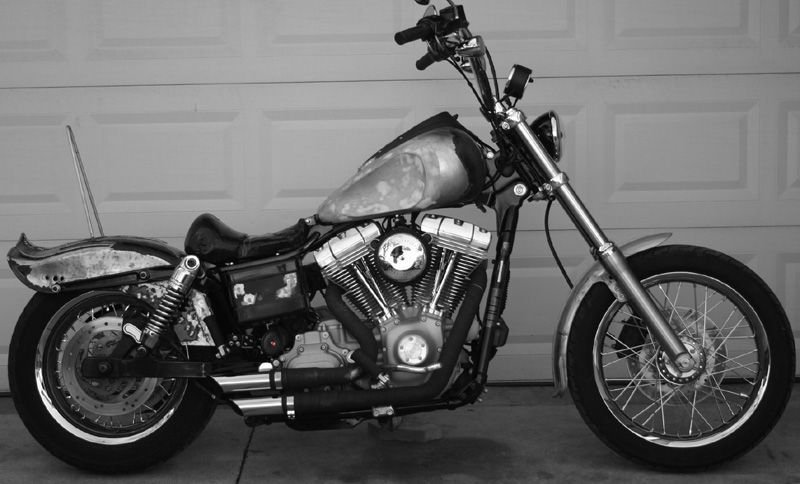
(pix below)
One of the stock brackets bolted right
to the rear footpeg perch.
Also comes with a relay and wiring.
Worked real good for me.
Been ugly raining a little once or twice a week.
Need to keep an eyeball peeled this weekend
for one of those bikini carwashes.
.

.
.
.
.
.
.
.
.
Last edited by mud; 01-15-2020 at 10:56 AM.
#159
Join Date: Mar 2007
Location: Chicago suburbs (Elgin/Schaumburg)
Posts: 19,481
Likes: 0
Received 25 Likes
on
23 Posts
I did not have to drill any holes... just get a small angle bracket and bolt it on... i will try and snap some pics before i start my tear down this weekend, be sure when you are bolting the horn to the angle bracket you use loctite and test the horn... if you bolt it on too tight to the bracket the horn will sound like a die'n duck... loosen it till the horn diafram can move then just bolt it down on one fothe bolt down there... easy as pie! mine sits almost in the same spot as Muds just a bit deaper in the bike
#160
Pretty slick Mud,
Thanks for the detailed response and pictures!!
This is one I think I can tackle.
With all my spare change going towards Christmas gifts, I may try to make my stock horn work.
Step 1 is to pick up a space heater for the shed.
Will post pics when finished.
ray.
Thanks for the detailed response and pictures!!
This is one I think I can tackle.
With all my spare change going towards Christmas gifts, I may try to make my stock horn work.
Step 1 is to pick up a space heater for the shed.
Will post pics when finished.
ray.

