* HOW TO * under fifty bux *
#1151
 02-23-2009, 08:50 PM

Thats correct the alignment pin on the outside of the barrel, take it off and the key is removable all the time.
#1153
02-25-2009, 02:30 AM
Here is my Ignition switch relocation on an 07 FXD Dash.
1 7/8 holesaw is a perfect fit, didnt need drill press as the pilot bit kept it running straight and true.
purchased the switch at BK Riders $22 shipped.
Since my AME kit wont allow use of the fork lock, I am wiring the power thru the neck switch to allow me to kill power to the dash mounted switch for added security, when I turn the neck switch to the ACC position it will open the power circuit to the dash mounted switch and apply power to my alarm system. (cut the nub off the neck key and it will come out in any position).
About 2 hours to cut the hole and mount the switch.
#1154
03-05-2009, 12:27 AM

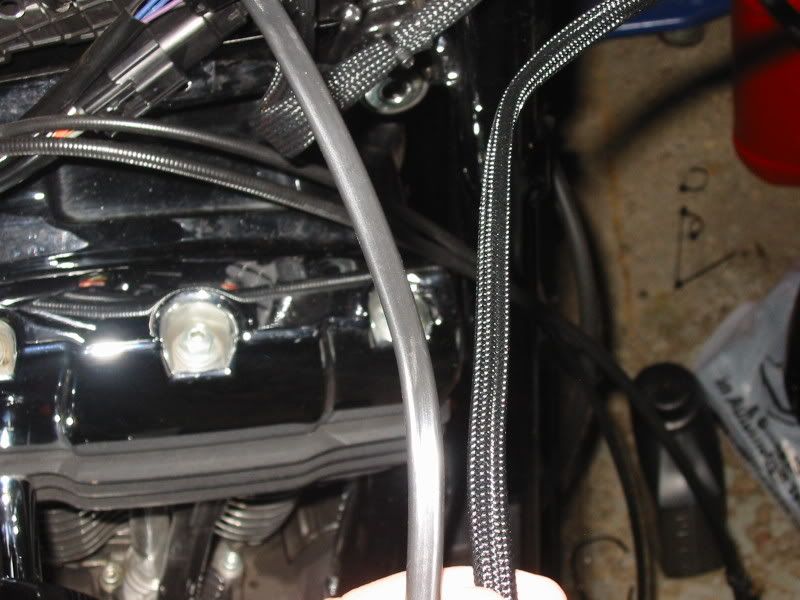
Chrome cable wraps
ok... since my cables where all done i did this how to using my oil lines for my oil cooler... still the same idea though
what you need...
http://cableorganizer.com/chrome-sle...-sleeving.html
5/16 will do most cables and what not, may have to go a touch bigger on the cables for the tach and speedo (i did mine in side entry black... another write up for another day)
here is how you do it:
what you need,
1. cable or hose (what your wrapping)
2. lighter or heat gun
3. razor to clean up the wrap after it is heated
4. wire sleeving
5. shring wrap
6. Scissors

before you start cut it smooth and heat that end wiht a lighter to melt it together a bit... this will help keep the end together as you stretch it around to get it started on the item you are wrapping:

when you start to install this stuff go slow, push it up on the cable and then pull it down... it moves inch by inch (least it does on rubber, on reg cables it slides on pretty easy)

before you cut the wrap to length slide on your shrink wrap... it will make it SO much easier to get on without fraying up the ends

once you get the wrap to the lenght you want it you have to cut it... it will fray out a bit... i use a lighter to heat it up (it does spark up after a bit under the flame) just blow it out and use your finger to dab down the fray ends so it is melted tight

slide the shrink wrap over that and heat with lighter (or heat gun)

finished product:

ok... since my cables where all done i did this how to using my oil lines for my oil cooler... still the same idea though
what you need...
http://cableorganizer.com/chrome-sle...-sleeving.html
5/16 will do most cables and what not, may have to go a touch bigger on the cables for the tach and speedo (i did mine in side entry black... another write up for another day)
here is how you do it:
what you need,
1. cable or hose (what your wrapping)
2. lighter or heat gun
3. razor to clean up the wrap after it is heated
4. wire sleeving
5. shring wrap
6. Scissors
before you start cut it smooth and heat that end wiht a lighter to melt it together a bit... this will help keep the end together as you stretch it around to get it started on the item you are wrapping:
when you start to install this stuff go slow, push it up on the cable and then pull it down... it moves inch by inch (least it does on rubber, on reg cables it slides on pretty easy)
before you cut the wrap to length slide on your shrink wrap... it will make it SO much easier to get on without fraying up the ends
once you get the wrap to the lenght you want it you have to cut it... it will fray out a bit... i use a lighter to heat it up (it does spark up after a bit under the flame) just blow it out and use your finger to dab down the fray ends so it is melted tight
slide the shrink wrap over that and heat with lighter (or heat gun)
finished product:
#1155
03-05-2009, 12:46 AM
May our Moderator Rest in Peace
JRK5892,
I did the same thing to my bike last year. But I didn't know about the chrome mesh so I used the more common black.
Before and after for the front turn signal wires.
One of the ends that's under the tank with the shrink tube on it.
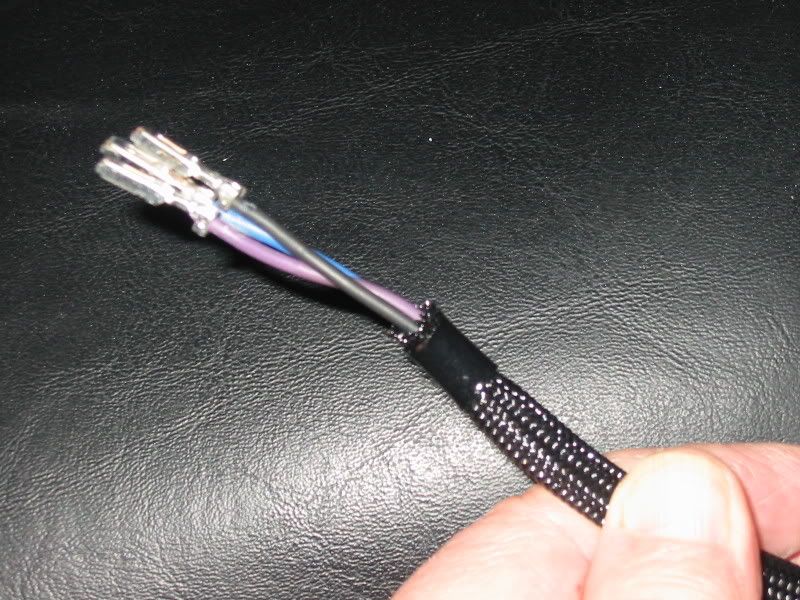
You can hide splices in wires very easily with this stuff.
You should also put a couple of wraps of electrical tape on the mesh before you use the shrink tubing.
It makes the shrink tube look a lot smoother or 'finished' with the tape under it.
I did the same thing to my bike last year. But I didn't know about the chrome mesh so I used the more common black.
Before and after for the front turn signal wires.
One of the ends that's under the tank with the shrink tube on it.
You can hide splices in wires very easily with this stuff.
You should also put a couple of wraps of electrical tape on the mesh before you use the shrink tubing.
It makes the shrink tube look a lot smoother or 'finished' with the tape under it.
Last edited by In Memoriam Citoriplus; 03-05-2009 at 12:56 AM.
#1156
03-05-2009, 01:09 AM

Club Member
#1157
03-05-2009, 08:33 AM
May our Moderator Rest in Peace
The only pics I have are a before and after of the turn signal wires.
It was my first attempt and you can see what can happen if you put the shrink tubing on without the tape.
It still looks like that today. But only because I'm too lazy to pull the tank off just for that. I want to wait until I have a good reason for taking the tank off (like a new paint job ) before I redo it properly.
Before;
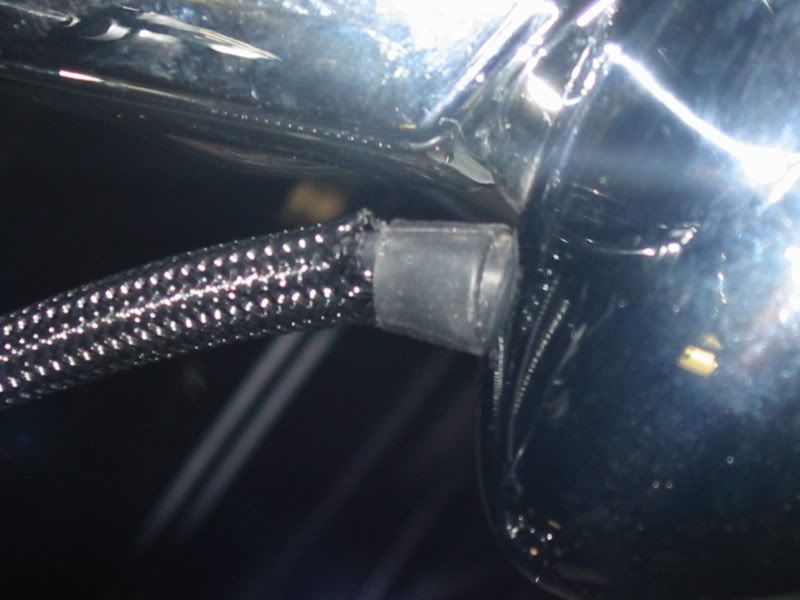
After;

You can see that if the shrink tubing doesn't completely cover the end of the mesh the heat from the shrinking process lets the mesh distort the tubing.
One other note, there are several differnet chemical formula's for shrink tubing. Most of them seem to look very dull once its been heated. Normally this isn't much of a problem as its ment for insulation not looks.
But when you use it for this kind of thing you may have to get hold of several different 'brands' to find the kind that looks shiny once its been heated.
I have no idea how to find the shiny kind by just looking at the package label. But I have noticed that if it looks a little 'slick' before its heated, its usually the kind that looks nice after its shrunk.
If you can't find any, a little black nail polish (know any Goth kids?) might work just as well.
It was my first attempt and you can see what can happen if you put the shrink tubing on without the tape.
It still looks like that today. But only because I'm too lazy to pull the tank off just for that. I want to wait until I have a good reason for taking the tank off (like a new paint job
) before I redo it properly.Before;
After;
You can see that if the shrink tubing doesn't completely cover the end of the mesh the heat from the shrinking process lets the mesh distort the tubing.
One other note, there are several differnet chemical formula's for shrink tubing. Most of them seem to look very dull once its been heated. Normally this isn't much of a problem as its ment for insulation not looks.
But when you use it for this kind of thing you may have to get hold of several different 'brands' to find the kind that looks shiny once its been heated.
I have no idea how to find the shiny kind by just looking at the package label. But I have noticed that if it looks a little 'slick' before its heated, its usually the kind that looks nice after its shrunk.
If you can't find any, a little black nail polish (know any Goth kids?) might work just as well.
#1158
03-05-2009, 11:04 AM
i have the black on my HD as well... looks good! got hte shrink wrap tip though on here so i am going to shrink those as well... i used small black zip ties when i did my hd... you can not even tell they are there... hell every cable, wire, line on my HD is done in the black. looks awesome! people ask me where i found gloss black braiding all the time
#1159
03-05-2009, 11:21 AM
Need,
harbor freight floating charger
quick release plugs (radio shack)
2 wire hoops
solder
shring wrap
solder gun
-pick this up:
http://www.harborfreight.com/cpi/cta...emnumber=42292

-then cut off the alligator clips
solder on the wire hoops so that it will hook right up to your battery
- from here cut the line right after the slinky part of the cable and solder in the quick release:
- hook it all up...
done!


plugs right into the wall

harbor freight floating charger
quick release plugs (radio shack)
2 wire hoops
solder
shring wrap
solder gun
-pick this up:
http://www.harborfreight.com/cpi/cta...emnumber=42292
-then cut off the alligator clips
solder on the wire hoops so that it will hook right up to your battery
- from here cut the line right after the slinky part of the cable and solder in the quick release:
- hook it all up...
done!
plugs right into the wall
#1160
03-05-2009, 01:50 PM

This may have been posted before. It was $21 for the ball joints. Unscew the old style and screw these on. Find 2 fine thread bolts and one nut and you are good to go. Last year while we were in Cherokee,NC one bike in our group had one of the oem sockets fall apart. Lucky for us we had some zip ties to keep us going. His bike only had 12,000 miles. Mine has 33,000 and the sockets were getting pretty loose. Any lawn mower shop will have these. It is well worth checking before riding season is here.
Last edited by soldierbot; 04-02-2021 at 07:46 AM.