Low Rider S turn signal kit easy bracket install
#1
 05-21-2017, 10:38 PM


I found some good write ups on this but felt they were missing some details. I got the Great bike gear license plate and turn signal relocation kit STBMS-02 kit. On our FXDLS bikes the left side turn signal stalk is shorter since it uses the license plate holder as a spacer. GBG doesn't sell the longer stalk any longer so go to your HD dealer and get one. It's the same as the right side one on the bike already. The parts guy will notice there are 2 part numbers for these, but he will figure it out. If not it is 69933-08 for black.
I also got the fender bracket kit from the dealer, Dyna docking hardware kit 53961-06 that has the gold tint fender brackets and some hardware with it. This allows the use of detachable sissy bars etc, plus with the longer bolts, allows the use of the easy bracket kit that I was putting on at the same time.
To do all this the seat comes off, and you find the left, right and license plate light connections. I removed those from under the seat and pulled them out so nothing is attached to the bike. You might not have to do this but I wanted to have more room to work for soldering the extension wires to the turn signals and also to work with the new license plate frame/light assy. Take the front bolts out that hold the fender on. Put a pin punch or large screwdriver in the hole so it will hold the fender on and allow it to pivot, since when you take the turn signals off the fender would be totally loose and fall out. Put a rag on the front side of the fender that drops down towards the bottom. Even though it's not visible why get it all scratched up since it will hit the bike.
On the license plate light and frame assy, it has white and black wires. The white wire is positive, black is negative. When you cut the chassis side power wires you'll have to use a voltmeter and figure out which of those 2 wires is + and -, then solder it up.
On my bracket I didn't like the angle, it almost hit the fender if installed the way it was. I wanted a bit more gap between the top of the license plate frame and the bottom of the fender so I used a die grinder on the front holes.

Then had to drill out holes in the fender brackets for those forward bolts. The instructions in my kit didn't say this needed to be done but the online ones did. It's pretty obvious it has to be done though, otherwise the license plate bracket won't be secure at all without all 4 holes getting bolted up.

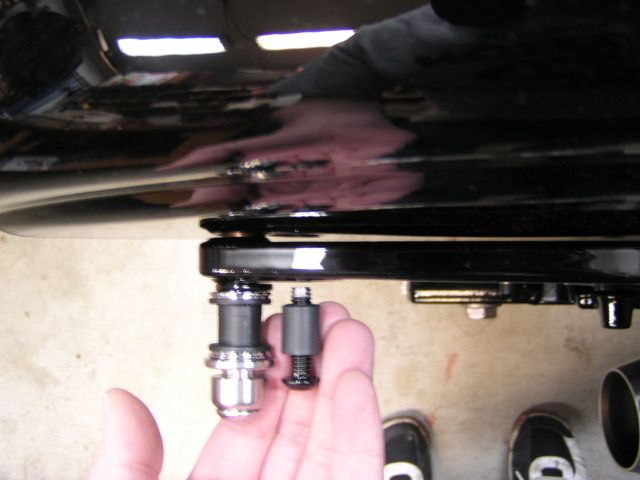
When I bolted up the bracket it all went well but realized there should be a spacer in that forward hole so when it was torqued down it wouldn't be getting torqued down on a hollow hole. So I got plastic spacers to put inside. They were white, so I used black heat shrink tubing to make them dark to match. Then torqued it down.
On the turn signal wires I cut 4 inches of wire and soldered that in to get the length I needed so I could run the harness in the factory way it was before from back to under the seat. If you know how much you have to solder in place you won't have to mess with getting the pins out of the plastic connector housings. I tried and did that on one side, took 30 minutes. Instead just cut the 3 wires and remove. Then when installing everything you can route the harness through the bracket first, then solder it together with the wire extension. Make a bench by the tire like this and it works great.


When done running the wires back, I used a piece of hose to help protect the wires plus stop gunk from shooting through this hole to where the other wires go, under the seat. Zip tie that in place.

That's about it. I don't know how long the dealer would have taken to install these items, but it sure took a lot longer than I thought it would. Here are the finished pictures. The easy bracket docking hardware, because of the spacers used for the detachable accessories, are offset a little bit. But that doesn't stop the brackets from fitting up just fine.


I'm going to have to retake this one below, will do that later.

I also got the fender bracket kit from the dealer, Dyna docking hardware kit 53961-06 that has the gold tint fender brackets and some hardware with it. This allows the use of detachable sissy bars etc, plus with the longer bolts, allows the use of the easy bracket kit that I was putting on at the same time.
To do all this the seat comes off, and you find the left, right and license plate light connections. I removed those from under the seat and pulled them out so nothing is attached to the bike. You might not have to do this but I wanted to have more room to work for soldering the extension wires to the turn signals and also to work with the new license plate frame/light assy. Take the front bolts out that hold the fender on. Put a pin punch or large screwdriver in the hole so it will hold the fender on and allow it to pivot, since when you take the turn signals off the fender would be totally loose and fall out. Put a rag on the front side of the fender that drops down towards the bottom. Even though it's not visible why get it all scratched up since it will hit the bike.
On the license plate light and frame assy, it has white and black wires. The white wire is positive, black is negative. When you cut the chassis side power wires you'll have to use a voltmeter and figure out which of those 2 wires is + and -, then solder it up.
On my bracket I didn't like the angle, it almost hit the fender if installed the way it was. I wanted a bit more gap between the top of the license plate frame and the bottom of the fender so I used a die grinder on the front holes.

Then had to drill out holes in the fender brackets for those forward bolts. The instructions in my kit didn't say this needed to be done but the online ones did. It's pretty obvious it has to be done though, otherwise the license plate bracket won't be secure at all without all 4 holes getting bolted up.

When I bolted up the bracket it all went well but realized there should be a spacer in that forward hole so when it was torqued down it wouldn't be getting torqued down on a hollow hole. So I got plastic spacers to put inside. They were white, so I used black heat shrink tubing to make them dark to match. Then torqued it down.

On the turn signal wires I cut 4 inches of wire and soldered that in to get the length I needed so I could run the harness in the factory way it was before from back to under the seat. If you know how much you have to solder in place you won't have to mess with getting the pins out of the plastic connector housings. I tried and did that on one side, took 30 minutes. Instead just cut the 3 wires and remove. Then when installing everything you can route the harness through the bracket first, then solder it together with the wire extension. Make a bench by the tire like this and it works great.


When done running the wires back, I used a piece of hose to help protect the wires plus stop gunk from shooting through this hole to where the other wires go, under the seat. Zip tie that in place.

That's about it. I don't know how long the dealer would have taken to install these items, but it sure took a lot longer than I thought it would. Here are the finished pictures. The easy bracket docking hardware, because of the spacers used for the detachable accessories, are offset a little bit. But that doesn't stop the brackets from fitting up just fine.


I'm going to have to retake this one below, will do that later.

#2
05-22-2017, 05:14 AM
Club Member
Nice write up. I have the same kit. Found it odd that you needed to modify it, as mine bolted on no problem, no modification necessary. I also did not need to extend cables. Assume you're not getting any canbus errors? I was always told never to solder canbus bike wires, crimp only. But maybe it's less important for lighting circuits? Good to know if so. Just to note, the turn signal stalks are not directional, so the shorter or the longer could be used, depending on if you want to move them inboard or leave them as original. Sportster stalks also fit if you want slightly longer as well.
#3
05-22-2017, 08:41 AM

Great write up. I did the same kit a few months ago and also didn't have to modify anything. My kit did come with the longer stalk for the turn signal but didn't include the mounting bracket shown in your write up. I reused the brackets that come with the HD sissy bar dock kit and everything bolted right up.
#4
05-24-2017, 11:19 PM
Thanks guys, yes I think they recently just stopped including the single longer stalk in the kit. Which they told me on the phone I'd have to buy.
That's a good idea too, short stalks on both sides. And I realized they were the same L to R at the time too. Usually I would have thought go short instead of long. Brain fart there on my part.
I'm betting you guys did it fine and all that happened is the connectors went from being somewhere in the center area under the seat to that area close to where the fender meets the electrical box.
I didn't have any errors after doing the soldering on left, right and license plate lights. And, had I known that I would have thought twice about doing it. But now that you mentioned that, it does ring a bell somewhere in my head that I saw that in a post before I did all this.
The only thing that bugs me, is on that 3rd picture you can see a large gap (in part because it isn't even close to getting bolted into place) between the fender support and the painted fender. Now when all bolted up I have almost no clearance there. As in probably couldn't put a sheet of paper there. This could be a thing where it was like that before, and now that I've done this I'm critical of everything I touched. So I spent another 2 hours taking those HD fender brackets out again, trying to figure out why the fender seems to bow out towards the rear bolt area. I even put the stock fender brackets in and sized them up to the HD docking brackets. Bolt holes lined up perfectly, all the same. The threaded bolt holes in the brackets line up with the holes in the large fender supports (the black one that are like 1 inch thick) and it still is a bit bowed out. They also line up to the holes in the fender. I think it's the fact that the fender is pretty narrow on the front two bolts. So when torqued down it spreads the fender wider at the front part. Then the rear gets bolted up.
So what I'm saying is, both times I've had the fender off, and both times it bolts up with very little clearance in that area. I'm going to go check out some LRS bikes at my local dealer to look for myself at a factory unmolested rear fender. I looked at the painted fender in that area, and didn't see scuff marks like it had been hitting in the 1000 miles I'd ridden it before doing this mod.
What is it like in that area on your bikes?
I've done tons of upgrades and mods to import cars and bikes over my many years. It could be my brain is permanently metric now, as it is hard to reach for my fractional wrenches!

Thread
Thread Starter
Forum
Replies
Last Post