Installed w/ pics--HD Boom Audio Music and Intercom Kit (on '04 Electra Glide)
#1
(Lengthy post due to the installation of this kit on my '04 Electra Glide. HD fitment information says this kit is for '07 and newer fairing models, but is very easily adapted for '06 fairing models, and only slightly more difficult on my '04. Don't know if it can be modified to work on older bikes than '04.)
Installed the HD Boom Audio Music and Intercom kit, p/n 77108-09; CB module, 76416-06C; non-Ultra overlay harness, 70169-06; and, J&M in-fairing CB antenna, p/n FPA-HCCB in my Harman Kardon radio equipped ’04 Electra Glide. For me, this is the ideal solution for CB radio without replacing the long chrome Street Glide type (more accurately the SEEG type) tank console; permanently mounting an Ultra tour pak with speakers, passenger controls, and headset connector (because I almost never have the tour pak on the bike); and, rear mounted antenna (because the holes in the SG rear fender fascia were filled as part of my recent paint project and prefer no antennas at the rear in any event). The instructions are clear; the installation is straightforward; and the kit works as intended.
Here's a picture of the rider headset connector that sits on double-sided tape and is secured with a metal bracket that is installed between the chrome console and rubber gasket:
http://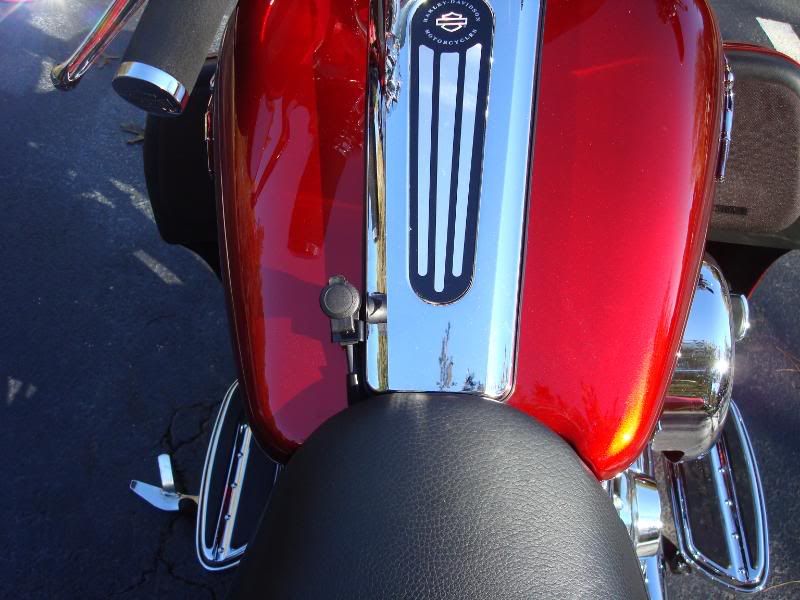
(NOTE: A clever alternative to using the clip/tape mount on the gas tank is to locate the rider headset connector in the left side mid-frame heat deflector (if you have the deflector on your bike) as was done on an SESG2 in this thread with pictures: http://www.cvoharley.com/smf/index.php?topic=62448.0) I liked this idea and relocated my rider headset connector to newly installed heat defelctors on the left side. Here's a picture:
http://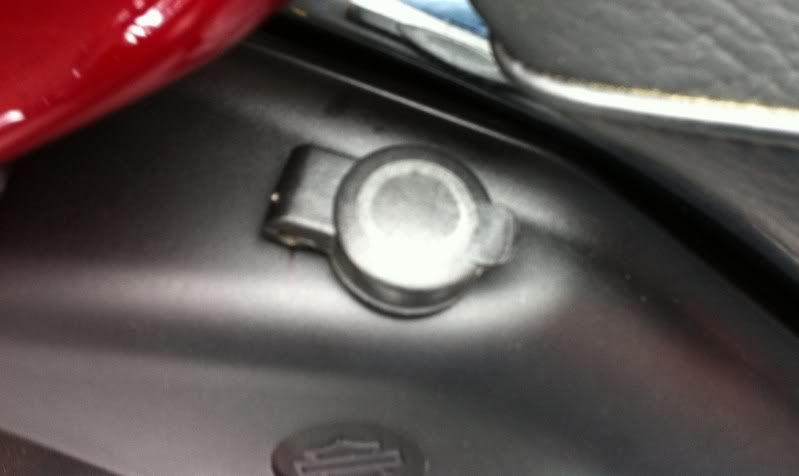
Here are a couple of pictures of the passenger headset connector and PTT/volume switch:
http://
http://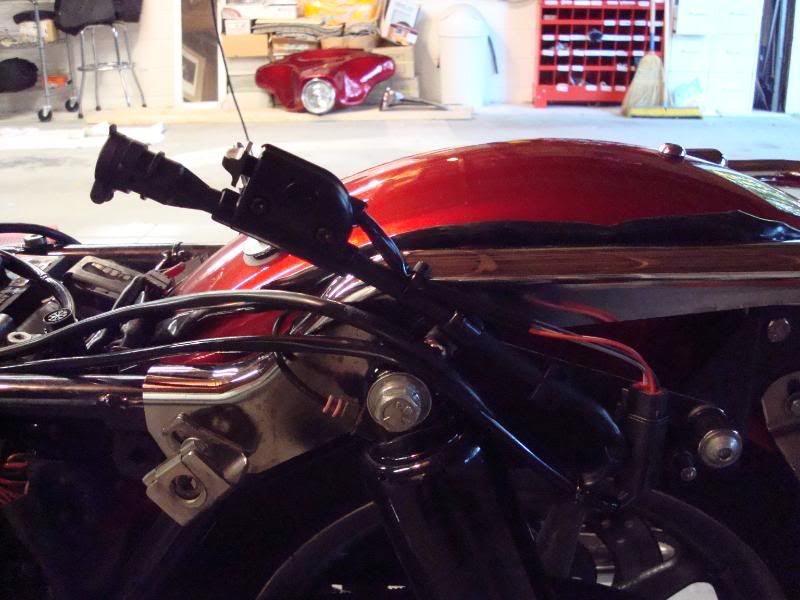
As explained below, because my bike is an ’04, several relatively simple modifications were necessary for this installation, but everything works as intended. On an ’06 bike, the only modification to the kit is to remove the Molex connector and terminal pins from the kit supplied left handlebar switch harness and use the OEM Deutsch connector from your bike with newly installed terminal sockets on the wire ends. If you have an ’07 or newer bike, the installation is simple and straightforward with no modifications of the bike’s wiring—essentially plug and play electrically speaking.
The BAMI kit includes several primary components: (1) new left handlebar switches/housings/harness; (2) rider headset connector; (3) passenger headset connector and switch (PTT/Vol.); and, (4) "Speaker" switch for the fairing cap. The kit is intended for ’07 and newer bikes (although the installation instructions also (oddly) refer to installation on an ’06 model). If you have an ’06 bike, the only required modification is to change out the Molex connector on the handlebar switch harness and replace it with the Deutsch connector from your OEM switch harness. You will need new Deutsch wire terminal sockets, HD p/n 72191-94 (qty. 12) to crimp on the wires and reassemble the Deutsch connector, and remove the clutch interlock switch and its wires from the kit supplied harness. Removing the switch/wires is simple. The switch is virtually identical to the brake light switch in the right handlebar switch housing. (Speculating, but HD probably didn’t want to make a separate kit for the ’06 model using the Deutsch connector on the switch harness.)
If you have an ’04 or ’05 bike, you will also need to change a connector on the OEM interconnect harness and splice two wires. On the pre-06 harness, there is a three-wire Deutsch audio connector on the interconnect harness that must be replaced with a six-wire Deutsch connector (though it uses only four wires); the '06 and newer bikes already have the correct Deutsch connector and wires. (The six-wire connector is HD p/n 72116-04; socket lock 75156-94; terminal sockets 72191-94 (qty. 2); and, seal pins 73195-94.) This change is necessary because the “new” six-wire Deutsch connector plugs into a mating connector on the non-Ultra overlay harness.
Here's a pic of the OEM three-wire Deutsch connector:
http://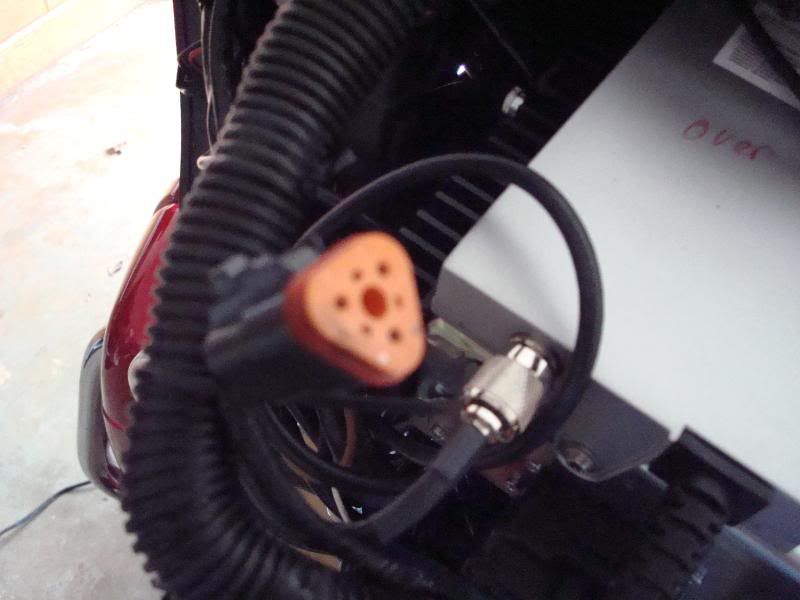
And a picture of the Deutsch six-wire replacement and parts:
http://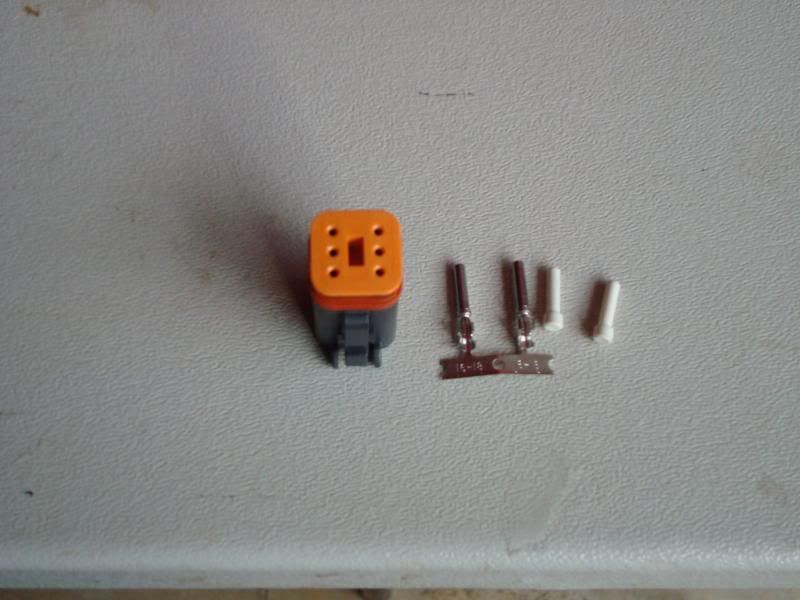
The wiring modifications are simple (but see NOTE of self-inflicted error): (1) retain the V/Gy wire and Be/Y wire, and not use the O/V wire in the OEM three-wire Deutsch connector; add splices from the R/O wire and Bk/Gn wire from the 23-wire base radio connector (pin outs 10 and 11) using terminal sockets p/n 72191-94; and, install these along with the two wires retained from the three wire connector in the new six-wire Deutsch connector. (The wire colors and chambers are: slot 1--V/Gy, slot 2--Be/Y, slot--3 R/O, and slot 6--Bk/Gn; slots 4 and 5 are blank and use the seal pins.) The HD Service Manual has excellent information on the disassembly and assembly of Deutsch connectors. Disassembling the Molex connector requires a very small diameter pick tool; a tech at my local HD store did mine as a favor; and, there is enough wire length to simply cut off the Molex connector, strip the wires to attach the sockets, and assemble the Deutsch connector if you are installing the kit on an '06 or older bike.
Note on self-inflicted error: Despite making a chart of the "simple wiring modification" showing wire color and location, I mangaged to splice the wrong wire from the base radio connector generating a DTC trouble code in the radio and evidenced by the left audio switch changing the radio's mode when pressed down rather than changing channels. I wrongly assumed that the problem was a pinched wire in the handlebar switch housings and unecessarily disassembled both looking for the pinched/shorted wire. Now, the left side housing is no big issue, but the right side means fussing with the throttle and idle cables and the brake light switch--a real pita. It was only when I looked at the handlebar audio switch matrix in the service manual and identified the wires used for the "down" audio mode function, that I knew to check the splices at the base radio connector harness. I easily identified my splicing mistake and took about 10 minutes to correct my mistake. I also didn't understand the radio display, "P/N 23-4," meant the wire in the base radio connector was the problem. It's a good thing I can laugh at myself, and fortunate that my mistake wasn't catastrophic and easily fixed.
For the HK radio's Automatic Volume Control to function on an '04 or '05 bike, a final wiring modification is to sever the white/green wire (pin out #9 on the base radio connector) and reconnect/splice it from the connector to the serial data wire at the speedometer connector (slot 2, LGn/V). (This change is necessary since the pre-’06 bikes use the white/green wire from the Vehicle Speed Sensor to provide vehicle speed information to the radio, while the ’06 and newer bikes use the serial data wire.)
Here's a picture of the severed white/green wire (upper left of pic with bare wire showning), and the speedo connector with the light green/violet wire bared prior to splice (in the lower right) in the connector with the green gasket/seal:
http://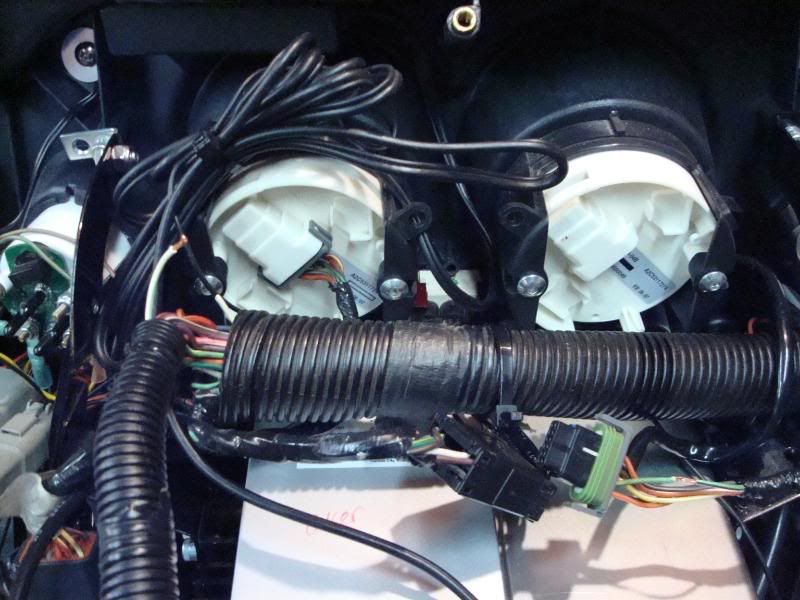
HD has included the installation instructions as a pdf file on the website with the product description:
http://www.harley-davidson.com/gma/g...bmLocale=en_US
Here's a picture of the J&M in-fairing antenna (the antenna wire is temporarily covered with duct tape; the supplied plastic wire holders were installed later and duct tape removed):
http://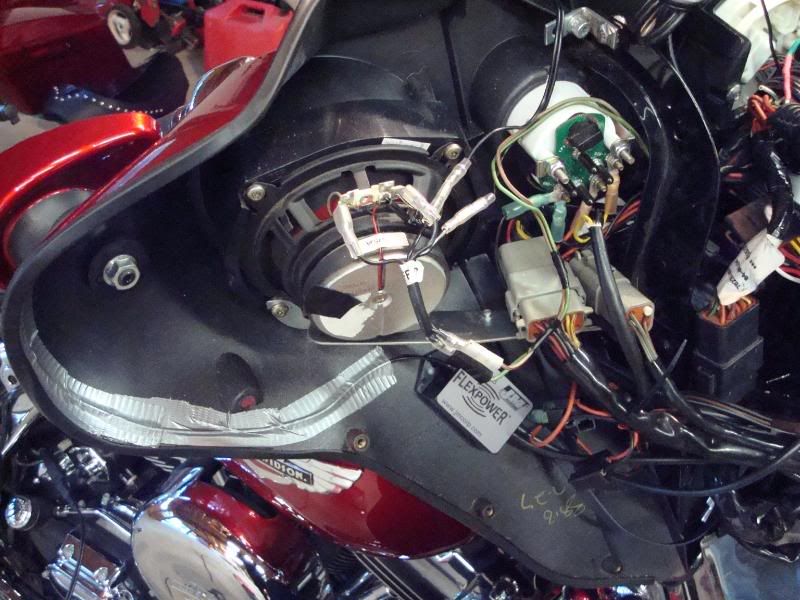
The antenna includes a ground wire that attaches at the gound screw located on the left side of the triple tree (not pictured).
On an ’07 or newer bike, the parts list is:
1. BAMI kit, p/n 77108-09;
2. Non-Ultra overlay harness, p/n 70169-06;
3. CB module, p/n 76416-06C;
4. CB antenna (I used J&M in-fairing model FPA-HJCB, but HD offers others);
5. Headset/Mic of your choice (I used J&M Elite series headset and lower cord.)
On an ’06 model, the above parts are used, plus the terminal sockets, p/n 72191-94 (qty 12, but buy a couple extra in case a bad crimp or two occur), to assemble the Deutsch connector on the left handlebar switch harness.
On an ’04 or ’05 bike, the above parts are needed plus two more terminal sockets and the six-wire Deutsch connector, 72116-04; socket lock, 75156-94; and, seal pins 73195-94 (qty. 2), and re-use of the OEM Deutsch connector from the removed left handlebar switch harness.
The only specialty tool needed is a crimping tool. I used the BCT-1 crimp tool. For information on it and its use, this link may be useful:
http://www.aeroelectric.com/articles.../matenlok.html
I took the bike to my local HD store for the HD Digital Technician to "turn on" the Intercom function in the HK headunit. There was a $50 charge for this service. Incidentally, the DT flash is on HD's intranet and generates a charge from HD to the dealership for the flash.
PM me if you would like additional information.
If you want a CB installation on an '04 or newer bike (Street Glide, Road Glide, non-Ultra Electra Glide), this kit offers something new and better than HD's previous CB installation option IMO because it doesn't require a new tank console or a tour pak.
I'll add some better pictures of the bike post-installation; I didn't have the camera and I was excited to test the unit. And I'll see if I can get some riding in to check the range of the J&M in-fairing antenna and provide some additional information.
Edit: If you want to use an external CB antenna, HD offers a couple of choices for frame mount or tour pak mount. Both have installation instructions on line at HD's website. These are the ones for the tour pak mounted CB antenna: http://www.harley-davidson.com/en_US...ts/-J04742.pdf and these are for frame mount: http://www.harley-davidson.com/en_US...ts/-J03648.pdf
Installed the HD Boom Audio Music and Intercom kit, p/n 77108-09; CB module, 76416-06C; non-Ultra overlay harness, 70169-06; and, J&M in-fairing CB antenna, p/n FPA-HCCB in my Harman Kardon radio equipped ’04 Electra Glide. For me, this is the ideal solution for CB radio without replacing the long chrome Street Glide type (more accurately the SEEG type) tank console; permanently mounting an Ultra tour pak with speakers, passenger controls, and headset connector (because I almost never have the tour pak on the bike); and, rear mounted antenna (because the holes in the SG rear fender fascia were filled as part of my recent paint project and prefer no antennas at the rear in any event). The instructions are clear; the installation is straightforward; and the kit works as intended.
Here's a picture of the rider headset connector that sits on double-sided tape and is secured with a metal bracket that is installed between the chrome console and rubber gasket:
http://

(NOTE: A clever alternative to using the clip/tape mount on the gas tank is to locate the rider headset connector in the left side mid-frame heat deflector (if you have the deflector on your bike) as was done on an SESG2 in this thread with pictures: http://www.cvoharley.com/smf/index.php?topic=62448.0) I liked this idea and relocated my rider headset connector to newly installed heat defelctors on the left side. Here's a picture:
http://

Here are a couple of pictures of the passenger headset connector and PTT/volume switch:
http://

http://

As explained below, because my bike is an ’04, several relatively simple modifications were necessary for this installation, but everything works as intended. On an ’06 bike, the only modification to the kit is to remove the Molex connector and terminal pins from the kit supplied left handlebar switch harness and use the OEM Deutsch connector from your bike with newly installed terminal sockets on the wire ends. If you have an ’07 or newer bike, the installation is simple and straightforward with no modifications of the bike’s wiring—essentially plug and play electrically speaking.
The BAMI kit includes several primary components: (1) new left handlebar switches/housings/harness; (2) rider headset connector; (3) passenger headset connector and switch (PTT/Vol.); and, (4) "Speaker" switch for the fairing cap. The kit is intended for ’07 and newer bikes (although the installation instructions also (oddly) refer to installation on an ’06 model). If you have an ’06 bike, the only required modification is to change out the Molex connector on the handlebar switch harness and replace it with the Deutsch connector from your OEM switch harness. You will need new Deutsch wire terminal sockets, HD p/n 72191-94 (qty. 12) to crimp on the wires and reassemble the Deutsch connector, and remove the clutch interlock switch and its wires from the kit supplied harness. Removing the switch/wires is simple. The switch is virtually identical to the brake light switch in the right handlebar switch housing. (Speculating, but HD probably didn’t want to make a separate kit for the ’06 model using the Deutsch connector on the switch harness.)
If you have an ’04 or ’05 bike, you will also need to change a connector on the OEM interconnect harness and splice two wires. On the pre-06 harness, there is a three-wire Deutsch audio connector on the interconnect harness that must be replaced with a six-wire Deutsch connector (though it uses only four wires); the '06 and newer bikes already have the correct Deutsch connector and wires. (The six-wire connector is HD p/n 72116-04; socket lock 75156-94; terminal sockets 72191-94 (qty. 2); and, seal pins 73195-94.) This change is necessary because the “new” six-wire Deutsch connector plugs into a mating connector on the non-Ultra overlay harness.
Here's a pic of the OEM three-wire Deutsch connector:
http://

And a picture of the Deutsch six-wire replacement and parts:
http://

The wiring modifications are simple (but see NOTE of self-inflicted error): (1) retain the V/Gy wire and Be/Y wire, and not use the O/V wire in the OEM three-wire Deutsch connector; add splices from the R/O wire and Bk/Gn wire from the 23-wire base radio connector (pin outs 10 and 11) using terminal sockets p/n 72191-94; and, install these along with the two wires retained from the three wire connector in the new six-wire Deutsch connector. (The wire colors and chambers are: slot 1--V/Gy, slot 2--Be/Y, slot--3 R/O, and slot 6--Bk/Gn; slots 4 and 5 are blank and use the seal pins.) The HD Service Manual has excellent information on the disassembly and assembly of Deutsch connectors. Disassembling the Molex connector requires a very small diameter pick tool; a tech at my local HD store did mine as a favor; and, there is enough wire length to simply cut off the Molex connector, strip the wires to attach the sockets, and assemble the Deutsch connector if you are installing the kit on an '06 or older bike.
Note on self-inflicted error: Despite making a chart of the "simple wiring modification" showing wire color and location, I mangaged to splice the wrong wire from the base radio connector generating a DTC trouble code in the radio and evidenced by the left audio switch changing the radio's mode when pressed down rather than changing channels. I wrongly assumed that the problem was a pinched wire in the handlebar switch housings and unecessarily disassembled both looking for the pinched/shorted wire. Now, the left side housing is no big issue, but the right side means fussing with the throttle and idle cables and the brake light switch--a real pita. It was only when I looked at the handlebar audio switch matrix in the service manual and identified the wires used for the "down" audio mode function, that I knew to check the splices at the base radio connector harness. I easily identified my splicing mistake and took about 10 minutes to correct my mistake. I also didn't understand the radio display, "P/N 23-4," meant the wire in the base radio connector was the problem. It's a good thing I can laugh at myself, and fortunate that my mistake wasn't catastrophic and easily fixed.
For the HK radio's Automatic Volume Control to function on an '04 or '05 bike, a final wiring modification is to sever the white/green wire (pin out #9 on the base radio connector) and reconnect/splice it from the connector to the serial data wire at the speedometer connector (slot 2, LGn/V). (This change is necessary since the pre-’06 bikes use the white/green wire from the Vehicle Speed Sensor to provide vehicle speed information to the radio, while the ’06 and newer bikes use the serial data wire.)
Here's a picture of the severed white/green wire (upper left of pic with bare wire showning), and the speedo connector with the light green/violet wire bared prior to splice (in the lower right) in the connector with the green gasket/seal:
http://

HD has included the installation instructions as a pdf file on the website with the product description:
http://www.harley-davidson.com/gma/g...bmLocale=en_US
Here's a picture of the J&M in-fairing antenna (the antenna wire is temporarily covered with duct tape; the supplied plastic wire holders were installed later and duct tape removed):
http://

The antenna includes a ground wire that attaches at the gound screw located on the left side of the triple tree (not pictured).
On an ’07 or newer bike, the parts list is:
1. BAMI kit, p/n 77108-09;
2. Non-Ultra overlay harness, p/n 70169-06;
3. CB module, p/n 76416-06C;
4. CB antenna (I used J&M in-fairing model FPA-HJCB, but HD offers others);
5. Headset/Mic of your choice (I used J&M Elite series headset and lower cord.)
On an ’06 model, the above parts are used, plus the terminal sockets, p/n 72191-94 (qty 12, but buy a couple extra in case a bad crimp or two occur), to assemble the Deutsch connector on the left handlebar switch harness.
On an ’04 or ’05 bike, the above parts are needed plus two more terminal sockets and the six-wire Deutsch connector, 72116-04; socket lock, 75156-94; and, seal pins 73195-94 (qty. 2), and re-use of the OEM Deutsch connector from the removed left handlebar switch harness.
The only specialty tool needed is a crimping tool. I used the BCT-1 crimp tool. For information on it and its use, this link may be useful:
http://www.aeroelectric.com/articles.../matenlok.html
I took the bike to my local HD store for the HD Digital Technician to "turn on" the Intercom function in the HK headunit. There was a $50 charge for this service. Incidentally, the DT flash is on HD's intranet and generates a charge from HD to the dealership for the flash.
PM me if you would like additional information.
If you want a CB installation on an '04 or newer bike (Street Glide, Road Glide, non-Ultra Electra Glide), this kit offers something new and better than HD's previous CB installation option IMO because it doesn't require a new tank console or a tour pak.
I'll add some better pictures of the bike post-installation; I didn't have the camera and I was excited to test the unit. And I'll see if I can get some riding in to check the range of the J&M in-fairing antenna and provide some additional information.
Edit: If you want to use an external CB antenna, HD offers a couple of choices for frame mount or tour pak mount. Both have installation instructions on line at HD's website. These are the ones for the tour pak mounted CB antenna: http://www.harley-davidson.com/en_US...ts/-J04742.pdf and these are for frame mount: http://www.harley-davidson.com/en_US...ts/-J03648.pdf
Last edited by Harleypingman; 11-25-2011 at 03:09 PM. Reason: Accidentally posted before finished.
#5
Darren and MassHD, thanks. I'd been waiting/hoping someone else would be the HDF guinea pig for this kit, but then concluded that I'd still have to take the plunge installing it on an '04 bike when the kit's fitment information says '07 and newer.
hrchdog, if you go to HD's website and check the kit(s) you have and the BAMI kit I used, you can view the Installation Instruction for each kit. The instructions include a "service parts list" (Harley-speak for a parts list for the kit). You can compare the intercom kit you have with the service parts list for the BAMI, 77108-09, and determine what, if any, differences there are. In reading the descriptions for the intercom kits in the P&A catalog, the non-Ultra overlay harness (p/n 76109-06) is not referenced as being required. If you don't have that harness already, you will need it for the CB to work with the headset connectors unless you devise a work around solution. Also, no dealer flash is required for the CB; the flash is needed to turn "on" the Intercom feature.
hrchdog, if you go to HD's website and check the kit(s) you have and the BAMI kit I used, you can view the Installation Instruction for each kit. The instructions include a "service parts list" (Harley-speak for a parts list for the kit). You can compare the intercom kit you have with the service parts list for the BAMI, 77108-09, and determine what, if any, differences there are. In reading the descriptions for the intercom kits in the P&A catalog, the non-Ultra overlay harness (p/n 76109-06) is not referenced as being required. If you don't have that harness already, you will need it for the CB to work with the headset connectors unless you devise a work around solution. Also, no dealer flash is required for the CB; the flash is needed to turn "on" the Intercom feature.
Last edited by Harleypingman; 11-01-2009 at 01:47 PM.
#7
Trending Topics
#9
My original post has been edited to include pictures of the rider headset connector and passenger headset connector with PTT/Vol. switch as installed.
The OP was also edited to include my "confession" of a dumb wiring mistake I made before completing the installation.
Props to Iron Cross Audio (http://www.ironcrossaudio.com/) for resurrecting from the dead (according to HD Tech Services) the HK head unit that locked up due to a software glitch.
The BAMI kit installation instructions are available on-line from HD. For this thread's purposes, the installation required removal of the outer fairing, gas tank, seat, left side cover and saddlebag; removal of the left handlebar switches, housings, and harness; and, the fairing switch cap (to install the "Speaker" rocker switch). The additional work for an '06 or '04-'05 installation is explained in the original post; figure it took an additonal hour (not counting the time wasted on my dumb wiring mistake and its fix).
Prior to buying the BAMI kit, the wiring diagrams for '06 and '07 HK radio equipped bikes were compared to my '04 Touring Models wiring diagrams with particular emphasis on the base radio connector and the handlebar switches. With the exceptions noted in the OP, they're the same. If you are considering the BAMI kit for your '05 or older bike, I encourage you to do the same comparison and verify wire colors, location, and part nos. as necessary.
The HD Service Manual is essential to me for this kind of project.
Last edited by Harleypingman; 04-23-2011 at 02:42 AM.
The following users liked this post:
QdawG (07-18-2019)
#10

