
"DIY MODS" and TRICKS to SAVE $$$$$$
#1
 11-29-2007, 07:01 PM

I have determined that there are mods all over this site! Why can't we just have a post for DIY Mods? So I started this post as a DIY MODS post. Everyone has ideas on Do It Yourself ideas. So I would like to have this post as a sticky!But I guess it depends on Terry. So let's hear it from all you guys out there about all your DIY mods and keep this available to everyone! The money you save here may be your own. [sm=americanasmiley.gif][sm=biker2.gif][sm=goodidea.gif][sm=icon_cheers.gif][sm=patriot.gif]

Top Answer
12-01-2007, 02:08 PM

Here is the most bang for the buck mod I have done yet! Crankcase breather hose. I cannot take credit for it. jag1886give me this tip so hats off to him!
Normal braid line is not cheap. Last crankcase kit I bought was a braided line from head to head with banjo fittings built in was about $65.00.
Here is a step by step with pics!
Local hardware store for a 3/8" braided sink hose with fitings.
I bought 30" piece since this was a trial run and not sure of length, cost was $5.74
Attachment 543096
Cut one end off between the nut and crimp so that the crimp keeps the braids together.
Attachment 543097
Measure for length. I chose to run the hose straight down to the inside of the frame and so the hose stopped just below the frame.
Attachment 543098
Tape the braided hose where your about to cut it and hacksaw it off!
Attachment 543099
I used a clamp that came with my air cleaner kit. I left the tape on and slid the hose on the clamp and attached to the vent tube.
Attachment 543100
Make sure your hose doesnt get close to the pipes or any moving parts. Secure with a zip tie if needed.
Attachment 543101
I had alot left so 30" might be a little much for my route.
Attachment 543102
Now sit back open a cold one and enjoy the $6.00 mod. I must add that it looks way better in person then the pics. Looks way better than a piece of black hose. Also, it took me longer to post this then do the job!!!Hope this saves someone some cash!
Attachment 543103
#2
11-29-2007, 07:04 PM

Road Warrior
The following 4 users liked this post by NCCopBikeRider:
#3
11-30-2007, 11:00 PM
Road Captain
#4
12-01-2007, 12:53 AM
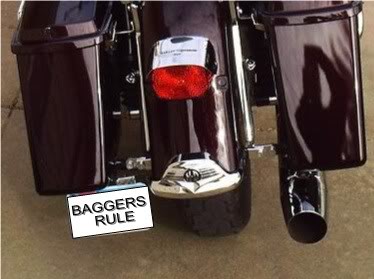
+1 on the pipes! I did it and it works great! You can use your left muffler bracket for your plate as well! Another DIY is cut off your grab rail and replace it with caps or spikes like I did. Drill and tap grip ends and add spikes adds a custom look.That's just some of what I have done! I am all about saving money and a personal touch! Here are some pics!
The following 6 users liked this post by CREEPSHOW:
bcop803 (09-16-2017),
FZMello (06-21-2021),
nycran (12-01-2020),
rawger (05-17-2018),
RoadHogDoug (10-26-2017),
and 1 others liked this post.
#5
12-01-2007, 05:04 AM

Elite HDF Member
I had a smoked lay down lens cover that the bulb melted a hole into. I was just going to throw the lens away, and get a new one. But, instead, I took one of the many die I have laying around the house (I am a craps dealer at a casino), and added that to my lens cover.
[IMG]local://upfiles/12433/BC23E6DE28BA4941A1F6A120FC3FA9C1.jpg[/IMG]
[IMG]local://upfiles/12433/BC23E6DE28BA4941A1F6A120FC3FA9C1.jpg[/IMG]
The following 3 users liked this post by PapaTravis:
#6
12-01-2007, 05:24 AM
#7
12-01-2007, 05:32 AM
Elite HDF Member
Another little, and very inexpensive, thing I did was when I added the passing lamps to my rk custom. I wanted the extra light, at night, and I like the look. What I did not care for was the look of the black wire coming off the light bar, to behind the nachelle, and into the head light housing. What I did was to go to Autozone and buy this plastic, chrome looking, wire conduit. I wrapped it around the wires, and into the housing. I think it really makes the light bar look finished, and was cheap to do. Even though it is only plastic, it has held up really well. In fact, it looks as good as the day I did it.
[IMG]local://upfiles/12433/9F91410F9C734E9DA1AF84B04D226A8E.jpg[/IMG]
[IMG]local://upfiles/12433/B762DF6B8BFE40ECB2132EA951E66D7A.jpg[/IMG]
[IMG]local://upfiles/12433/1066122B95F94792A13A15A802B0EC67.jpg[/IMG]
[IMG]local://upfiles/12433/191417B60BFD4E399C3A3D0954F17D11.jpg[/IMG]
[IMG]local://upfiles/12433/9F91410F9C734E9DA1AF84B04D226A8E.jpg[/IMG]
[IMG]local://upfiles/12433/B762DF6B8BFE40ECB2132EA951E66D7A.jpg[/IMG]
[IMG]local://upfiles/12433/1066122B95F94792A13A15A802B0EC67.jpg[/IMG]
[IMG]local://upfiles/12433/191417B60BFD4E399C3A3D0954F17D11.jpg[/IMG]
The following 4 users liked this post by PapaTravis:
Trending Topics
#8
12-01-2007, 05:34 AM
Elite HDF Member
ORIGINAL: relli
great idea! i bought a garage door opener remote-split the case and wired a momentary switch to it. drilled a hole in the bottom of my windshield bag for the switch, put the remote in the bag. works great for about 20 bucks.
great idea! i bought a garage door opener remote-split the case and wired a momentary switch to it. drilled a hole in the bottom of my windshield bag for the switch, put the remote in the bag. works great for about 20 bucks.
The following users liked this post:
ThedUb77 (05-05-2020)
#9
12-01-2007, 06:04 AM
split the case on the remote-under the button is a circuit board with two contact points where the button hits when ya press it. solder a wire to each, notch the edge of the case to accomidate the wires and close case. wire a momentary switch to the end of the two wires and mount where you want. i used my windshield bag (left side) but have also drilled a hole in a sidecover on my last bike and had it mounted in there.got everything from home depot.
The following 12 users liked this post by relli:
7up (09-10-2019),
animalv (09-25-2022),
Blender (04-23-2016),
CHUDDLESTON (10-06-2019),
cmathison (02-10-2023),
and 7 others liked this post.
#10
12-01-2007, 06:10 AM
Elite HDF Member