
Installing 2" Pullback Bars FLHTK (Pics included)
#91
 09-02-2014, 02:00 PM


Thanks for posting this. Unfortunately, I don't have your expertise and had the dealer install my bars, they were Wild 1 12.5 chubby's. Love the bars but the dealer left the left side with a 1/8" gap before it's flush to the 1-1/4" part. I was able to move the hydraulic clutch part but the switch housing and grip won't slide over. How easy was it to move the left grip on and off? I know on non-heated grip bikes, sometimes the left are glued on or more difficult to take off. I wanted to just do this myself instead of taking it back to the dealer if it was something I could do in a few minutes. Just dont want to mess anything up either since I paid a good buck to have it done. I bought the longer steel braided cables but the labor they charged me was $600. Which, I don't necessarily mind but it irritates me a bit I have to fix it or bring it back.
Mark
Mark
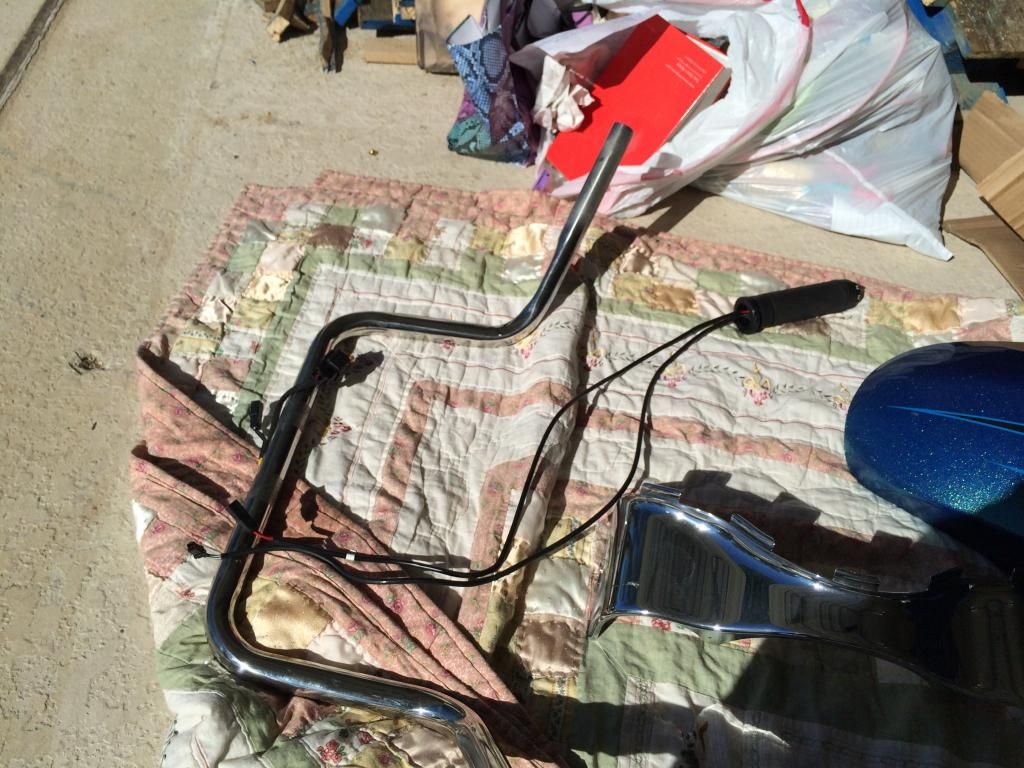
Went out and got my 2" Pullback bars from Harley this morning.
This will be my 4th Ultra to get them. I'm 5'8" and I've always had to ride slightly leaned forward with both hands on the bars, and have to lean a lot more when doing full lock turns.
Bars used are Part # 56176-08
I did not get ANY extra stuff regardless of what the parts guys will tell you.
For Poops and Grins, I got an estimate for the job from a dealership for $1500 parts and labor.
Doing this myself cost me $150 for the bars after discount, and 2 hours of my time. I started at 2:30 and finished at 4:30 using hand tools and no assistance.
I've always been able to do the job on previous ones without the "extra" stuff (I usually re-routed the clutch cable out of the inner fairing hole and routed down along the bars giving me a nice hole to mount a 12v socket on the previous years)
Anyways.....Here we GO!
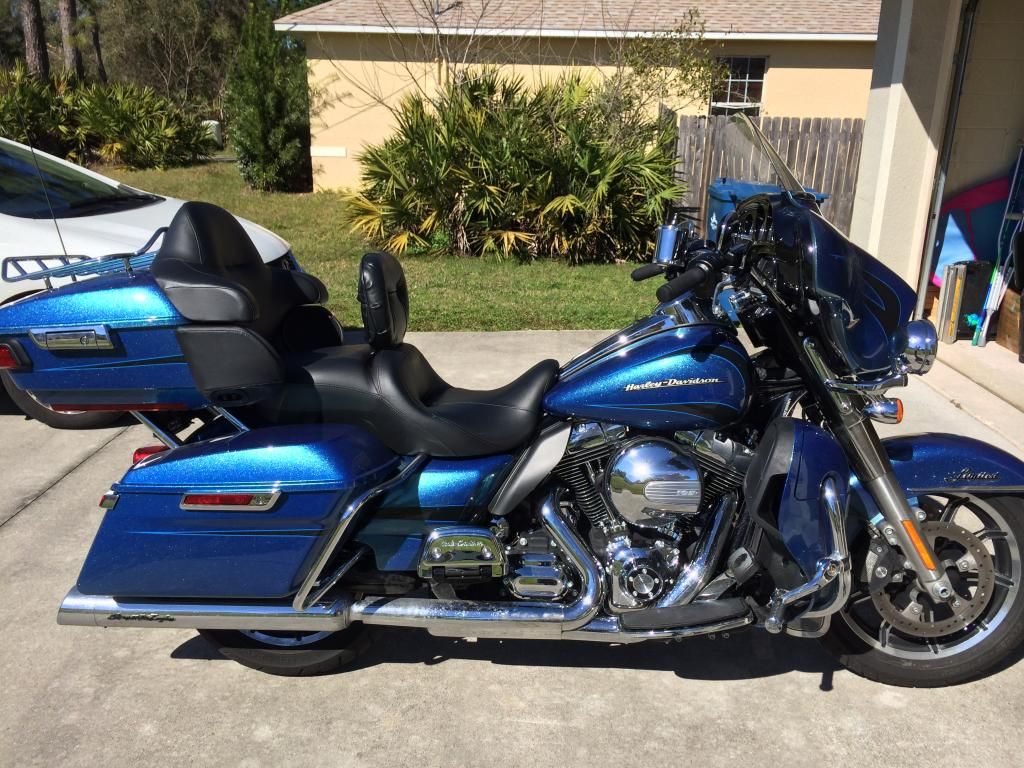
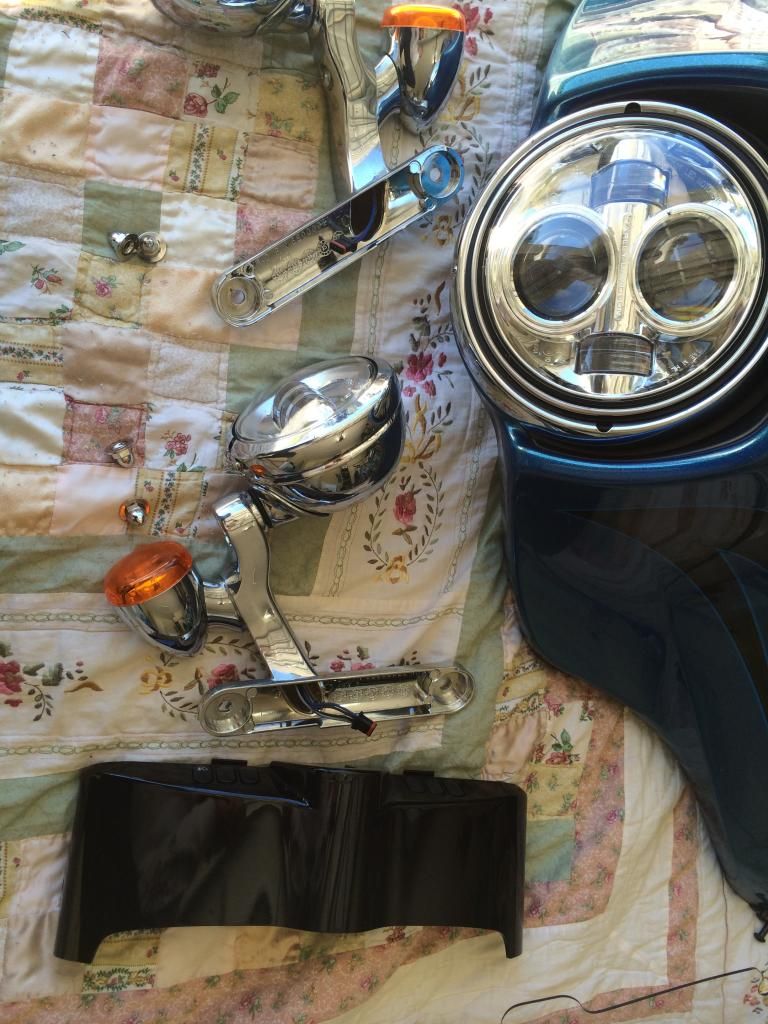
First Picture: Stock Bars:
Step one, Remove front outer fairing cap. FYI, easier on the '14's then previous year.
Step two, remove ignition and lock nut and guide ring

Step 3, remove 1 screw from each side of switch panel
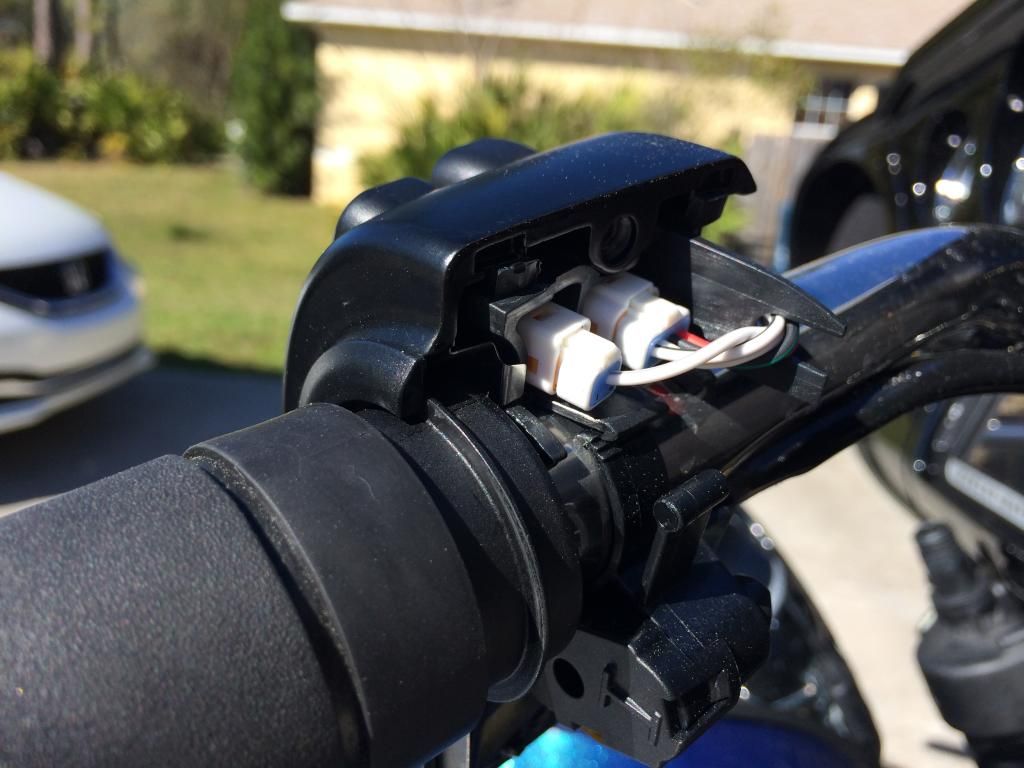
Step 4, Unplug switch banks.

Back side of switch bank
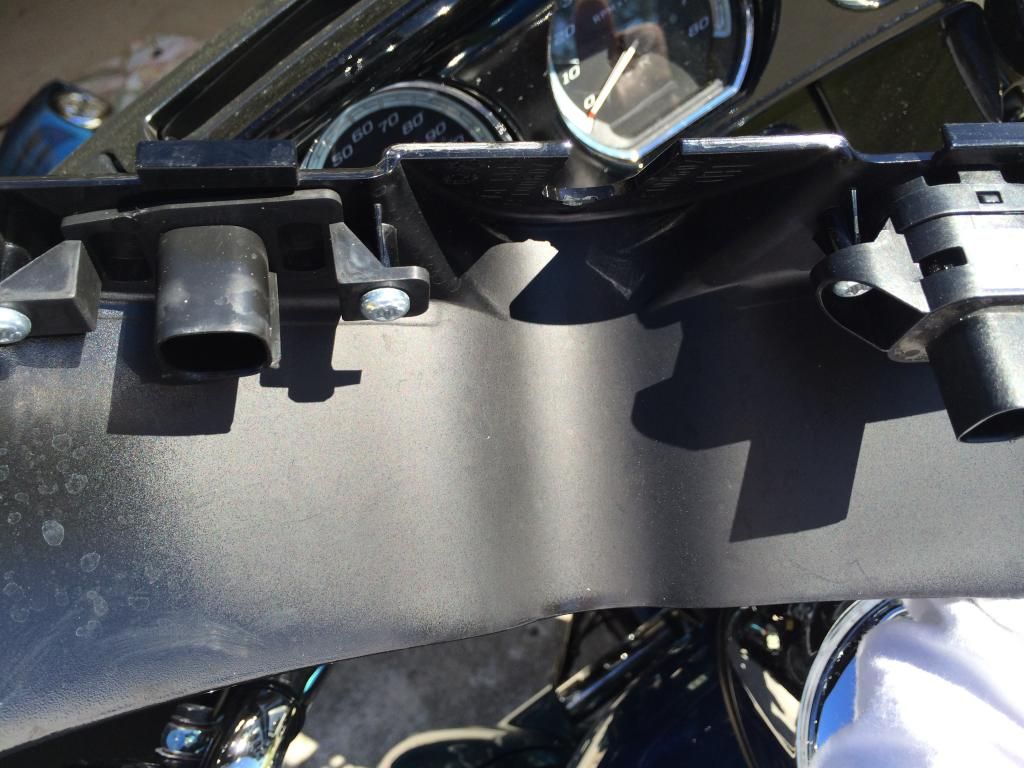
Step 5, Remove Spots/front turn signals retaining Acorn nuts (see image 4) Remove Spots/signals (there are connectors there)
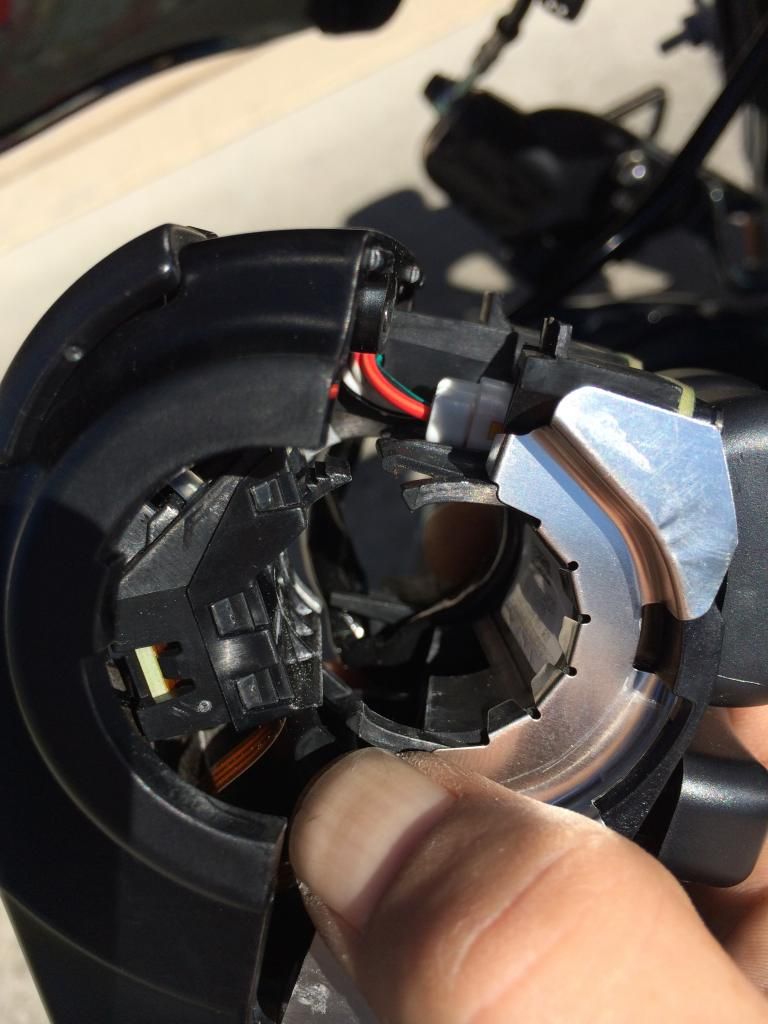
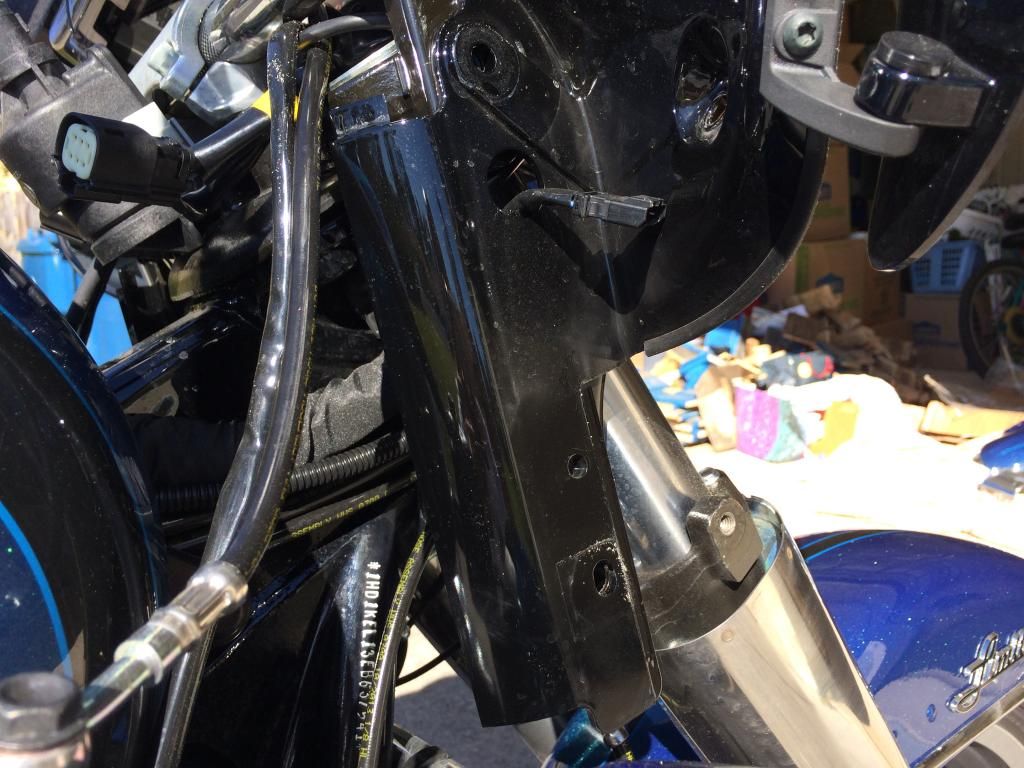
Next Remove switch gear housings and levers. (Note: there is a little retaining tab you will need to use a small flat blade or pick tool to release. I've included photos)
---------------------------------
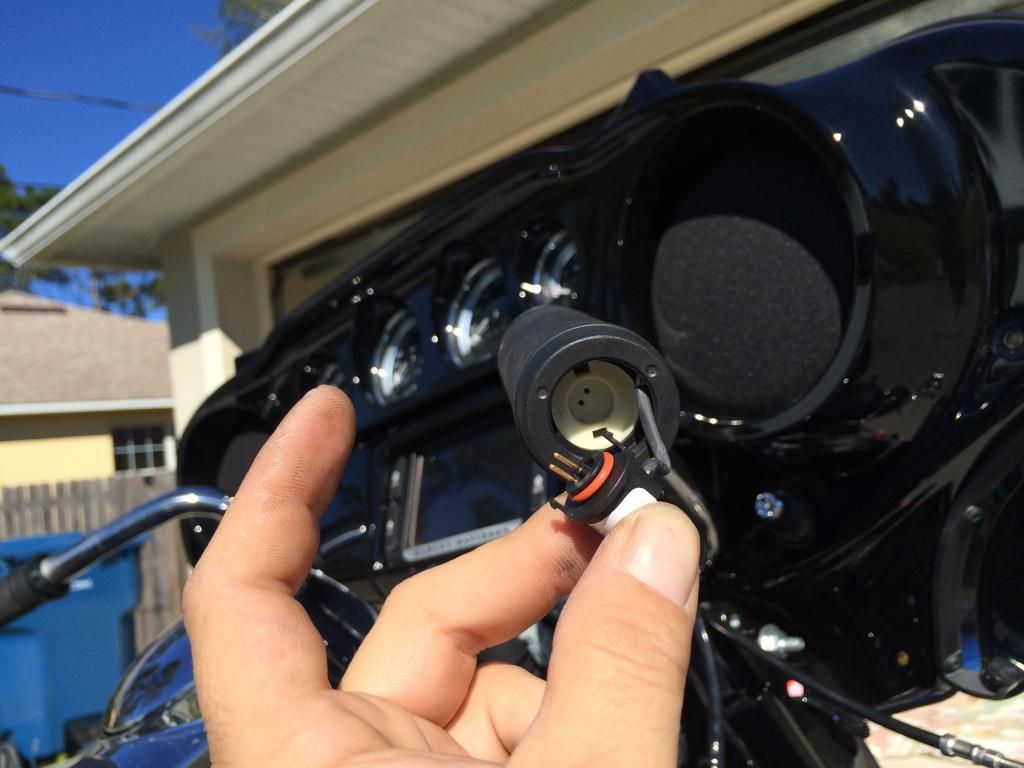
On the right (throttle side) grip, pop the small disc cap to gain access to the heated grip power connector and gently pull outward to unplug the power connector.
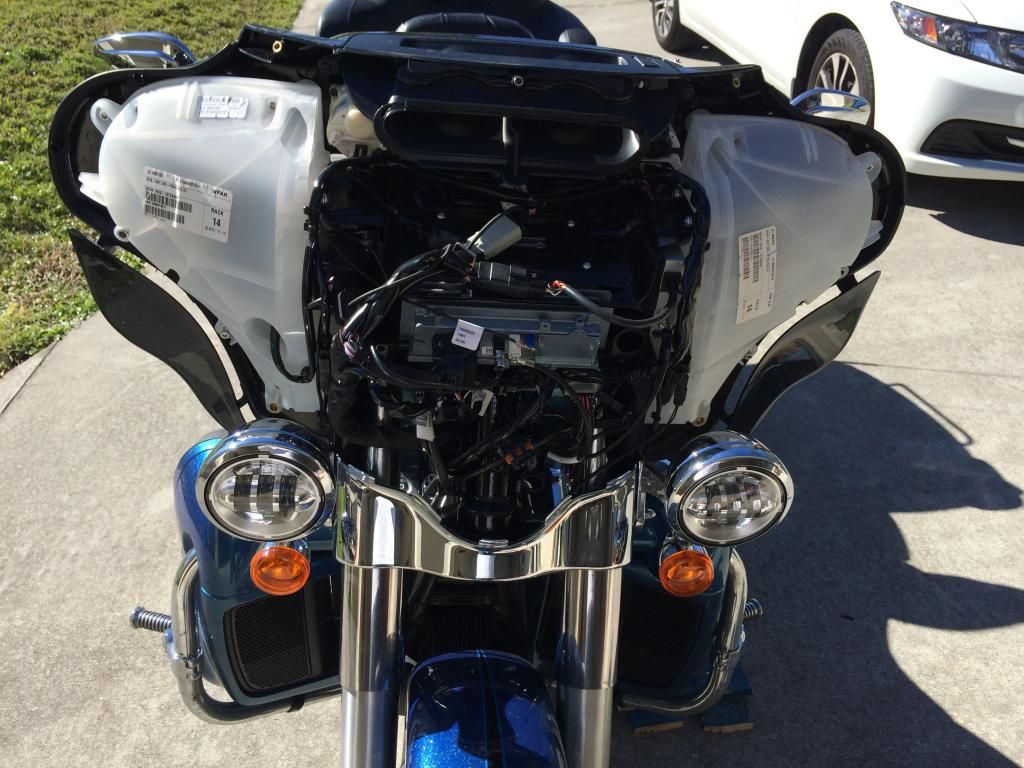
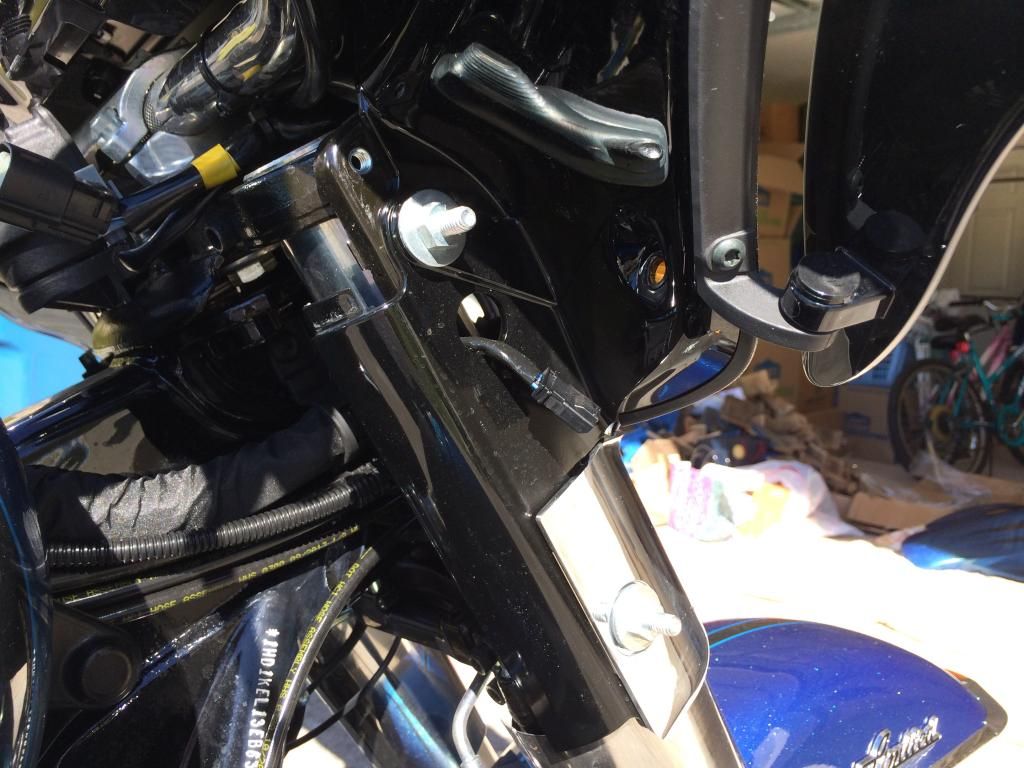
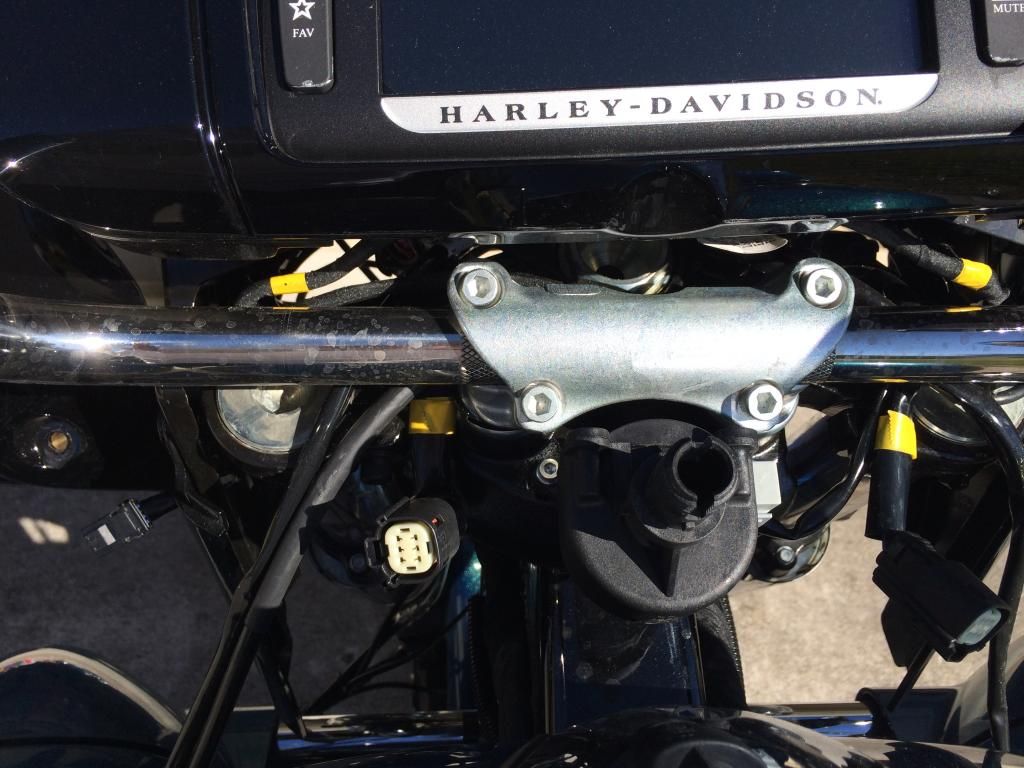
Next remove the 2 Studs that retained your spots/front turn signals and then angle the inner fairing/frame/electronics assembly forward.
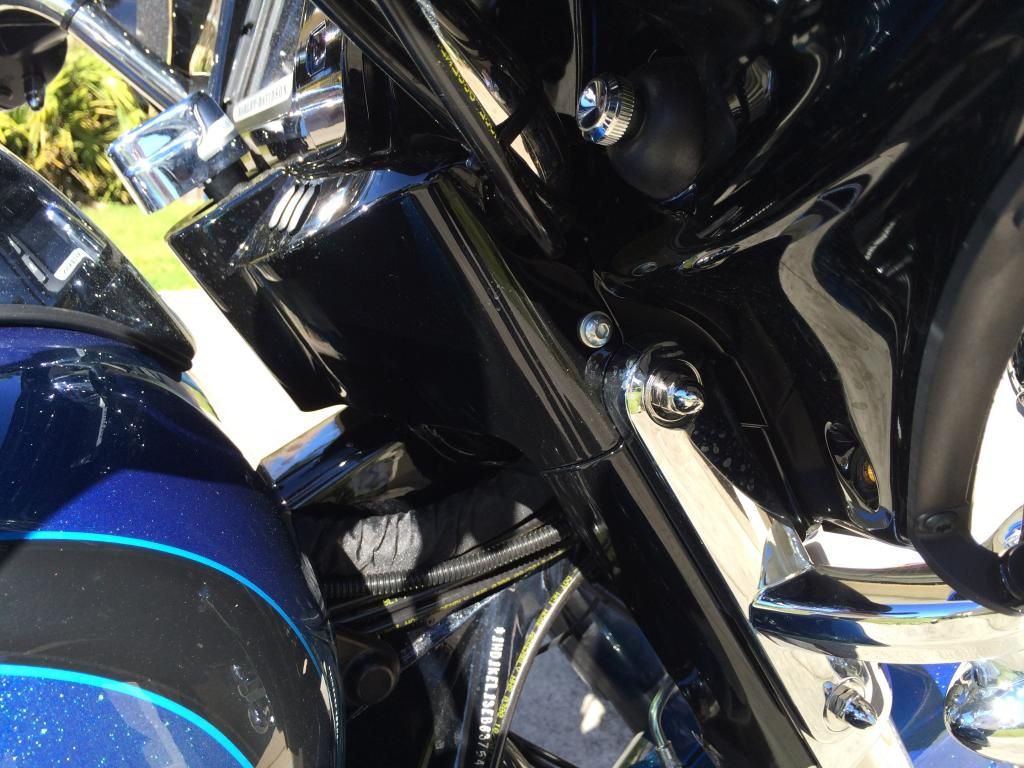
You now have access to the clamp. Before you remove it, disconnect the heated grip power connector (left side) and the twist grip connector (right side) you do not need to disconnect the right side heated connector that loops back to the bars, unless it's routed through something.
Once the Bars are off, slide off the throttle grip separating it from the twist grip sensor. Slide out the twist grip sensor while feeding the harness into the center of the bar only far enough to gain access to the mid line connectors (2)
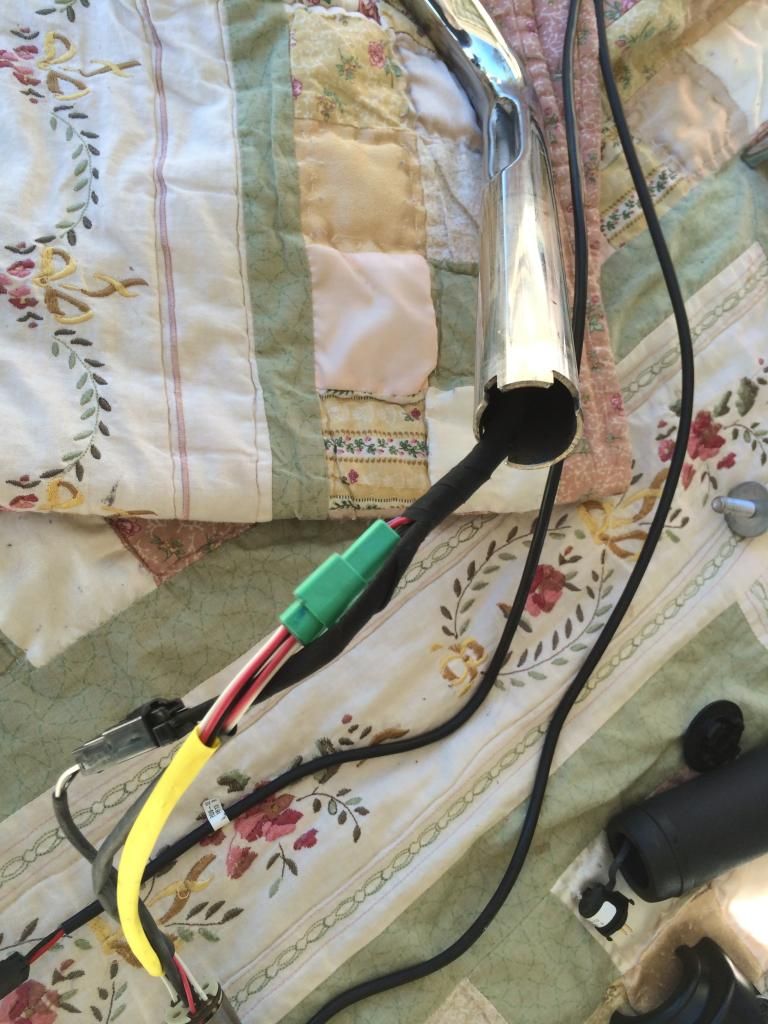
The left side grip and harness can be pulled out all together.
Finally re-assemble everything in reverse order. I didn't take any pictures going back together, cause I really didn't think I needed to.
PRO TIP!!! Before you tighten down the bar clamp, slide the fairing back over it's stud holes, put the studs back in a few threads. Set the bars with 1/4' - 1/2" clearance to the inner fairing at it's closest point. Any more and you will run into tank contact issues at full steering lock.
Oh, Also, I had to slightly loosen the banjo bolt holding the front brake hose to the master cylinder to rotate the banjo a little on re-assembly, only loosen it enough to spin the banjo with some force, any more and you risk leaking fluid or introducing air which will require a trip to the dealer to have the ABS Bled with the Digi-Tech.
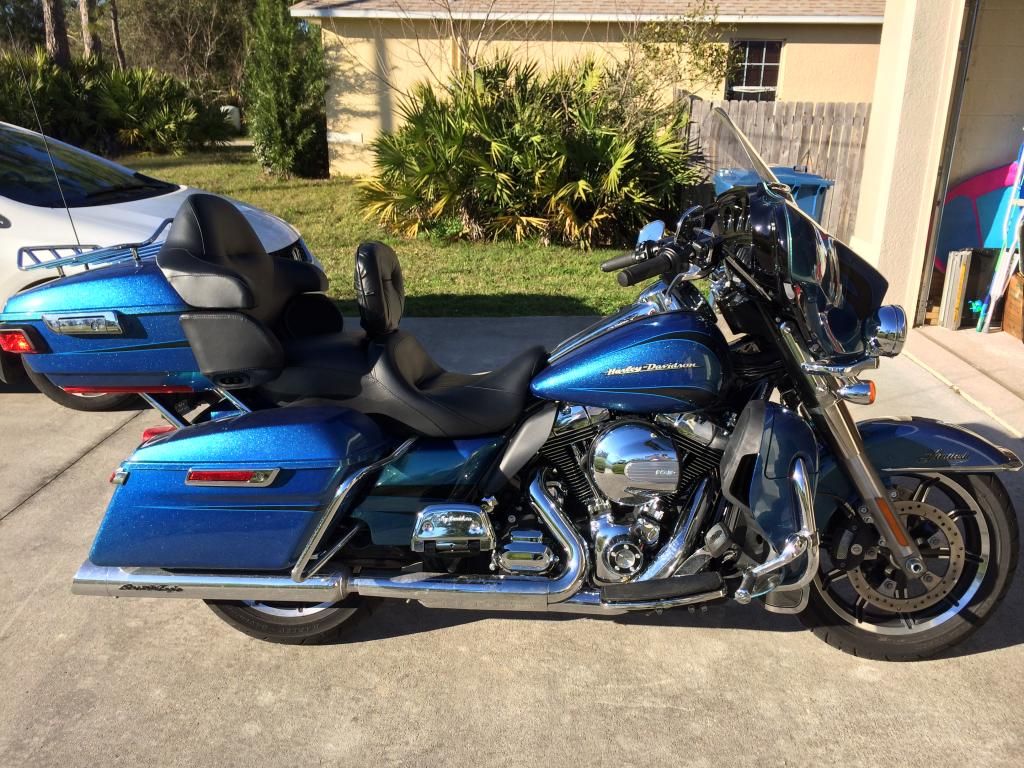
After Photo:
This will be my 4th Ultra to get them. I'm 5'8" and I've always had to ride slightly leaned forward with both hands on the bars, and have to lean a lot more when doing full lock turns.
Bars used are Part # 56176-08
I did not get ANY extra stuff regardless of what the parts guys will tell you.
For Poops and Grins, I got an estimate for the job from a dealership for $1500 parts and labor.
Doing this myself cost me $150 for the bars after discount, and 2 hours of my time. I started at 2:30 and finished at 4:30 using hand tools and no assistance.
I've always been able to do the job on previous ones without the "extra" stuff (I usually re-routed the clutch cable out of the inner fairing hole and routed down along the bars giving me a nice hole to mount a 12v socket on the previous years)
Anyways.....Here we GO!
First Picture: Stock Bars:
Step one, Remove front outer fairing cap. FYI, easier on the '14's then previous year.
Step two, remove ignition and lock nut and guide ring
Step 3, remove 1 screw from each side of switch panel
Step 4, Unplug switch banks.
Back side of switch bank
Step 5, Remove Spots/front turn signals retaining Acorn nuts (see image 4) Remove Spots/signals (there are connectors there)
Next Remove switch gear housings and levers. (Note: there is a little retaining tab you will need to use a small flat blade or pick tool to release. I've included photos)
---------------------------------
On the right (throttle side) grip, pop the small disc cap to gain access to the heated grip power connector and gently pull outward to unplug the power connector.
Next remove the 2 Studs that retained your spots/front turn signals and then angle the inner fairing/frame/electronics assembly forward.
You now have access to the clamp. Before you remove it, disconnect the heated grip power connector (left side) and the twist grip connector (right side) you do not need to disconnect the right side heated connector that loops back to the bars, unless it's routed through something.
Once the Bars are off, slide off the throttle grip separating it from the twist grip sensor. Slide out the twist grip sensor while feeding the harness into the center of the bar only far enough to gain access to the mid line connectors (2)
The left side grip and harness can be pulled out all together.
Finally re-assemble everything in reverse order. I didn't take any pictures going back together, cause I really didn't think I needed to.
PRO TIP!!! Before you tighten down the bar clamp, slide the fairing back over it's stud holes, put the studs back in a few threads. Set the bars with 1/4' - 1/2" clearance to the inner fairing at it's closest point. Any more and you will run into tank contact issues at full steering lock.
Oh, Also, I had to slightly loosen the banjo bolt holding the front brake hose to the master cylinder to rotate the banjo a little on re-assembly, only loosen it enough to spin the banjo with some force, any more and you risk leaking fluid or introducing air which will require a trip to the dealer to have the ABS Bled with the Digi-Tech.
After Photo:
#92
09-03-2014, 06:27 AM

I too am hoping to do this install. My CVO has all the wiring inside the bars. Does there appear to be enough length in the switch, throttle and heated grip wiring to run all of them internally?
FWIW, HD's web site said these bars WILL NOT fit CVO models. I'm trying to understand why.
FWIW, HD's web site said these bars WILL NOT fit CVO models. I'm trying to understand why.
The reason they say they won't fit is because they don't go into the channels in the inner fairing on '14 models. However, that does not matter at all, and they fit just fine. I have 4000 miles with them on my '14 CVO now.
#93
09-03-2014, 08:28 AM
Advanced
Join Date: Jul 2013
Location: Riverview
Posts: 88
Likes: 0
Received 0 Likes
on
0 Posts
#94
09-05-2014, 02:27 PM


#95
09-07-2014, 03:50 PM

 BTW, I got my bars for $120 from New Castle HD, nice.

#97
10-07-2014, 03:10 PM

Cruiser
Really nice write up... glad someone resurrected this thread. I'm 6'1" and feel like I'm reaching for the bars on my Ultra. I don't know if they need brought back further or would be better raised up a few inches (I see mainly my elbows in the mirrors). Is there any adjustment to the stock bars that may help me?
If not, can someone explain the "pullback" bars?
If not, can someone explain the "pullback" bars?
#98
10-07-2014, 03:54 PM
Blow thread is about "Apes" but has a lot of other bars listed.
https://www.hdforums.com/forum/new-r...-the-apes.html
http://www.wild1inc.com/ has some side by side comparisons.
#99
10-20-2014, 10:07 AM

Stage I
Join Date: Oct 2014
Location: the villages fl
Posts: 1
Likes: 0
Received 0 Likes
on
0 Posts
john I have 2014 ultra want to install reach bars got your pics and info but when I pull my switch plate off there is no way i can get to bar clamps without pulling radio in your pics your bar clamps are exposed nicely did you do anything different any other info would help thanks
#100
10-20-2014, 01:47 PM

Advanced
I received a HOG journal at home and they described the differences between the 2015 Ultra Limited "normal" and Ultra Limited "LOW". One of the differences was that the Ultra Limited LOW comes with the 2 inch pull back handlebars . Since the handlebars 56176-08 don't seem to fit in the fairing indents, maybe the handlebars on the new Ultra Limited LOW are different and do fit. I have been keeping an eye on this tread as I want to replace my handlebars but I was hoping HD would come out with reduced reach handlebars that would actually fit perfectly. All I got from the parts guy at the dealership was that he could not confirm the part number for the handlebars on the FLHTK LOW... and the beat goes on.