
HD Headlight Visor Trim Gap Fix w/pics
#1
 05-04-2017, 07:08 PM


I've been putting off installing the extended HD headlight visor trim ring because of the 1/8"-1/4" gap at the bottom of the ring. Did some searching on google the other day and found some info where someone cut a pice out of the factory trim ring to remove the gap in the new visor style ring.
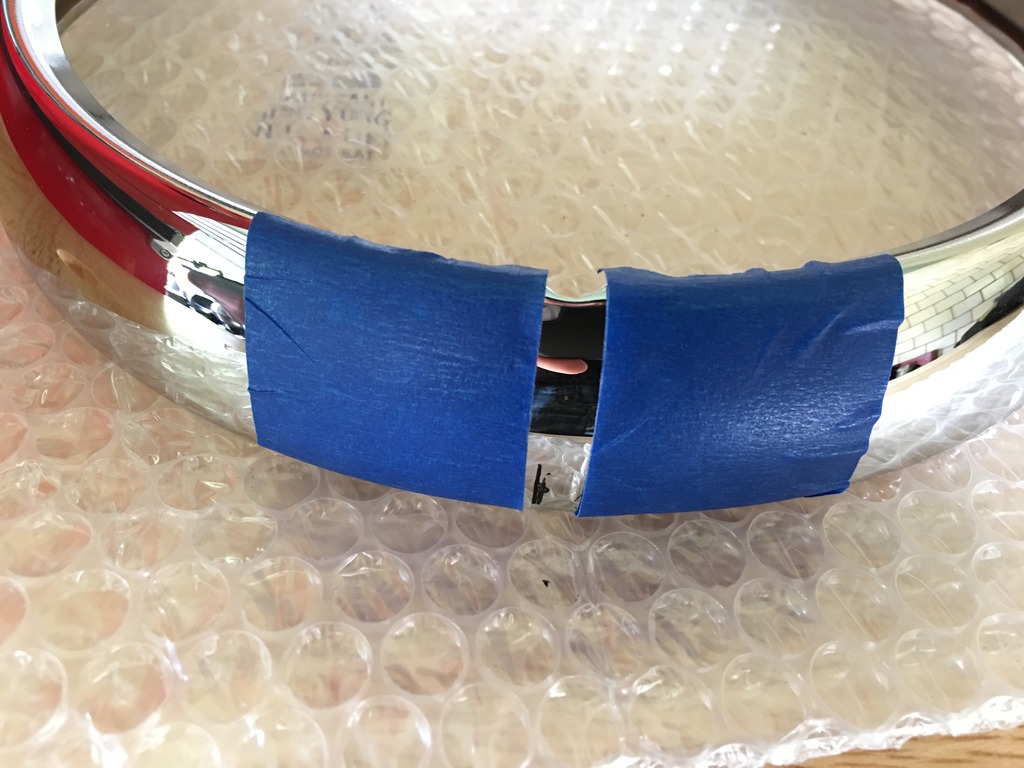
I took my stock ring off and flipped the lower mounting hole 180 degrees then put new visor ring over it. Then I tightened new ring down and marked the gap on old trim ring with a fine sharpy marker. The gap was about a 1/4". I then put painters tape on outside of sharpy marks to make more visible. I then took a dremel with a cut off wheel and removed the 1/4" out of the factory ring. This will now allow the new visor ring to completely close and leave no gap at the bottom. I also removed the rubber ring clips inside the factory ring before cutting.
Here are some pics. Hope this will help with others that don't like the gap at the bottom of this new trim ring.
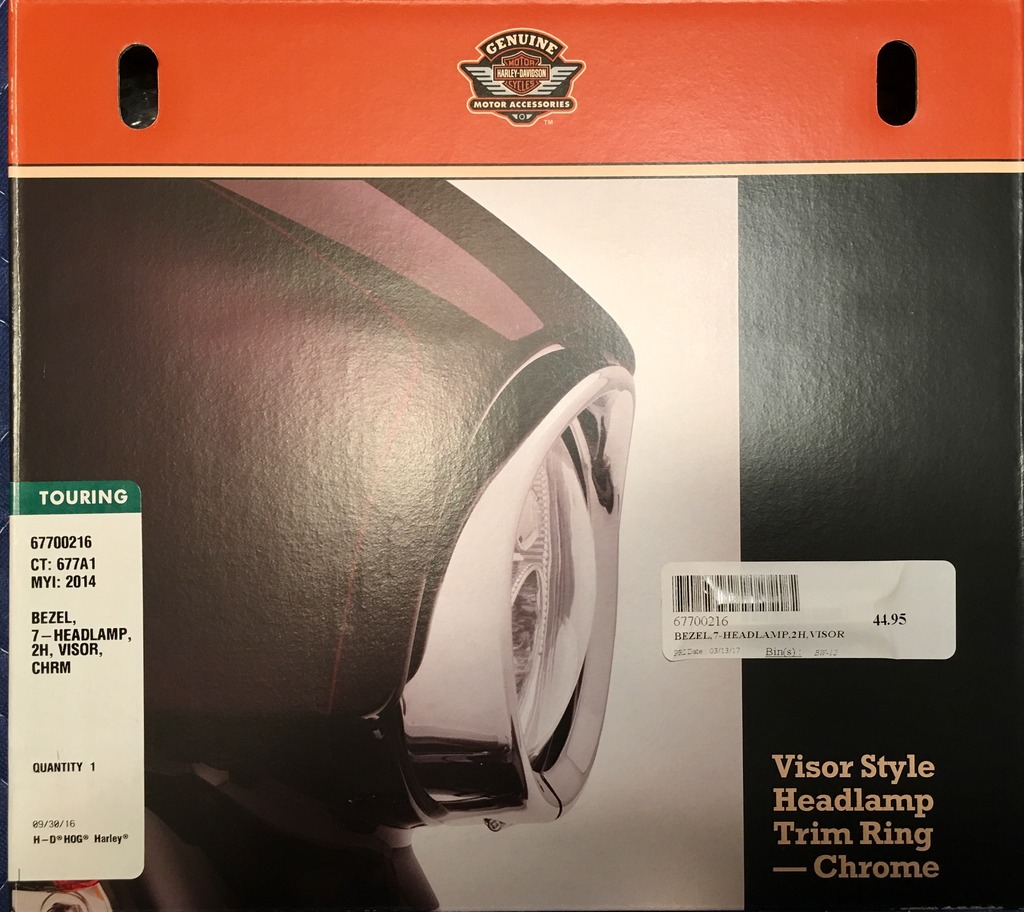
Chrome Visor Trim Ring
Taped area of stock ring that needs removed
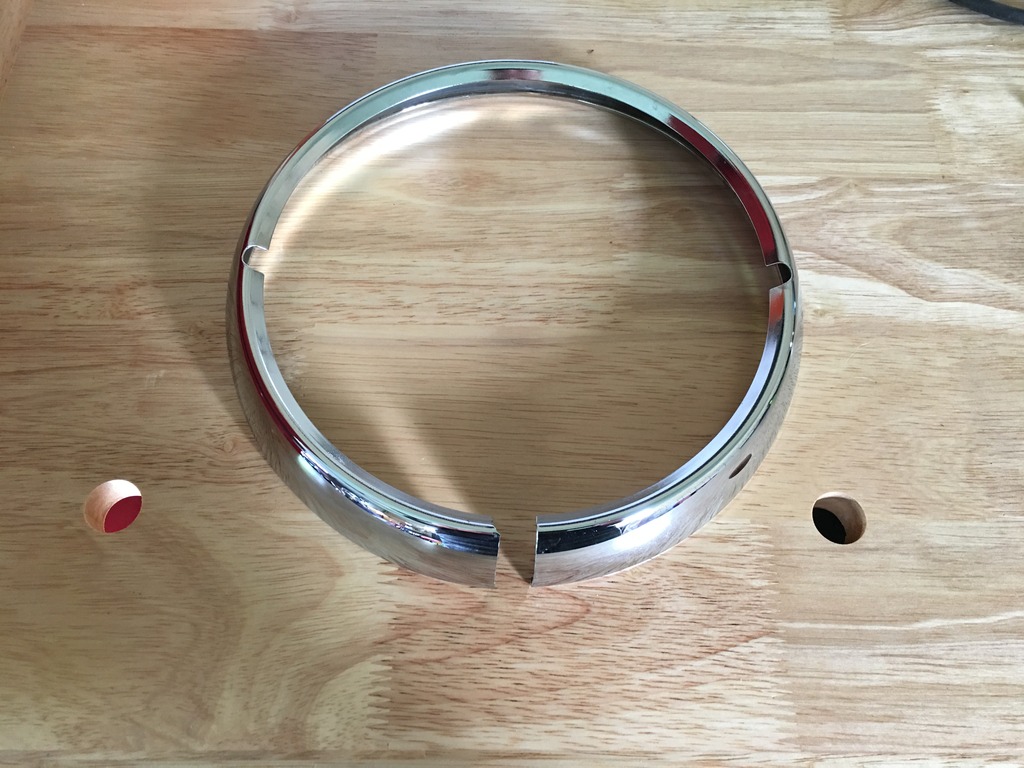
Stock trim ring after removing 1/4" of it. It sprung out to about a 1/2"
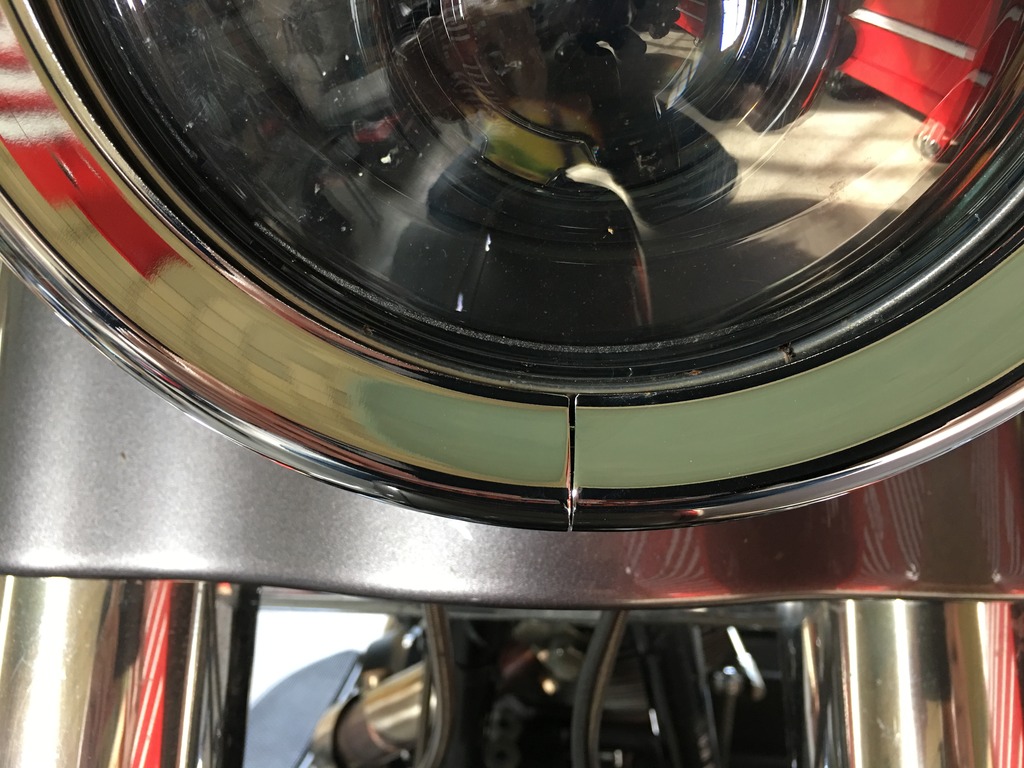
New visor trim ring with now gap
I took my stock ring off and flipped the lower mounting hole 180 degrees then put new visor ring over it. Then I tightened new ring down and marked the gap on old trim ring with a fine sharpy marker. The gap was about a 1/4". I then put painters tape on outside of sharpy marks to make more visible. I then took a dremel with a cut off wheel and removed the 1/4" out of the factory ring. This will now allow the new visor ring to completely close and leave no gap at the bottom. I also removed the rubber ring clips inside the factory ring before cutting.
Here are some pics. Hope this will help with others that don't like the gap at the bottom of this new trim ring.
Chrome Visor Trim Ring

Taped area of stock ring that needs removed

Stock trim ring after removing 1/4" of it. It sprung out to about a 1/2"

New visor trim ring with now gap

#2
05-05-2017, 03:21 AM
Stellar HDF Member
I had simlar sucess closing the gap on, what Harley calls the "Visor Style Headlight Trim Ring" on my 2015 Ultra Lmited. I did this by doing something a little different. What I did was to loosen the original Trim Ring before installing the new "Visor Style Headlight Trim Ring." While doing this seems completely backwards; what loosening the original Trim Ring does, is that it opens space behind the original Trim Ring that (and this is important) disappears when the original Trim Ring is fastened tightly (the way it should be if it was the only Trim Ring). The new "Visor Style Headlight Trim Ring" is designed to latch into the space that loosening the original Trim Ring opens up. When the original Trim Ring is fastened tightly the inside edge of the "Visor Style Headlight Trim Ring" can't squeeze behind it. The result is that without loosening the original Trim Ring the new "Visor Style Headlight Trim Ring" is trying to close a slightly larger circle than it was designed to close. This results in "The Gap!" The "trick" is to loosen the original Trim Ring just enough to allow the "Visor Style Headlight Trim Ring" to close completely, without being so loose that when you tighten the new "Visor Style Headlight Trim Ring" it doesn't secure both trim rings tightly to the Headlight Assembly.
#3
05-05-2017, 07:04 AM

Road Master
I had simlar sucess closing the gap on, what Harley calls the "Visor Style Headlight Trim Ring" on my 2015 Ultra Lmited. I did this by doing something a little different. What I did was to loosen the original Trim Ring before installing the new "Visor Style Headlight Trim Ring." While doing this seems completely backwards; what loosening the original Trim Ring does, is that it opens space behind the original Trim Ring that (and this is important) disappears when the original Trim Ring is fastened tightly (the way it should be if it was the only Trim Ring). The new "Visor Style Headlight Trim Ring" is designed to latch into the space that loosening the original Trim Ring opens up. When the original Trim Ring is fastened tightly the inside edge of the "Visor Style Headlight Trim Ring" can't squeeze behind it. The result is that without loosening the original Trim Ring the new "Visor Style Headlight Trim Ring" is trying to close a slightly larger circle than it was designed to close. This results in "The Gap!" The "trick" is to loosen the original Trim Ring just enough to allow the "Visor Style Headlight Trim Ring" to close completely, without being so loose that when you tighten the new "Visor Style Headlight Trim Ring" it doesn't secure both trim rings tightly to the Headlight Assembly.
#5
05-05-2017, 08:41 AM
Stellar HDF Member
I had simlar sucess closing the gap on, what Harley calls the "Visor Style Headlight Trim Ring" on my 2015 Ultra Lmited. I did this by doing something a little different. What I did was to loosen the original Trim Ring before installing the new "Visor Style Headlight Trim Ring." While doing this seems completely backwards; what loosening the original Trim Ring does, is that it opens space behind the original Trim Ring that (and this is important) disappears when the original Trim Ring is fastened tightly (the way it should be if it was the only Trim Ring). The new "Visor Style Headlight Trim Ring" is designed to latch into the space that loosening the original Trim Ring opens up. When the original Trim Ring is fastened tightly the inside edge of the "Visor Style Headlight Trim Ring" can't squeeze behind it. The result is that without loosening the original Trim Ring the new "Visor Style Headlight Trim Ring" is trying to close a slightly larger circle than it was designed to close. This results in "The Gap!" The "trick" is to loosen the original Trim Ring just enough to allow the "Visor Style Headlight Trim Ring" to close completely, without being so loose that when you tighten the new "Visor Style Headlight Trim Ring" it doesn't secure both trim rings tightly to the Headlight Assembly.
this procedure is in the instructions that comes with the trim ring
#6
05-05-2017, 06:16 PM
I had simlar sucess closing the gap on, what Harley calls the "Visor Style Headlight Trim Ring" on my 2015 Ultra Lmited. I did this by doing something a little different. What I did was to loosen the original Trim Ring before installing the new "Visor Style Headlight Trim Ring." While doing this seems completely backwards; what loosening the original Trim Ring does, is that it opens space behind the original Trim Ring that (and this is important) disappears when the original Trim Ring is fastened tightly (the way it should be if it was the only Trim Ring). The new "Visor Style Headlight Trim Ring" is designed to latch into the space that loosening the original Trim Ring opens up. When the original Trim Ring is fastened tightly the inside edge of the "Visor Style Headlight Trim Ring" can't squeeze behind it. The result is that without loosening the original Trim Ring the new "Visor Style Headlight Trim Ring" is trying to close a slightly larger circle than it was designed to close. This results in "The Gap!" The "trick" is to loosen the original Trim Ring just enough to allow the "Visor Style Headlight Trim Ring" to close completely, without being so loose that when you tighten the new "Visor Style Headlight Trim Ring" it doesn't secure both trim rings tightly to the Headlight Assembly.
#7
05-06-2017, 03:36 AM
Stellar HDF Member
Yup . . . but then again . . . who reads the instructions? LOL Doing so turned out to be a good idea . . . . eventually . . . . for me anyway.
Advice to myself!
See the attached instruction sheet. Harley # -J05739
Advice to myself!
See the attached instruction sheet. Harley # -J05739
Trending Topics
#8
05-06-2017, 07:58 AM
I had simlar sucess closing the gap on, what Harley calls the "Visor Style Headlight Trim Ring" on my 2015 Ultra Lmited. I did this by doing something a little different. What I did was to loosen the original Trim Ring before installing the new "Visor Style Headlight Trim Ring." While doing this seems completely backwards; what loosening the original Trim Ring does, is that it opens space behind the original Trim Ring that (and this is important) disappears when the original Trim Ring is fastened tightly (the way it should be if it was the only Trim Ring). The new "Visor Style Headlight Trim Ring" is designed to latch into the space that loosening the original Trim Ring opens up. When the original Trim Ring is fastened tightly the inside edge of the "Visor Style Headlight Trim Ring" can't squeeze behind it. The result is that without loosening the original Trim Ring the new "Visor Style Headlight Trim Ring" is trying to close a slightly larger circle than it was designed to close. This results in "The Gap!" The "trick" is to loosen the original Trim Ring just enough to allow the "Visor Style Headlight Trim Ring" to close completely, without being so loose that when you tighten the new "Visor Style Headlight Trim Ring" it doesn't secure both trim rings tightly to the Headlight Assembly.
The following users liked this post:
X90 (01-05-2022)


Thread
Thread Starter
Forum
Replies
Last Post