Harley Davidson Softail: How to Change Transmission Fluid
Aside from properly shifting gears, keeping fresh transmission fluid installed in your Softail is the best way to keep your transmission problem-free. The process is fairly simple and may save you hundreds when you do it yourself!
This article applies to the Harley Davidson Softail.
The transmission relies on fresh transmission fluid to keep temperatures cool, reduce friction, and minimize wear. Metal shavings collect in the fluid over time as mileage increases. These shavings mix with the fluid and reduce the fluid's ability to lessen friction between surfaces. Overheated transmission fluid from racing or engine overheating damages the fluid, making replacement mandatory. Changing the transmission fluid can be easily accomplished in the garage at home with basic tools.

Materials Needed
- 3/8" ratchet
- 6" ratchet extension
- 5/8" socket
- 7/32" Allen head key or socket
- 3/8" Allen head key or socket
- Small flathead screwdriver or pick
- Torque wrench
- Motorcycle jack (optional)
- Funnel
- Drain plug o-ring
- Transmission fluid
- Rubber gloves
- Safety glasses
The drain plug has an o-ring that should be replaced. You can purchase this o-ring from Harley or buy one from your local parts store. You'll need an o-ring with a 2mm width, 10mm inner diameter, and 14mm outer diameter.
Although Harley Davidson suggests using genuine Harley Davidson Formula+ Transmission and Primary Chaincase Lubricant (part number 99851-05), many owners use gear oil such as 75w-90 with success. Some even use automatic transmission fluid. What fluid works best for you depends on factors like transmission wear, type of riding, and climate. Owners in colder climates will benefit more from thinner weight oil. Synthetic fluids are recommended over conventional types. Remember to replace the fluid every 5,000 miles. Refer to your owner's manual for your year model's maintenance intervals. A copy can be downloaded at the link below in the Related Discussions section.
Step 1 – Lift it up (optional)
Slide the jack underneath the middle of the frame. Remember that there's always a chance of failure when using a hydraulic jack. Use a mechanical jack or add a jack stand for safety. Strap your Softail to the jack to keep it from falling. Depending on your style of jack and body size, it may be easier for you to leave your Softail on the kickstand.
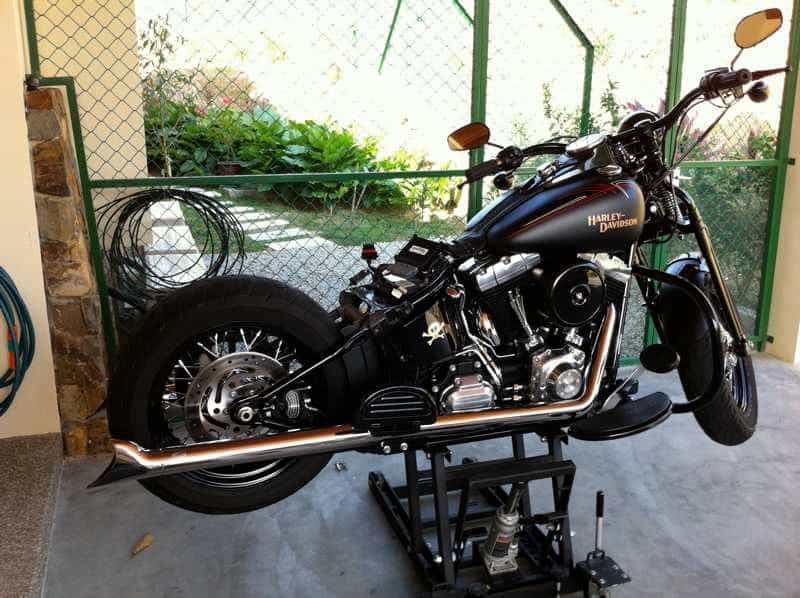
Figure 1. Jacking up and strapping a Softail. 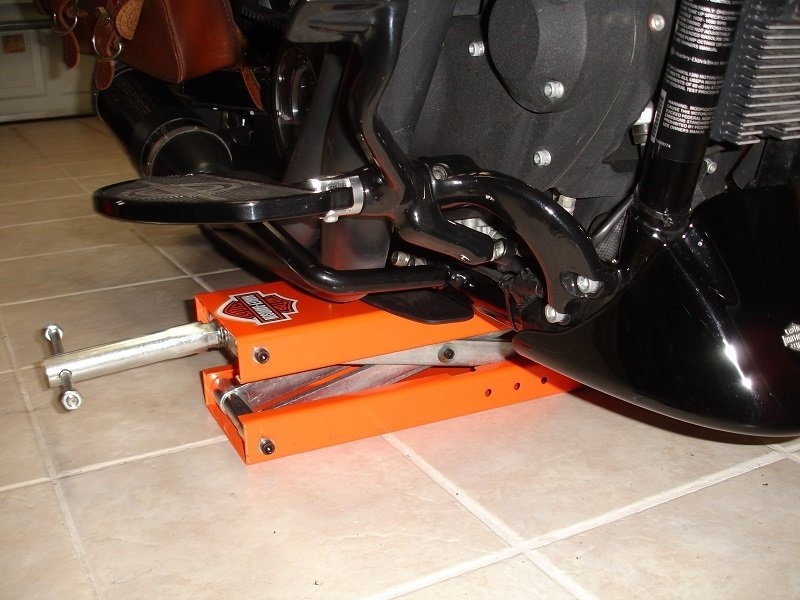
Figure 2. Using a mechanical jack.
Step 2 – Remove the fill plug
Locate the fill plug on the gearbox cover. It's next to the exhaust pipe(s) and below the oil tank. Some model years will have the fill plug located on the forward side of the gearbox cover. Remove the plug with a 3/8" Allen key or socket. Have a drain pan or towels ready as some fluid may spill from the fill plug hole.

Figure 3. The transmission fill plug. 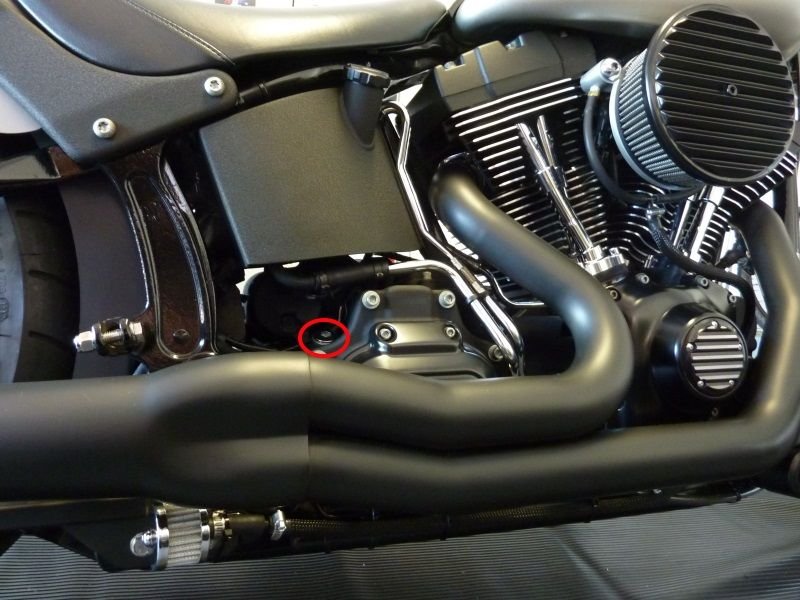
Figure 4. Another view of the fill plug.
Step 3 – Remove the drain plug
Locate the drain plug between the shocks on the bottom side of the transmission. It's difficult to see and access, but with a 3/8" ratchet, 6"-8" extension, universal joint, and a 5/8" socket, it can be removed. Place your drain pan underneath the bolt. Once the fluid is almost completely drained, level out the bike to remove any remaining fluid.

Step 4 – Re-install the drain plug
Clean any dirt off the drain plug and install a new o-ring. Note any metal shavings on the drain plug magnet. A small flat blade screwdriver or 90-degree pick makes o-ring removal easy. Clean any dirt off the drain plug opening and begin installing the drain plug. Use a 7/32" Allen key or socket to start threading the plug, then switch to the 5/8" socket. Final torque is 20 ft.-lbs.
Step 5 – Fill the transmission with new fluid
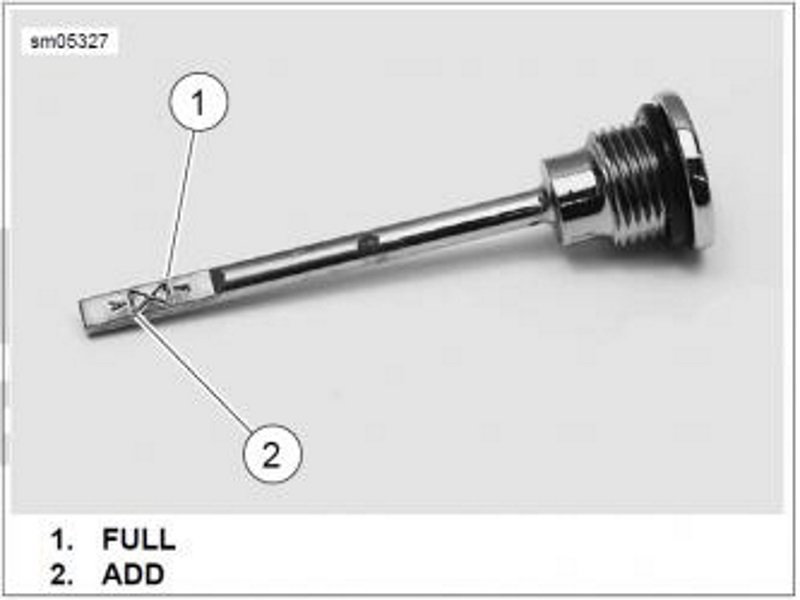
Inspect the fill plug o-ring for damage and replace if necessary. Place a funnel into the fill plug hole and pour 22 oz. (650 milliliters) or 32 oz. (946 milliliters) of fluid into the transmission (differs by year). Different year models use different methods to check the fluid level. Some years need to be checked with the bike level while others need to be checked on the kickstand. Like the bike's position, the position of the dipstick varies as well. For Softails with the dipstick in Figure 7, place the dipstick onto the fill plug opening. DO NOT start the threads. Check your owner's manual for specific instructions. Once the level is correct, torque the fill plug to 50 in.-lbs.
Related Discussions, Site, and Video
- Harley Davidson Owner's Manual - Harley-Davidson.com
- How to Change Harley Transmission Fluid - Youtube.com
- Softail Models Transmission Fluid - HDforums.com
- Transmission Oil Change 5k Miles - HDForums.com


