Harley Davidson Dyna Glide: How to Change Transmission Fluid
Changing the transmission fluid can go a long way towards the preservation of your motorcycle. The fluid lubricates and cushions the gears, keeping things shifting smoothly and quietly.
This article applies to Harley Davidson Dyna Glide models (1991-2016).
It only takes a few minutes and a couple dollars to change your transmission fluid. Just like your engine oil, the fluid acts to cushion and lubricate the metal inside of your transmission. This allows smooth and quiet(ish) shifts, and prevents the metal surfaces in contact with each other from grinding down, or overheating and breaking. Sounds important, doesn't it? Well it is. And also like your engine oil, with exposure to heating and cooling, it begins to break down and gather particulate matter. That's okay, though, as we will be changing your transmission fluid shortly. Follow along and you'll see just how easy it really is.

Materials Needed
- 5/8" socket and ratchet combo
- 3/8" Allen key
- Oil drip pan
- 1 QT of transmission flui
The type of fluid you use in your transmission is entirely up to you. Harley Davidson recommends using their brand of engine oil in your engine, primary, and transmission. Since engine oil is subjected to forces entirely different than what happens in either a transmission or primary, I choose to use specialized fluids in each system. For the transmission, I have always used Redline ShockProof Heavy Duty. Any heavy weight (75-90) gear oil will perform in your transmission, but companies like Royal Purple and Redline always make quality products, in my experience.
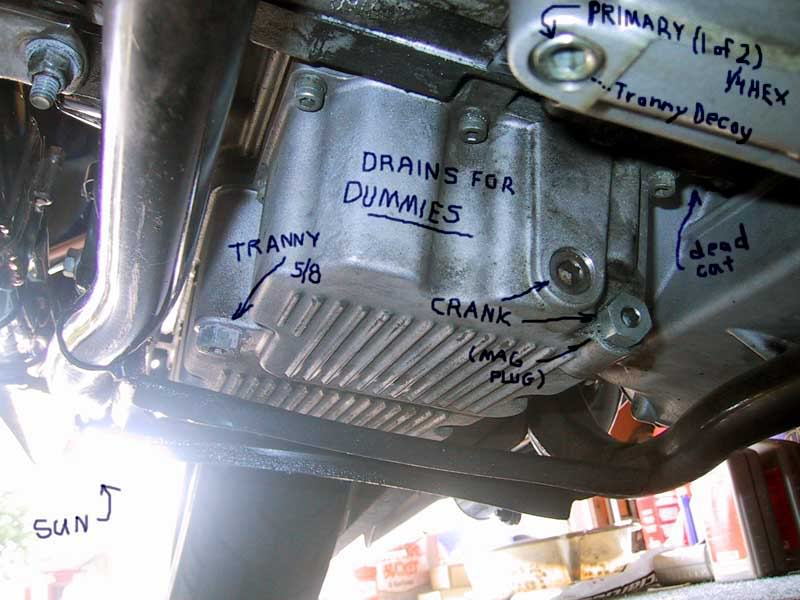
Step 1 – Drain your old transmission fluid
To do this, position the drip pan under your motorcycle and loosen the transmission drain plug until the old fluid begins to drain. Take care not to drop the drain plug in the drip pan, as you will want to inspect the magnetic element on the end. This magnetic element is designed to attract any metal particulate that may be found in your transmission fluid. There will always be some metal there, but finding too much material on this plug can indicate extreme wear inside your transmission. After all of the fluid has drained, reinstall the drain plug with a fresh O-ring.
Pro Tip
It is best to change the fluids when the bike is warm. Take your motorcycle on a 5-minute ride and run through the gears a few times, to warm and thin the fluid, making it drain faster and more completely. Be careful of the hot exhaust and engine parts.
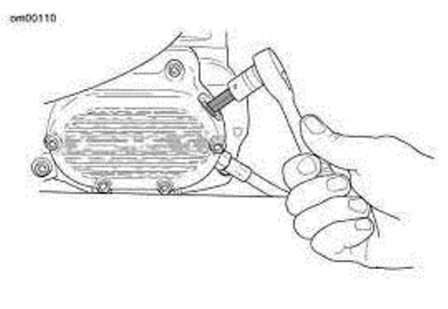
Step 2 – Fill the transmission with new fluid
On your transmission, there is a cap with a large Allen key hole in the center of it. This is your transmission fill hole, as well as your dipstick. Use your Allen key to loosen the cap, and remove it. Very slowly, fill the transmission with fluid. Stop every 3-4 ounces, and wait for the transmission fluid to flow down into the transmission. If you like, this is a good time to depress your clutch and run through your gears a couple of times. Moving the gears helps the thick transmission fluid to fill more evenly. Check often on your dipstick to verify the amount of fluid in your transmission is correct. Most take 23 to 24oz, check your manual. The dipstick should be checked while the bike is upright, either on a stand or just being held by an assistant.
Pro Tip
Do not overfill your transmission. If you do, use a clean turkey baster to remove fluid until it reads the proper amount.
Featured Video: How to Change Transmission Fluid
Related Discussions
- Transmission Fluid Change - HDForums.com
- Transmission Oil Change - HDForums.com


